Table of Contents
Advertisement
Advertisement
Table of Contents

Subscribe to Our Youtube Channel
Related Manuals for Arctiko Integraline ULUF P390


Summary of Contents for Arctiko Integraline ULUF P390
- Page 1 ORIGINAL OPERATING INSTRUCTIONS Integraline RANGE ULUF P390/P500/P610/P820...
-
Page 2: Table Of Contents
Contents Contents Page Page Introduction Warnings How to turn on the device Further information about the appliance Menu user Symbols How to change the setpoint Abbreviations How to change alarm limits Access list Safety Ecomode settings Intended use Event list Personal safety Graphs Menu settings... -
Page 3: Introduction
Introduction Safety Arctiko is obligated as a supplier to ensure the users safety when operating Please take a few minutes to read and become familiar with the advantages of your appliance. To meet the high quality demands required by the medical one of our appliances. -
Page 4: Handling & Transportation
Directive, WASTE ELECTRICAL AND ELECTRONIC EQUIPMENT (WEEE). occurred during shipping. If damage is observed, report to the shipping company and your local Arctiko distributor. 2. Remove all packaging materials, plastic and straps. All packing materials are entirely recyclable. For more information on where to dispose of waste, contact your local authority or recycling station. -
Page 5: Installation
Installation Location Place the appliance in a location that satisfies the following conditions in or- der to achieve optimal operating results: Preparing the appliance - Firm and levelled floor: Placing the appliance on a firm and flat floor reduces the risk of excessive noise and vibration. - Unpack the appliance: Remove all packaging material, plastic bags and straps. -
Page 6: Electrical Connection
Electrical connection Replacing the power cord may only be done by authorized personal. In order to ensure a reliable installation that complies with the limits of temperature and voltage drop, it is necessary to determine maximum load of Never use gas lines as the ground protection for the unit. This can appliances connected to the installation. -
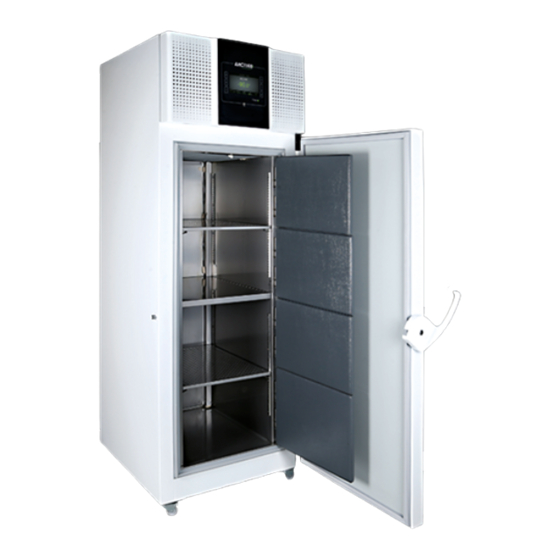
Page 7: Product Description
Product description Cabinet description The Intergraline range offers the best ultra-low temperature freezing with high performance and stability. Standard features are noise reduction tech- nology, dual cooling system, VIP panels, air flow control, filter-less construc- tion for less maintenance, low noise level, low energy consumption, low heat dissipation and excellent temperature stability. -
Page 8: Cabinet Description
Filterless construction Arctiko’s dual compressor system is designed as a filter-less system, which prevents malfunctions caused by dust building up in the filter. This minimizes the maintenance of the cooling system and secures a more stable operation. -
Page 9: Vacuum Valve
Display Remote alarm contact Easy and user-friendly control panel, with a 6-key resistive keyboard. You can access a variation of settings, in order to adjust your unit for your exact needs. A 4GB microSD is provided as standard, installed internally for The remote alarm contact is located on the backside of the appliance. -
Page 10: Action Icons
Action Icons Temperature alarms Info events Door Warning... -
Page 11: Failure Events
To reset the alarm and reenable the compressor; accept the alarm and turn the unit off and on again. During pulldown this alarm may be activated. If this happens please reset the alarm. If the alarm keeps reoccuring please contact your distributor or Arctiko service for help. COMPRESSOR FAILURE ALARM OCCURED To accept a failure, press the center of the screen. -
Page 12: Outcome Frames
Outcome frames Warnings The outcome frames will be accompanied by a long beep. To accept a warning, press “ ”. DOOR OPEN... -
Page 13: How To Turn On The Device
How to turn on the device How to turn off the device Menu user Press on the screen and hold, to turn on the Press “Menu key” to access “Menu user”. device. Press and hold “Standby” to turn off the device (put in standby mode). -
Page 14: How To Change The Setpoint
How to change the setpoint How to change the alarm limits Press the “Menu key” to access the menu. -
Page 15: Access List
Access list Ecomode setting KEY FUNCTION... -
Page 16: Event List
Event list Graphs Shows number of pages with events. Press change page. REPRESENTATION CRITERIA SCROLLING THE FRAPH AND ENABLING THE TRACES If the event list is empty, the icon above will be shown. -
Page 17: Menu Settings
Menu settings How to set date/hour Press select to move the highlight and +/- to change the value. To confirm press “Enter” - DATE/HOUR set the clock device - DISPLAY set the configuration of panel display The system clock does not automatically manage the Summer time. The connection towards the Cloud refers to the transparent UTC at the - PASSWORD set the three levels of passwords... -
Page 18: Password Settings
Admin: For setting more advanced parameters and for managing users. The default password is “111”. Service: For accessing the service menu. The service settings are reserved for qualified Arctiko service personnel. By entering the admin password both the admin and user passwords can be changed. -
Page 19: Default Settings
Default settings Data download D D e e s s c c r r i i p p t t i i o o n n U U n n i i t t D D e e f f a a u u l l t t s s e e t t t t i i n n g g Setpoint °C -80,0... -
Page 20: Open And Process Data On A Computer
You can transfer the data to a computer in order to analyze, process or forward information. The program “THERMO CONVERTER” is needed to transfer the data. The program can be obtained by contacting your Arctiko distributor. 1. Insert the USB drive with the loaded data in a computer. -
Page 21: Rating Plate
Rating plate The rating plate is placed on the front right corner of the compressor department. Oddesundvej 39 - 90 5. The file will now open in Excel or your equivalent program . 1. Logo 5. Refrigerant and quantity 9. Weight in Kg 2. -
Page 22: Maintenance
Frequent and correctly executed maintenance is essential to ensure high Battery charge % Refrigerator Serial Number BATT % performance and functionality of the appliance. Arctiko recommends a thorough examination twice a year and cleaning at least once a month. Battery voltage Refrigerator Model... -
Page 23: Cleaning
Defrosting Arctiko strive for day-to-day delivery of spare parts. However, some special parts may take longer due to production time. Arctiko guarantees availability This appliance does not have automatic defrost, therefore you have to of spare parts for all appliances for at least 10 years after the delivery. -
Page 24: Troubleshooting
Troubleshooting Notes: Most malfunctions arise in wrong use of the appliance and can often be solved on the spot. In order to resolve some of the most common malfunctions please see the following troubleshooting scheme: Problem Cause Action Overload or load of warm products Discharge warm or excess may cause the temperature to rise. - Page 25 Arctiko A/S Oddesundcej 39 DK-6715 Esbjerg N Phone: + 45 7020 0328 info@arctiko.com arctiko.com 5080063-02-GB...
Need help?
Do you have a question about the Integraline ULUF P390 and is the answer not in the manual?
Questions and answers