Table of Contents
Advertisement
Quick Links
INSTALLATION INSTRUCTIONS
SERVICE KIT -
- N1.5, N2.0 & N3.0 bar variants only.
22 (Section 5)
Pressure switch
31 Strainer
25 (Section 3)
PCB
24 (Section 2)
Capacitor (note ratings)
29 (Section 4)
Strain relief bush
Fig. 1
Note: 1) Quantities are to cover a twin pump, singles use half.
2) See relevant section for detailed instructions.
MONSOON NEGATIVE PUMPS (Pre - 2008) Part No.
17
21 (Sections 1 & 5)
Bonded seal
26 (Sections 2, 3 & 4)
Adhesive foam pad
23 (Sections 2, 3 & 5)
Screws (K40 x 16 mm)
5 (Section 1)
8 (Section 1)
Seal Counterface
Thrower
20 (Section 7)
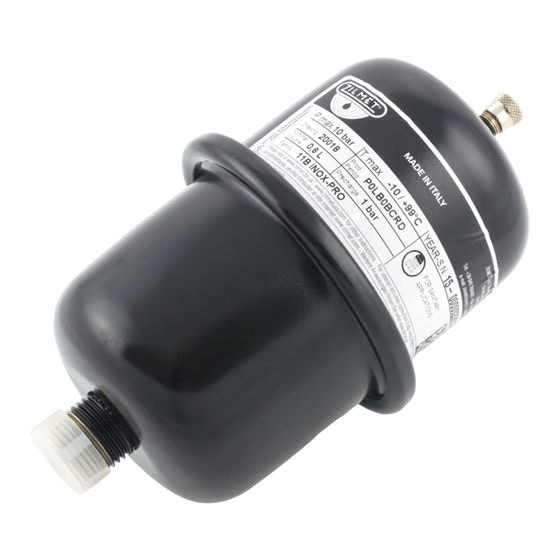
Pressure vessel (0.6 litre)
19 (Sections 1 & 5)
Rubber washer (G ½ ")
17
18 (Sections 1 & 6)
'O'-ring (ID 15.0 mm)
15 (Section 8)
Magnetic float
27 (Section 1 & 4)
Reed switch tie wrap
7 (Section 1)
Woodruff key
12 (Section 2)
'O'-ring
6 (Section 1)
(ID 21 mm)
'O'-ring
(ID 66.4 mm)
3 (Section 1)
Stainless washer
(OD ¾ ")
2 (Section 1)
Circlip
4 (Section 1)
Rotary seal
28474
17 (Section 1)
'O'-ring (ID 14.0 mm)
16 (Section 8)
Clip
14 (Section 1)
Screws (M4 x 16 mm)
13 (Section 1)
'O'-ring (ID 19 mm)
28 (Section 4)
Reed switch
11 (Section 2)
Non-return
valve assembly
10 (Section 2)
Non-return
valve holder
9 (Sections 1 & 6)
'O'-ring
(ID 24.6 mm)
1 (Sections 1 & 6)
Screws (M6 x 35 mm)
Cont ...
Advertisement
Table of Contents

Related Manuals for Stuart Turner 28474


Summary of Contents for Stuart Turner 28474
- Page 1 INSTALLATION INSTRUCTIONS SERVICE KIT - 28474 MONSOON NEGATIVE PUMPS (Pre - 2008) Part No. - N1.5, N2.0 & N3.0 bar variants only. 20 (Section 7) Pressure vessel (0.6 litre) 19 (Sections 1 & 5) Rubber washer (G ½ “) 22 (Section 5) 18 (Sections 1 &...
-
Page 2: Table Of Contents
Strainer Clip Check to see that you have all the above items and that they are not damaged. If any damage is found contact Stuart Turner Ltd within 24 hours of receipt. • PUMP PREPARATION To prepare the pump to accept the service kit parts, each pump part must be removed noting its exact position and sequence (Fig. -
Page 3: Rubber Washer
SECTION 1 - MECHANICAL SEAL REPLACEMENT The parts required to replace the seal (one end only) are: ITEM ITEM Screws, ‘O’-Ring (M6 x 35 mm) (ID 24.6 mm x 2.4 mm c/sec) Circlip Screws (M4 x 16 mm) Stainless Washer ‘O’-Ring (OD ¾... - Page 4 To identify which components are required, the following exploded view details the pump components along with the serviceable parts. Flow switch, transfer pipe & pressure vessel assembly Fig. 3 Note: Alternative pressure vessel (20) shown. Single variation pump head. Fig. 4 Control module not shown.
- Page 5 To disassemble the pump, the following items are required to be removed in the sequence detailed (Fig. 4). • Remove screws (A) and lift complete assembly away and position next to pump ensuring no stress is placed on the cables. •...
- Page 6 To assemble the seal correctly, the shaft must be clean and the following steps carried out. 1. Use End 1 of the applicator tool to push the seal counterface (item A) firmly into the housing, ensuring it is located flat against the back of the mounting plate housing. 2.
-
Page 7: Capacitor (1 Off Each Variant)
SECTION 2 - CAPACITOR REPLACEMENT Terminal box lid Fig. 11 The parts required to replace the capacitor are: ITEM ITEM Screws, Self Tapping Adhesive Foam Pad (K40 x 16 mm) Capacitor • CAPACITOR - USED ON MONSOON UNIVERSAL PUMPS Capacitor rating 7 µf - N1.5, N2.0, N3.0 bar Single... - Page 8 IMPORTANT: Take note of capacitor wiring connection and colours before removal. Disconnect and remove capacitor (item 24) and foam securing pad (item 26), make note of pad fitted position. Damaged components must be replaced. Contact Stuart Turner for advice on replacements not supplied with kit. •...
-
Page 9: Section 3 Printed Circuit Board Replacement
SECTION 3 - PRINTED CIRCUIT BOARD REPLACEMENT The parts required to replace the printed circuit board are: ITEM ITEM Screws, Self Tapping Adhesive Foam Pad (K40 x 16 mm) Printed Circuit Board Note: - When fitted this printed circuit board will detect the following fault conditions: •... - Page 10 To view the light the following procedure must be followed:- • Isolate the mains electrical power supply from the pump. • Remove the four screws (item 23) retaining the terminal box lid. • Lift the terminal box lid off. • IMPORTANT –...
- Page 11 Disconnect all wiring from terminal blocks on printed circuit board (PCB Item 25). • Remove two M4 nuts (item A) and carefully lift PCB (Item 25) away from terminal box. Damaged components must be replaced. Contact Stuart Turner for advice on replacements not supplied with kit. Cont ...
- Page 12 • REASSEMBLY Reassembly is the reverse of the disassembly instructions with the new replacement parts fitted as required. Note: For correct installation the capacitor must be secured and positioned as detailed in Figs. 19 & 20. Secure PCB nuts to a torque of 1.5 Nm (item A). Secure terminal box lid screws to a torque of 0.8 Nm (item 23).
-
Page 13: Reed Switch Tie Wrap
SECTION 4 - REED SWITCH REPLACEMENT The parts required to replace the reed switch are: ITEM ITEM Screws Reed Switch (K40 x 16 mm) Reed Switch Tie Wrap Strain Relief Bush • WIRING DIAGRAMS MAIN WINDING THERMOTRIP CAPACITOR START WINDING S3 S3 BLUE 230 VAC/1PH/50Hz... - Page 14 Bush Pliers Fig. 23 Damaged components must be replaced. Contact Stuart Turner for advice on replacements not supplied with kit. • REASSEMBLY • Fit the new strain relief bush around the reed switch cable and squeeze the strain relief bush with pliers to compress the cable.
- Page 15 • Locate the reed switch within the body groove as highlighted X-X (Fig. 25), and feed the tie wrap through the second catch. • The tie wrap can now be pulled tight to secure the reed and excess cut to length as shown (Fig.
-
Page 16: Section 5 Pressure Switch Replacement
SECTION 5 - PRESSURE SWITCH REPLACEMENT The parts required to replace the pressure switch are: ITEM ITEM 19 Rubber Washer (G ½ ") 22 Pressure Switch 21 Bonded Seal 23 Screws, Self Tapping (K40 x 16 mm) • PRESSURE SWITCHES Number Used on Monsoon Negative Pumps 19784... - Page 17 • DISASSEMBLY • Isolate electrical supply before fitting replacement part. • Replacing the pressure switch components should only be carried out by a competent person. • The supply cord and internal wiring within the terminal box are routed and secured to ensure compliance with the electrical standard EN 60335-1.
- Page 18 Unscrew the pressure switch and seal from the flow switch manifold body (Fig 31). Flow switch manifold body Fig. 31 Damaged components must be replaced. Contact Stuart Turner for advice on replacements not supplied with kit. • REASSEMBLY Reassembly is the reverse of the disassembly instructions with the new replacement parts fitted as required.
- Page 19 SECTION 6 - NON-RETURN VALVE (NRV) REPLACEMENT The parts required to replace the non-return valve are: ITEM ITEM ‘O’-Ring Non-Return Valve Assembly (ID 24.6 mm x 2.4 mm sec) (NRV) Non-Return Valve Holder Screws (M4 x 16 mm) • DISASSEMBLY To access the NRV, the flow switch body assemblies must first be removed (Fig.
- Page 20 Once the flow switch assemblies have been removed the NRV is now accessible as shown in Fig. 33. • Remove ‘O’-ring (item 9) from between pump body and flow switch assembly. • Firmly pull the NRV assembly (items 10/11) from the lower end of the flow switch body assembly (Fig.
-
Page 21: Section 7 Pressure Vessel Replacement
• Rotate the pressure vessel as shown to unscrew (Fig. 35). • Remove rubber washer from manifold body (Fig. 36). Damaged components must be replaced. Contact Stuart Turner for advice on replacements not supplied with kit. Fig. 35 Fig. 36 Cont ... - Page 22 • REASSEMBLY Reassembly is the reverse of the disassembly instructions with the new replacement parts fitted as required. Engage vessel screw thread and tighten as shown to confirm a secure hand tight connection, nip tight to 5-6 Nm torque (Fig. 37). Fig.
-
Page 23: Section 8 Magnetic Float Replacement
Remove clip (item 16) using needle nose pliers (Fig. 38). • Remove magnetic float (item 15) using needle nose pliers (Fig. 38). Damaged components must be replaced. Contact Stuart Turner for advice on replacements not supplied with kit. • REASSEMBLY Reassembly is the reverse of the disassembly instructions with the new replacement parts fitted as required. -
Page 24: Section 9 Strainer
Failure to do this will damage the seal. • Carefully check pump and pipework for leaks whilst pump running and stationary before leaving the installation unattended. Stuart Turner reserves the right to amend specifications without notice. - 24 -... - Page 25 - 25 -...
- Page 26 - 26 -...
- Page 27 - 27 -...
- Page 28 Stuart Turner Ltd, Henley-on-Thames, Oxfordshire RG9 2AD ENGLAND Tel: +44 (0) 1491 572655, Fax: +44 (0) 1491 573704 info@stpumps.co.uk www.stuart-turner.co.uk Pt. No. 20017 Issue No: 1716/1-03...
- Page 29 Digital Showers Mixer Showers Power Showers Smart Showers Shower Towers From Top Shower Brands Mira Showers Aqualisa Showers Triton Showers Gainsborough Showers Shower Pumps can upgrade your showering experience even more Stuart Turner Shower Pumps Salamander Shower Pumps Grundfos Shower Pumps...
Need help?
Do you have a question about the 28474 and is the answer not in the manual?
Questions and answers