Stuart Turner Monsoon U1.5 bar Twin Installation Instructions Manual
Monsoon universal twin pump
Hide thumbs
Also See for Monsoon U1.5 bar Twin:
Table of Contents
Advertisement
Installation Instructions
For Monsoon Universal
Twin Pump
Medium Pressure U1.5 bar
Medium Pressure U2.0 bar
INDEX
. . . . . . . . . . . . . . . . . . . . . . . .Page No
Product Description . . . . . . . . . . . . . . . . . . . .1
Application . . . . . . . . . . . . . . . . . . . . . . . . . . .1
Storage . . . . . . . . . . . . . . . . . . . . . . . . . . . . . .2
Typical Installation . . . . . . . . . . . . . . . . . . . . .2
Pre-Installation Check . . . . . . . . . . . . . . . . . .2
Pump Location . . . . . . . . . . . . . . . . . . . . . . . .3
Pipework . . . . . . . . . . . . . . . . . . . . . . . . . . . .5
Pump Connections . . . . . . . . . . . . . . . . . . . . .6
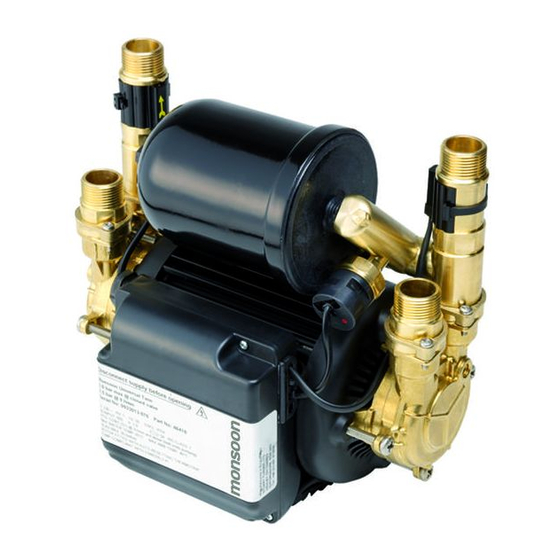
PRODUCT DESCRIPTION
Electric motor driven twin ended peripheral pumps complete with an automatic control
system, consisting of flow switches, pressure switch and pressure vessel and electronic
controls.
APPLICATION
Monsoon Universal pumps are suitable for positive or negative head installation
conditions. The pumps are designed for whole house pressure boosting applications in
vented stored water systems. Inlet pressures to the pump and ambient temperatures
must not exceed the values given in the technical specifications.
This pump set must not be used for any other application without the
written consent of Stuart Turner Limited and in particular, must not be
connected directly to the mains water supply.
This appliance is not intended for use by persons (including children)
with reduced physical, sensory or mental capabilities, or lack of
experience and knowledge, unless they have been given supervision
or instruction concerning use of the appliance by a person responsible
for their safety.
Children should be supervised to ensure that they do not play with the
appliance.
WARNING - Washer/condenser dryers and condenser dryers.
The pump must not be used in the water supply line to a washer/
condenser drier or a condenser drier, which uses a constant flow of
cold water to aid the condenser drying process, as damage can occur
to the pump. If in doubt or for further information contact Stuart
Turner Ltd.
Please leave this instruction booklet with the pump as it contains
maintenance and safety information (Original Instructions)
High Pressure U3.0 bar
High Pressure U4.0 bar
High Pressure U4.5 bar
INDEX
. . . . . . . . . . . . . . . . . . . . . . . .Page No
Electrical Installation . . . . . . . . . . . . . . . . . . .10
Commissioning . . . . . . . . . . . . . . . . . . . . . . . .13
Maintenance . . . . . . . . . . . . . . . . . . . . . . . . . .15
Technical Specification . . . . . . . . . . . . . . . . . .18
Noise . . . . . . . . . . . . . . . . . . . . . . . . . . . . . . .19
Trouble Shooting Guide . . . . . . . . . . . . . . . . .19
Environment Protection . . . . . . . . . . . . . . . . .20
Advertisement
Table of Contents

Related Manuals for Stuart Turner Monsoon U1.5 bar Twin


Summary of Contents for Stuart Turner Monsoon U1.5 bar Twin
-
Page 1: Table Of Contents
This pump set must not be used for any other application without the written consent of Stuart Turner Limited and in particular, must not be connected directly to the mains water supply. -
Page 2: Storage
Regulations 1999. BS6700 and building regulations. Fig. 1 Be installed by a competent person. If in doubt consult Stuart Turner Ltd. STEP 1: PRE-INSTALLATION CHECK Pressure vessel Fig. 2 The pressure vessel (Fig. 2) is factory fitted to the pump assembly. -
Page 3: Pump Location
The pump must not be located where the static pressure on the inlet or outlet to the pump is greater than permitted. Should the installation exceed these limits, contact Stuart Turner for further advice. The pump must be installed so that the following conditions are met: Locate the pump in a dry, frost free position where it cannot be sprayed with water. - Page 4 Preferred Pump Location (shaded area). Pump at a level below draw off tapping in cylinder. Model Max. inlet Max. outlet head head U1.5 hot water U2.0 services U3.0 U4.0 12 m 12 m U4.5 Table 1 Fig. 3 If it is not possible to locate the pump in the preferred area due to site limitations and it is necessary to position the unit in the loft, or in a position above the secondary tapping that feeds the pump, then there is an increased risk of air locks.
-
Page 5: Pipework
STEP 3: PIPEWORK (General) WARNINGS: Ensure pipework to and from pump is independently supported to prevent forces being transferred to inlet and outlet branches of pump. Do not introduce solder flux to pumps, pump parts or hoses manufactured from plastic. All solder joints should be completed and flux residues removed prior to pump connection. -
Page 6: Pump Connections
Never operate pump with inlet and/or outlet isolating valves in the closed position. Damage will occur! The pump is supplied with flexible hoses for connection to inlet and outlet pipework. It is recommended that only the Stuart Turner hoses supplied are used for making these connections. - 6 -... - Page 7 Hose to pump The pump inlet and outlet ports have factory assembled fittings which are specifically designed for connection to the G¾ female running nuts on the flexible hoses. The hose end is fitted with a rubber sealing washer which is held captive within the nut assembly. Locate the hose into position and screw the nut fully onto the fitting by hand.
- Page 8 Prior to inserting pipe into fitting mark the insertion depth on the wall of the pipe with a soft pencil at a distance of 33 mm from the end to be inserted. 22 mm Pipe Pencil mark Fig. 7 Check in the mouth of the fitting that ‘O’-ring, nylon washer and collet are in position.
- Page 9 Pump Connections (General) 22 mm copper outlet pipework. 22 mm copper inlet pipework In the case of horizontal feeds use a Suction supply 22 mm compatible stem elbow (not from tank with supplied). Do not bend the hose push-in plumbing more than 30°...
-
Page 10: Electrical Installation
Typical Low Level Installation In certain installations it may be necessary to install a 90° bend on the inlet or outlet connections of the pump before the flexible hose to accommodate a low level installation. Below are some preferred connection options. All connections seal on the pump body using a fibre or rubber sealing washer. - Page 11 Adjacent suction and delivery pipes should be fitted with earthing clamps to BS 951 and connected with earthing wire size 4 mm² (Fig. 11). A standard kit is available from Stuart Turner (Part No. 17044).
- Page 12 If the supply cord is to be changed or is damaged, it must be replaced with a special cord assembly available from Stuart Turner or one of their approved repairers. On disassembly note the cord retention and routing system. Re-assemble to the same pattern.
-
Page 13: Commissioning
Cable Gland Fitting Instructions Fig. 13 To enable correct assembly of the cable gland the 'O'-ring (Fig. 13 item 1) must be placed over the cable before the clamping insert (Fig. 13 item 2) can be tightened. Note: Cable diameter range:- 6.5 mm to 9.5 mm. Supply Cord Extension The pumps are fitted with a supply cord to the following specification:- All models . - Page 14 Priming WARNING Never operate pump with inlet and/or outlet isolating valves in the closed position. Damage will occur! The chambers must be primed (filled with water) before starting. This is achieved as follows. a) Turn off the pump inlet isolating valves 1 & 2 and pump outlet isolating valves 3 &...
-
Page 15: Maintenance
For Further Technical Support Phone the Stuart Turner Pump Assist team on 0844 98 000 97. Our staff are trained to help and advise you over the phone or arrange for a service engineer to call. - Page 16 M4 screws Manifold clamp Inlet fitting ‘O’-ring Strainer Inlet port Location detail Fig. 15 The pressure vessel air pre-charge does not require routine maintenance. Should ever the need arise for the vessel to have its air pre-charge checked or replenished, it should be carried out as follows: - a) Isolate pump electrically.
- Page 17 Pressure vessel Schrader valve Fig. 16 e) Replenish air charge if required by injecting air into the vessel via the Schrader valve using a car or bicycle pump, ensuring a system outlet valve (tap) remains open during this procedure to allow the vessel to exhaust any excess water. Close all system taps, open hot and cold inlet pump isolating valves, turn on electrical power.
-
Page 18: Technical Specification
9.2 Kg 10.4 Kg 12.5 Kg 13.3 Kg Stuart Turner reserve the right to amend the specification in line with its policy of continuous development of its products. Note: For information on other voltages/frequencies which are not shown, consult any supplementary instruction sheet supplied, or the rating label attached to the pump. -
Page 19: Noise
NOISE The equivalent continuous A-weighted sound pressure level at a distance of 1 metre from the pump does not exceed 70 dB(A). TROUBLE SHOOTING GUIDE Symptoms Probable Cause Recommended Action Pump will not start. Electrical supply. Check wiring connections. Check all switches are ‘on’. Check fuse (see fuse section). -
Page 20: Environment Protection
If this does not happen, this indicates a possible fault with the reed switch or the P.C.B which is located within the terminal box. These should be checked electrically. Consult Stuart Turner for further instructions. Body Reed Clamp... - Page 21 GOOD PRACTICE Always flush system prior to installing a new or serviced pump. Always ensure both sides of the pump are primed (filled with water) before starting the pump. DO NOT RUN PUMP DRY. Always ensure the pump has a flooded suction. Always ensure anti-vibration feet are used.
- Page 22 THE MONSOON GUARANTEE Congratulations on purchasing a Stuart Turner pump. We are confident this pump will provide many years of trouble free service as all our products are manufactured to the very highest standard. All Monsoon Pumps are guaranteed to be free from defects in materials or workmanship for 3 years from the date of purchase.
- Page 23 Proof of purchase should accompany the returned unit to avoid delay in investigation and dealing with your claim. You should obtain appropriate insurance cover for any loss or damage which is not covered by Stuart Turner Ltd in this provision. Please record here for your records.
-
Page 24: Declaration Of Conformity
Signed ........Stuart Turner are an approved company to BS EN ISO 9001:2000...
Need help?
Do you have a question about the Monsoon U1.5 bar Twin and is the answer not in the manual?
Questions and answers