In-situ RuggedReader Operator's Manual
Hide thumbs
Also See for RuggedReader:
- Getting started manual (31 pages) ,
- Quick start manual (2 pages)
Table of Contents
Advertisement
Quick Links
Advertisement
Table of Contents

Related Manuals for In-situ RuggedReader


Summary of Contents for In-situ RuggedReader
- Page 1 ® Rugged Reader OPERATOR’S MANUAL October 2007...
- Page 2 In-Situ Inc. makes no warranty of any kind with regard to this material, including, but not limited to, its fitness for a particular application. In-Situ will not be liable for errors contained herein or for incidental or consequential damages in connection with the furnishing, performance, or use of this material.
-
Page 3: Table Of Contents
1 INTRODUCTION ................. 7 Windows Mobile® 5.0 ......................... 7 How to Use This Manual ......................7 Conventions ........................8 The Anatomy of the RuggedReader ................... 9 What We Provide ........................11 Accessories ........................11 Warranty ........................... 12 How to Contact Us ........................12 To Obtain Repair Service (U.S.) .................. - Page 4 Backing up Data ........................40 5 USING ACTIVESYNC® ............... 41 Re-establishing a Connection ....................41 Exploring the RuggedReader from the Desktop Computer ............. 43 Transferring Files To & From the RuggedReader ..............44 Rugged Reader Operator’s Manual 0055450 rev. 002 10/07...
- Page 5 Log Data ........................... 53 Exit Pocket-Situ ........................ 53 Using TDG Logger ........................54 Transferring Files from the RuggedReader to a Desktop/Laptop PC ........56 Using Win-Situ® Sync (Automatic Transfer) ..............56 Using Microsoft ActiveSync (Manual Transfer) ..............57 After the Transfer (either method) ..................58 Reinstalling the In-Situ Software ....................
- Page 6 CONTENTS 7 CARE AND MAINTENANCE ............60 Storing the RuggedReader and Battery Packs ................ 60 Protecting against Mechanical Shock ..................62 Safely Using the Battery Pack ....................62 Safely Using the Wall Charger ....................62 Replacing the Battery Pack ...................... 63 Using the RuggedReader in Extreme Temperatures ..............
-
Page 7: Introduction
The ultra-rugged RuggedReader —rock solid and field ready in the most extreme environments—is your reliable field companion. Designed for Windows Mobile ® 5.0, your RuggedReader features a wide variety of ® application software choices, including Win-Situ Mobile, control software ®... -
Page 8: Conventions
Windows Mobile operating system Section 5: Using ActiveSync ® Section 6: Using In-Situ Software — Win-Situ Mobile — Pocket-Situ 4 — TDG Logger — Transferring data files from the RuggedReader to a desktop computer Section 7: Care and Maintenance of the RuggedReader Conventions Throughout this operator’s manual you will see the following symbols:... -
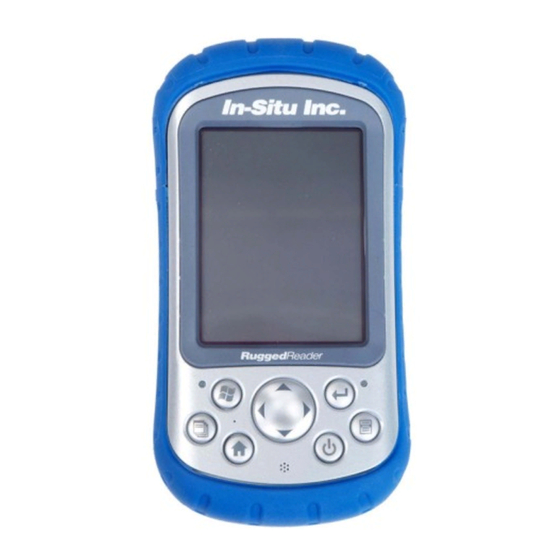
Page 9: The Anatomy Of The Ruggedreader
SECTION 1: INTRODUCTION THE ANATOMY OF THE RUGGEDREADER 1 Elastomer overmold 11 Power button (pages 22-23) 2 Magnesium case front 12 Context menu button (page 20) 3 Display bezel 13 Enter button (page 20) 4 Charge LED (page 31) 14 Notification LED (p. 31) - Page 10 SECTION 1: INTRODUCTION 20 Stylus 21 Main screws (do not remove) Top view with top cap 22 Top cap screws (captive) (page 32) 23 Slot for future accessory 24 Compact Flash card slot (page 32) 25 Secure Digital I/O card slot (page 32) 26 Stylus slot 27 USB Client (mini B) 28 12V DC jack...
-
Page 11: What We Provide
• TDG Logger, for use with the T506 Total Dissolved Gas probe Reference Tools: • A quick start guide ® • Getting Started CD from Microsoft (installs ActiveSync • In-Situ Software/Resource CD (includes user’s guide) Accessories Accessory / Replacement Part Catalog No. 12V Auto Charger Adapter ............55410 Lithium-Ion Battery Pack .............. -
Page 12: Warranty
To Obtain Repair Service (U.S.) service the If you suspect that your RuggedReader is malfunctioning and repair is re- device yourself. This action quired, you can help assure efficient servicing by following these guidelines: voids the warranty. - Page 13 SECTION 1: INTRODUCTION 2. Be prepared to describe the problem, including how the RuggedReader was being used and conditions noted at the time of the malfunction. 3. If Tech Support determines that service is needed, they will ask that your company pre-approve a specified dollar amount for repair charges.
-
Page 14: Getting Started
2 GETTING STARTED This chapter repeats the installation instructions in the RuggedReader Quick Start guide. If you used the Quick Start guide to set up your TIP: If you used RuggedReader, you completed Steps 1-5. the Quick Start guide to set up... -
Page 15: Step 2: Charge The Battery Pack
TIP: Note: After a few minutes the 4. Charging the RuggedReader for 4.5 hours charges it up to 95%. Let device suspends, the device charge for 6 hours to get a full charge. and the flashing red LED... -
Page 16: Step 4: Install Activesync® On A Desktop Computer
STEP 5: CREATE AN ActiveSync CONNECTION Install ActiveSync on your desktop computer before creating a connection. 1. Plug USB Client end (mini B) of the USB communi- cations cable into your RuggedReader when TIP: ActiveSync instructed by ActiveSync. may refer to the device “cradle”... -
Page 17: Tips For Your First Activesync Connection
SECTION 2: GETTING STARTED Tips for Your First ActiveSync Connection • To use In-Situ’s RuggedReader software, we recommend you set up a “Guest” connection in ActiveSync. To connect as a “Guest,” just click TIP: Multiple Cancel on the first page of the Sync RuggedReaders Setup wizard. -
Page 18: The Next Step
For Windows Mobile software features, go to Section 4 For details on Microsoft ActiveSync, check out Section 5 To start using In-Situ’s RuggedReader applications to talk to your In- Situ devices, turn to Section 6 Rugged Reader Operator’s Manual 0055450 rev. 002 10/07... -
Page 19: Using The Hardware
3 USING THE HARDWARE This chapter describes the hardware components of the RuggedReader: • Buttons • Power Management: suspending, powering off, and resetting the RuggedReader • Stylus • Touchscreen • LEDs signals • Peripheral Devices (CF and SD cards, USB drives) - Page 20 (similar to a right-click on a desktop computer) Enter button Enters the selected soft key or option Power button Turns the RuggedReader on and off, resets, suspends (see more details in the Power button section) Four-way directional Allows you to navigate button Rugged Reader Operator’s Manual...
- Page 21 SECTION 3: USING THE HARDWARE Customizing Button Functions Each button performs a specific function. You can customize the function of the following four buttons to open programs or perform shortcuts: • Start menu button (Button 1) • Applications Manager button (Button 2) •...
-
Page 22: Power
A series of keypad actions lets you restore factory defaults to the registry or to the whole device. Below are instructions for each action. Suspending Suspending the RuggedReader is different from powering it off: TIP: If the device suspends while it •... -
Page 23: Resetting The Device (Soft Reset)
The keypad backlight stays on for a few seconds after the device shuts off. Until the keypad backlight turns off, the device cannot be powered on again. To power on your RuggedReader, hold down until the green notification light appears. Introductory splash screens will be displayed, then the Today screen. -
Page 24: Restoring Factory Defaults (Hard Reset)
Logger), any software you installed, and any changes 2. When the green LED light appears on the front of the RuggedReader, you made to the device, simultaneously press and hold the following buttons for several including settings changes. -
Page 25: Conserving Power
SECTION 3: USING THE HARDWARE Conserving Power The RuggedReader has several settings that let you save battery power. Backlight To dim or turn off the display and keypad backlights: 1. Tap Start > Settings > System tab > Brightness. 2. Select the Battery Power tab. - Page 26 SECTION 3: USING THE HARDWARE Automatic Suspend By default, the RuggedReader will suspend automatically after three minutes of inactivity when on battery power. To adjust the time when the device suspends, follow these steps: 1. Tap Start > Settings > System tab > Power.
-
Page 27: The Stylus
SECTION 3: USING THE HARDWARE THE STYLUS Like the left button on a desktop computer mouse, the stylus is a tool that lets you select items and enter data. Like the right button, the stylus lets you perform shortcuts like cutting and pasting. Instructions for these tasks are listed in the chart below. - Page 28 SECTION 3: USING THE HARDWARE Entering Information You have several options for entering information into your RuggedReader using the stylus. On-screen Keyboard utility (the default input method) Letter Recognizer—recognizes character strokes and gestures Block Recognizer—recognizes letters from single strokes Transcriber—recognizes cursive, print, or mixed handwriting...
-
Page 29: The Touchscreen
In-Situ Inc. (catalog no. 55470). To apply a screen protector, follow these steps: 1. Make sure the RuggedReader screen is free of oils and dirt. You can wipe it with a microfiber cloth. 2. Peel back the paper liner from the screen protector, exposing approximately one inch. - Page 30 SECTION 3: USING THE HARDWARE Calibrating the Touchscreen If the touchscreen is not responding accurately to stylus taps, try calibrating it manually: 1. Tap Start > Settings > System tab. 2. Scroll down and tap on the Screen icon. 3. In the Screen Settings window, select the Align screen button.
-
Page 31: Led Signals
SECTION 3: USING THE HARDWARE LED SIGNALS The RuggedReader signals events and processes using LEDs. Charge LED (Red) This red light appears to the left of the Start menu button on the keypad. Flashing : battery is currently charging Solid... -
Page 32: Removing The Top Cap
SECTION 3: USING THE HARDWARE Removing the Top Cap The removable top cap protects the RuggedReader and storage cards. To CAUTION: remove the top cap: When the top cap is removed, 1. Remove the stylus. the RuggedReader is not sealed. Avoid exposing the 2. -
Page 33: Working With Files On A Peripheral Device
RuggedReader, and back up files from the RuggedReader onto a peripheral device. Use File Explorer to find, run, open, and copy these files as you would other files on the RuggedReader. Exploring Files in Section 4. -
Page 34: Basic Operations
4 BASIC OPERATIONS This section covers things you need to know to perform everyday tasks on your RuggedReader. THE TODAY SCREEN The Today screen is the default screen you see when your device powers on. From the Today screen you can view or select •... -
Page 35: The Start Menu
• Programs. Opens the Programs menu window, where you can view and access installed programs. To run a program, tap on it. For a list of the Programs installed on your RuggedReader, see Appendix C • Settings. Displays three settings tabs: Personal, System, and Connections. -
Page 36: Status Icons
SECTION 4: BASIC OPERATIONS • Help. Windows Mobile help is context-sensitive—the help screen information is directly related to what you are doing on the device. For some programs, you can open the program first, then tap Start > Help STATUS ICONS Status icons on the top line show the status of operations. -
Page 37: Exploring Files
SECTION 4: BASIC OPERATIONS EXPLORING FILES Use File Explorer to explore files stored on the RuggedReader or on a peripheral device: 1. Tap Start > Programs > File Explorer. File Explorer launches. 2. The current directory appears on the top line. To browse a different... -
Page 38: Working With Files
SECTION 4: BASIC OPERATIONS Working with Files Locate the file you want in File Explorer, as described on the previous page. • To run a program, tap it once. • To manipulate a file—copy, cut, delete, rename—do one of the following: Use the “right-click”... -
Page 39: Closing Running Programs
2. Select the program you want to switch to. 3. Tap Activate. The program comes to the forefront. ROTATING THE SCREEN The RuggedReader can show information in portrait or landscape view. To change the orientation: 1. Select Start > Settings > System tab > Screen. -
Page 40: Backing Up Data
SECTION 4: BASIC OPERATIONS BACKING UP DATA Your RuggedReader’s non-volatile flash memory is designed to protect your data. However, it is still a good idea to back up your work regularly by saving information to a desktop computer or to a Compact Flash (CF) or Secure Digital (SD) card. -
Page 41: Using Activesync
To re-establish an ActiveSync connection, follow these steps: to the RuggedReader. This is supplied on the Getting 1. If you plan to charge the RuggedReader while it is connected in Started CD. See installation instructions in Section 2 ActiveSync, plug the wall charger into the RuggedReader now. - Page 42 SECTION 5: USING ACTIVESYNC a. If you have not connected before or connected as a Guest, the Pocket PC Sync Setup Wizard is displayed. Do one of the following: TIP: If your device has To connect as a Guest trouble connecting, check firewall (recommended), click Cancel.
-
Page 43: Exploring The Ruggedreader From The Desktop Computer
SECTION 5: USING ACTIVESYNC EXPLORING THE RUGGEDREADER FROM THE DESKTOP COMPUTER You can explore and manipulate files on the RuggedReader from the desktop computer using ActiveSync. To explore the RuggedReader, follow these steps: 1. Connect the RuggedReader to the desktop and re-establish an ActiveSync Guest connection or partnership. -
Page 44: Transferring Files To & From The Ruggedreader
SECTION 5: USING ACTIVESYNC TRANSFERRING FILES TO & FROM THE RUGGEDREADER You can copy or move files between the RuggedReader and a desktop TIP: Win-Situ Sync can computer using ActiveSync. File transfer is done from the desktop automatically computer side. -
Page 45: Using In-Situ Software
Pocket-Situ 4 talks to Multi- Parameter TROLLs and Win-Situ Mobile communicates with Level TROLLs and Aqua TROLLs. A miniTROLLs. brief overview of the software is presented here. If you need help, refer to the Win-Situ Mobile Quick Start included with your RuggedReader. -
Page 46: Connect The Hardware
SECTION 6: IN-SITU SOFTWARE Connect the Hardware Connect the Level TROLL or Aqua TROLL to the RuggedReader’s 9-pin serial port (see the RuggedReader Quick Start guide). Launch the Software TIP: For convenience in Press the power button . Tap Start to display the Start menu. - Page 47 SECTION 6: IN-SITU SOFTWARE Win-Situ Mobile, Functions from “Home” Tab Note the all-important Expander button. It expands your view of available functions on all tabs Connected device Data site Memory gauge: Green–empty Battery gauge: Green–full charge Logging status: Gray–not logging Alarm status: Green–no alarms...
-
Page 48: Set The Troll's Clock
SECTION 6: IN-SITU SOFTWARE Set the TROLL’s Clock Set the device clock before logging: From Home, tap this sequence: Time button Sync button Add a Data Site Data logs are organized and filed by the Site where the data were = Expander collected. -
Page 49: Set Up A Data Log
For help on the prompts, see the Win-Situ Mobile Quick = Expander Start included with your RuggedReader. = OK At the end of the Logging Setup Wizard, a summary of the log setup is shown. Tap OK to write the log to the device. -
Page 50: Start The Log
SECTION 6: IN-SITU SOFTWARE Start the Log A Scheduled log starts at its programmed time. = Manual Start To start a Manual log: Tap View menu > = Scheduled Logging, tap the log, tap Start. Start log You can safely disconnect from the... -
Page 51: Using Pocket-Situ 4
Win-Situ 4/Pocket-Situ 4 user’s guide on the Parameter TROLLs and miniTROLLs. In-Situ Software/Resource CD. A brief overview is given here. Connect the Hardware Connect the instrument to the RuggedReader’s 9-pin serial port (see the RuggedReader Quick Start guide). TIP: If the Launch the Software program Press the power button on the RuggedReader. -
Page 52: Set The Troll's Clock
SECTION 6: IN-SITU SOFTWARE Set the TROLL’s Clock Select the TROLL in the tree and tap Edit, then Clock to synchronize the device clock to the RuggedReader clock. Calibrate Water Quality Sensors A Select Parameters B Tap QikCal Read Parameters... -
Page 53: Log Data
SECTION 6: IN-SITU SOFTWARE Log Data First, set up a test: A Tap Tests B Tap Add C Follow the Wizard When finished, the test appears in the Navigation tree. To start, stop, extract (download/view), or delete a test A Tap a test... -
Page 54: Using Tdg Logger
In-Situ’s T506 TDG probe. 1. Connect the T506 to the RuggedReader’s 9-pin serial port. 2. On the RuggedReader, tap Start > Programs > TDG Logger. The TDG Logger application will launch, and in a moment device readings will be displayed. - Page 55 6. Output will be logged until you tap OK to exit TDG Logger, or disconnect the probe. Readings will be logged to a .txt file on the RuggedReader (Built-In Storage \ TDGLogger) with the same name as the site. For the example here, use the File Explorer to navigate to My Device \ Built- In Storage \ TDGLogger \ south dam.txt.
-
Page 56: Transferring Files From The Ruggedreader Toa Desktop/Laptop Pc
• Pull log data from Win-Situ Mobile on the RuggedReader to Win-Situ 5 on the desktop TIP: If Win-Situ • Pull log data from Pocket-Situ 4 on the RuggedReader to Win- Sync is not Situ 4 on the desktop available, •... -
Page 57: Using Microsoft Activesync (Manual Transfer)
Exit Win-Situ Sync Using Microsoft ActiveSync (Manual Transfer) If Win-Situ Sync is not available, ActiveSync can be used to transfer files manually from the RuggedReader to the desktop. Follow the procedure in Section 5, Transferring Files To & From the RuggedReader. -
Page 58: After The Transfer (Either Method)
Win-Situ Software Manager. 2. When prompted, launch the Software Manager utility. (You can also launch it from the Windows Start menu > Programs > In-Situ Inc folder.) 3. Connect to the RuggedReader via ActiveSync (if not already con- nected). -
Page 59: Installing From A Cab File
& From the RuggedReader in Section 5.) your RuggedReader. Or contact In-Situ Technical 2. On the RuggedReader: Use File Explorer to navigate to the CAB file Support at 1-800-446-7488. and tap to run it. (See Exploring Files in Section 4.) This installs the application. -
Page 60: Care And Maintenance
Storage Temperature Range The RuggedReader can be stored at temperatures between -22° F and 140° F (-30° C to 60° C). If possible, store your RuggedReader indoors. Doing so helps protect your device from extreme temperatures and helps it run efficiently at startup. - Page 61 Taking the RuggedReader out of Extended Storage The battery pack discharges slightly during extended storage periods. When you are ready to use your RuggedReader again, follow these steps so your battery pack runs efficiently: 1. Plug the RuggedReader into a charger.
-
Page 62: Protecting Against Mechanical Shock
Use only the AC adapter shipped SAFELY USING THE WALL CHARGER with your • Use only wall chargers intended for the RuggedReader. Using any RuggedReader. Damage other external power source can damage your product and voids caused by the use of third- your warranty. -
Page 63: Replacing The Battery Pack
SECTION 7: CARE AND MAINTENANCE REPLACING THE BATTERY PACK To replace the battery pack, follow these steps: 1. Close all running programs. CAUTION: The 2. Suspend the device (press the power button briefly and release). device only stays on for 3. - Page 64 SECTION 7: CARE AND MAINTENANCE 8. Insert the replacement battery pack, lining up the battery contacts with the RuggedReader contacts. ➔ 9. Insert the tabs on the bottom of the battery door into the case slots. Close the battery door, making sure the door latch is in the unlock position as the door meets the case.
-
Page 65: Using The Ruggedreader In Extreme Temperatures
SECTION 7: CARE AND MAINTENANCE USING THE RUGGEDREADER IN EXTREME TEMPERATURES The RuggedReader operates from -22° F to 122° F (-30° C to 50° C). To help your device function properly, store it device indoors when possible. Other tips: • If the RuggedReader is exposed to temperatures below 14° F (-10°C ), the device may slow down or its display backlight may... - Page 66 SECTION 7: CARE AND MAINTENANCE 3. Apply water or a mild cleaning solution such as Windex or 409 to a microfiber cloth and gently wipe off the touchscreen. Other approved cleaners include Citrus Wonder and Citrus All Purpose Cleaner. CAUTION: Do not use tissues, paper towels, or harsh cleaning agents to clean the touchscreen.
-
Page 67: Repairing The Ruggedreader
SECTION 7: CARE AND MAINTENANCE REPAIRING THE RUGGEDREADER Do not attempt If the RuggedReader is in need of repair, contact In-Situ Inc. for a Return to service the Materials Authorization (RMA) number as described in Section 1. Do not RuggedReader attempt to service the device yourself. -
Page 68: Troubleshooting
Answers to issues not addressed here may be available through on-device help or the Windows Mobile website from Microsoft at www.Microsoft.com/ mobile. If you cannot find answers to your questions through these methods, contact In-Situ Inc. as described in Section Problem The touchscreen does not respond accurately to stylus taps. - Page 69 In case of damage, contact In-Situ Inc. Problem The RuggedReader runs slowly. Solutions It is possible that you have too many programs running. Try closing any programs you are not using. To view and close running programs: 1.
- Page 70 Solutions Firewall programs sometimes cause ActiveSync connection problems. In these cases, the firewall sees the RuggedReader as a strange and possibly hostile computer and prevents the device from connecting to the desktop computer. To allow the mobile device to connect to your desktop computer, follow these steps: 1.
-
Page 71: Appendix A: Specifications
APPENDIX A: SPECIFICATIONS Operating System Microsoft® Windows Mobile® 5.0 Processor Intel® XScale® PXA270, 520 MHz Memory 64 MB low-power RAM Storage Internal solid-state 128 MB Flash Display 3.5" (89 mm) QVGA active matrix color TFT transflective (outdoor) viewable) LCD with LED backlight; 240 x 320 pixels Touchscreen Sealed, resistive, pressure sensitive CF and SD Card Slots... - Page 72 APPENDIX A: SPECIFICATIONS Batteries Intelligent, rechargeable Li-Ion battery pack, 14 W-hr (nom.), operates for more than 20 hours on one charge, charges in 3 to 5 hours, internal circuitry sealed against moisture when battery is removed, change without tools Communications Module 9-pin D-sub connector, USB Host (Mini A), USB Client (Mini B), 12 VDC jack for power input and battery charging;...
-
Page 73: 9-Pin Serial Port Pinouts
APPENDIX A: SPECIFICATIONS 9-PIN SERIAL PORT PINOUTS Pin # Description Data Carrier Detect (DCD) Input Receive Data (RCD) Input Transmit Data (TXD) Output Data Terminal Ready (DTR) Output Ground (GND) Data Set Ready (DSR) Input Request To Send (RTS) Output Clear To Send (CTS) Input Ring Indicator (RI) Input Rugged Reader Operator’s Manual... -
Page 74: Appendix B: Certifications & Regulatory Information
APPENDIX B: CERTIFICATIONS & REGULATORY INFORMATION REGULATORY INFORMATION U.S.A. This equipment has been tested and found to comply with the limits for a Class A digital device, pursuant to Part 15 of the FCC Rules. These limits are designed to provide reasonable protection against harmful interference when the equipment is used in a commercial or residential environment. -
Page 75: Declaration Of Conformity
APPENDIX B: CERTIFICATIONS & REGULATORY INFORMATION DECLARATION OF CONFORMITY According to ISO/IEC Guide 22 and EN 450 14 Manufacturer’s Name: Juniper Systems, Inc. Manufacturer’s Address: 1132 West 1700 North Logan, UT 84321 USA Declares, under our sole responsibility, that the product: Product Name: Archer Field PC Model Number:... -
Page 76: Appendix C: Programs & Settings
ActiveSync. Synchronizes your RuggedReader with a desktop or laptop To use it, open the program, then tap Start > computer. You can also use ActiveSync to explore your RuggedReader Help. and synchronize your contacts, calendar, e-mail, and more. Calculator. Simulates a calculator. - Page 77 File Explorer. Lets you view, expand, and collapse the RuggedReader directory folders so you can locate files. Modem Link. Allows you to connect your RuggedReader to the Internet or computer network through Compact Flash (CF) and Secure Digital (SD) adapters (e.g., 56K dial-up modem or Ethernet adapters).
-
Page 78: Programs Installed By In-Situ Inc
Programs Installed by In-Situ Inc. Pocket-Situ 4. Control software for MP TROLL 9500s, miniTROLLs, and MP TROLL 9000s. TDG Logger. Displays and logs readings from In-Situ’s T506 Total Dissolved Gas probe. Win-Situ Mobile. Control software for Level TROLLs and Aqua TROLLs. - Page 79 APPENDIX C: PROGRAMS & SETTINGS Personal System Connections Setting settings settings settings Settings About Backlight Beam Bluetooth Buttons Brightness Certificates Clock & Alarms Connections Error Reporting Input Lock Memory Menus MSN options Network cards Owner Info Power Regional Settings Remove Programs Screen Sounds &...
-
Page 80: Index
44 Closing programs, 39 troubleshooting, 70 Copying files, 38 Icons, status, 36 Applications. See Programs from desktop computer, 44 In-Situ software, 45–59 to desktop computer, 40, 44 installing, 58–59 Pocket-Situ 4, 51–53 Backing up data, 40 TDG Logger, 54–55 Backlight Declaration of Conformity, 75 Win-Situ Mobile, 45–50... - Page 81 INDEX more than 2 weeks, 61 temperature, 60 Landscape view, 39 Recording, 77 Storage cards, 31–33 LED, green, 23, 31 Red LED, 15, 22, 31 Stylus, 27–28 LED, red, 15, 22, 31 Regulatory information, 74 Suspending, 22, 60, 63 Lock device, 34 Renaming files, 38 automatic suspend, 26–27 Lock-up, 23, 70...
Need help?
Do you have a question about the RuggedReader and is the answer not in the manual?
Questions and answers