Evolis Avansia User Manual
Hide thumbs
Also See for Avansia:
- User manual (81 pages) ,
- Technical note (30 pages) ,
- Service manual (293 pages)

Related Manuals for Evolis Avansia


Summary of Contents for Evolis Avansia
-
Page 1: User Guide
USER GUIDE Evolis Card Printer © 2013. All rights reserved. November 2013. Ref. KU-AVA1-041-ENG Rev. A0... -
Page 2: Copyright Notice
All the information contained in this document is subject to change without prior notice. Evolis Card Printer cannot be held liable for any errors that may be found in this manual, or for any loss or damage arising accidentally or as a result of dissemination or use of this manual. -
Page 3: Warranty Registration
As with all Evolis products, a great deal of care has been taken over this manual. Should you find an error, however, please let us know by emailing us at info@evolis.com. -
Page 4: Getting Started
Evolis reseller, who will tell you the procedure to follow. Evolis takes great care over the quality of its packaging and we ask that you keep this packaging somewhere clean and dry. -
Page 5: Operating The Printer Safely
1.2 Operating the printer safely The following precautions must be observed to assure safe operation of the printer. Also, do not do anything that is not described in this manual. Doing so may cause an unexpected accident. Installing location ä Do not install the printer in a damp or dusty location on an unstable table, on a slant, or any place where there is excessive vibration. -
Page 6: Security Cable
Handling ä Do not use flammable sprays near the printer. Do not touch anything inside the printer unless specified in this manual. Do not place heavy items on the printer and do not lean on the printer. While the printer is operating do not turn off the printer, unplung the power cable, or look inside the printer. The cooling fan is always running for cooling the inside of the printer. -
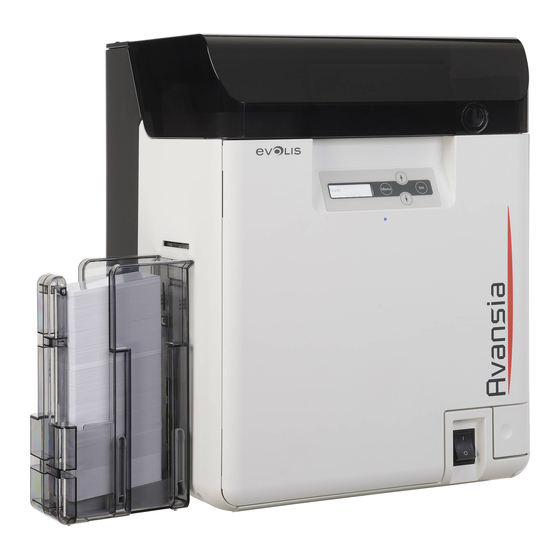
Page 7: Description Of The Printer And Its Functions
1-2 Description of the printer and its functions 1-2a FRONT SIDE OF THE PRINTER - Top cover - Control Panel - Front cover - Cover opening button - On-off switch - Card output hopper - Card ejection slot 1-2b INSIDE OF THE TOP COVER - Card feeder - Feeding roller - Top cover... - Page 8 1-2c REAR SIDE OF THE PRINTER - Reject slot - Peripheral USB socket - Ethernet socket (Lan cable port) - Port for enhancing function - Security cable slot (OPTION) - Power cable socket (PC) (10/100) - Filter RS-232C(PC) RS-232C(OPTION) 1-2d FRON T COVER - Card feeding wheel - Reverse feeding wheel - Cleaning roller...
-
Page 9: Installation
1-3 Installation 1-3a CONNECTING THE OUTPUT HOPPER Insert the hooks of the provided Card output hopper to the holes by the Card Ejection Slot. The output hopper is delivered with the printer. Plug it before using the printer. -
Page 10: Connecting The Printer
1-3. CONNECTING THE PRINTER Connection to the power supply ä The printer must be connected to a properly protected and earthed electrical installation. FI: Laite on liitettävä suojamaadoitus koskettimilla varustettuun pistorasiaan. NO: Apparatet må tilkoples jordet stikkontakt. SE: Apparaten skall anslutas till jordat uttag. This is a Class B device. - Page 11 1-3c RIBBONS AND FILMS Evolis original ribbons optimise your printer’s operation and avoid causing damage to it. The use of ribbons from other suppliers is liable to damage your printer and voids the manufacturer’s warranty for the printer. For optimum print quality, Evolis recommends that the printer is cleaned every time the ribbons and films are changed. See the Servicing and Maintenance section of this manual.
-
Page 12: Fitting The Ink Ribbon
ä Before fitting the ink ribbon you have to know about the Evolis electronic key which is delivered with every color ribbon. You will have to install the ribbon first and then install the key inside the printer as demonstrated below: The electronic key is equipped with a RFID tag which communicates with an electronic board inside the printer. - Page 13 Take up the ink ribbon slack. Turn the wheel as shown and take up the ribbon slack. Î Insert the ink ribbon cassette until a «click» is heard. Ï Drop the Evolis electronic key in his container like shown page 11. Ð Close the front cover. Ñ...
- Page 14 Clear Retransfer film ä The Retransfer unit includes parts heated to high temperatures. Be careful not to put your fingers inside the module. Follow the safety instructions. Appropriate configuration of the print driver should be carried out before fitting clear Retransfer film. Ê...
- Page 15 Î Take up the clear Retransfer film slack. Turn the wheel at right and take up the film slack. Ï Insert the clear Retransfer film cassette into the printer until a click is heard. Ð Close the front cover. Ñ Press the SET key when [Push SET Key ]appears on the LCD.
- Page 16 Evolis recommends the use of cards specially designed for Retransfer purposes. For more information, please contact your Evolis reseller who will advise on your choices. Be extremely careful to ensure that magnetic strip cards and contact smartcards are properly positioned in the card feeder.
-
Page 17: Cards Orientation
Cards orientation ä The printing side of the card is the surface on the front side of the card feeder (see pictures Ì Ê Ë Pre printed cards (Front surface) Contact smartcards (Front surface) Front side of the card feeder Front side of the card feeder Ë... -
Page 18: Adjusting Card Thickness
Adjusting card thickness ä The printer is equipped with a manual card thickness adjustment mechanism which can be reached either through the card input feeder or through the inside of the printing module when the print head bracket is open. The printer accepts cards between 0.76 mm (30mil) and 1 mm (40mil) thick. -
Page 19: Loading The Cards
Loading the cards ä Ê Open the top cover and open the card feeder as shown. Ë Hold the card retainer lever with your fingers and pull it right out. Ì Insert the cards in the feeder as indicated, with the side to be printed facing to the left. Í... -
Page 20: Removing Printed Cards
Removing printed cards ä Once the print and/or encoding cycle is complete, cards are delivered by default into the output hopper found on the left of the device. The hopper has a maximum capacity of approximately 250 cards. Users can select from three methods to collect cards from the output hopper: Front side of card visible –... - Page 21 Optimizing transfer conditions ä In order to optimize the transfer quality you can change the Retransfer settings according to your card type. Thanks to the LCD Panel or the printer driver you can select the card type, then the transfer speed and the transfer temperature. Ê...
- Page 22 Select the Reset option and confirm with OK. Exit the menu. Evolis advises you to empty the reject hopper regularly, such as whenever the ribbon is changed or during routine maintenance. You can also change the settings by using the printer driver.
- Page 23 It is possible to switch the rejection slot. To do so, please follows the instructions below: Ê Switch from Normal Mode to User mode (page 41 section 4.1b) Ë Press the t Key until [Card Setup] is displayed, then press the SET Key. Ì...
-
Page 24: Installing The Print Driver
It is therefore essential to proceed in stages, changing settings only when you are completely sure. Evolis offers the option to revert to the factory settings at any time if the adjustments made do not give the expected results. - Page 25 You will find more detailed information about the cards recommended by Evolis in the ‘Evolis Genuine Product’ list of consumables. Pay attention to the settings defined under the print driver Properties and do not hesitate to contact your Evolis reseller for any advice and assistance needed before making any changes.
- Page 26 “Graphics” tab ä The ribbon type Front/back printing Card collection method Card orientation, portrait or landscape Number of copies “Retransfer” tab ä Selection of film type Changing Retransfer settings Customised configuration...
- Page 27 “Tools” tab ä Setting and testing magnetic encoding options Test card printing Cleaning the printer Dialogue interface with the printer...
-
Page 28: Printing A Card
In Microsoft Word ® ä After having set the Evolis printer as the default: Start the MS-Word application Click on Page Setup in the menu bar The Paper tab has a Paper Size option, select CR80 Card In the Margins tab, set all margins to ‘0’, then in the Orientation section, select Landscape. - Page 29 2-4 Connecting to a network (Ethernet) All Evolis printers have the benefit of a TCP/IP network connection mechanism. This feature is available as standard or as an option, depending on the model in the range. Out of the box, the printer comes configured in DHCP mode (Dynamic Host Configuration Protocol), which means that its IP address is supplied by the network.
-
Page 30: Changing Network Connection Settings
Changing network connection settings ä Ê Switch from Normal Mode to User Mode Ë Press the Key until [Interface Setup] is displayed. Press the SET Key Ì Select the settings to change by using the / Keys. Press the SET Key to confirm. Settings Menu Details Printer ID... -
Page 31: Maintenance
In addition, the use of Evolis brand ribbons (Evolis Genuine Ribbons) also ensures that your equipment operates properly. Use of ribbons not approved by Evolis may as a consequence affect the quality and reliability of print jobs, produce low quality printed output and even affect the printer’s operation. -
Page 32: Routine Printer Cleaning
3-2 Routine printer cleaning The print head warranty is directly linked to routine cleaning of your printer. If you do not carry out this cleaning at the required times, the print head warranty will cease to be valid. Recommended cleaning cycle: whenever the ribbon is changed Servicing accessory: cleaning card Remove any cards that are inside the printer. - Page 33 Follow the procedure below: Cleaning the roller is recommended after printing 1000 cards. Ê Switch from Normal Mode to User mode (page 41 section 4.1b) Ë Press the tKey until [Cleaning] is displayed, then press the SET Key. Ì Then [Cool down...] is diplayed, wait until the figure drops to 70 or lower. The figure indicates the temperature of the heat roller.
- Page 34 Ï When [Remove cards] is diplayed, open the top cover. Ð Open the cards feeder and remove the cards from the cassette. Ñ When [Set Cleaning Crd] is displayed, load the cleaning card in the feeding slot. Align the adhesive side of the cleaning card to the right.
-
Page 35: Servicing The Cleaning Roller(S)
Remove the cleaning tape cassette (blue part), hold the cleaning tape cassette handle, lift it and pull. Í Remove the cleaning roller (black part). Î Wipe the rollers clean with an Evolis' wipe. Ï Load first the cleaning roller (black part) and then the cleaning tape cassette (blue part). Ð... - Page 36 Ë Open the top cover and remove the card feeder. Ì Clean the roller clean with an Evolis' wipe as shown. Turn the roller as you wipe it to clean it in the direction of the arrow. Î Close the top cover. Your printer is once again ready to use.
- Page 37 Open the front cover and the top cover. Í Lift the decurl section Î Wipe the roller clean with an Evolis' wipe fully moistened with water. Ï Return the decurl section to it original position. Close the top cover and front cover. Decurl Section Ë...
- Page 38 Rotate the reverse wheel. Î Locate the reverse section roller as shown. Ï Wipe the roller clean with an Evolis' wipe fully moistened with water. Ð Rotate the reverse leading wheel and fully clean the roller. Ñ Return the decurl section to it original position. Close the front cover.
- Page 39 3-6 Servicing the filter cleaning Recommended cleaning cycle: monthly Ê Turn off the printer. Ë Remove the filter cover on the rear of the printer. Ì Remove the filter from the filter cover. Í Use a vacuum cleaner to clean the filter. Î...
-
Page 40: Cleaning Tape Replacement
3-7 Cleaning tape replacement Ê Open the front cover. Ë Remove the cleaning tape cassette. Ì Lift up the tape spindle. Í Remove the used cleaning tape. Î Insert the new tape and return the tape spindle. Ï Insert the cleaning tape cassette. Ð... - Page 41 Î Insert a flat screwdriver into the groove on the end of the feeding roller. Ï Turn the screwdriver, and wipe the feeding roller inside the printer using an Evolis cotton swab fully moistened with water. Ð Return the ink ribbon cassette and the clear Retransfer film cassette to their original positions.
Need help?
Do you have a question about the Avansia and is the answer not in the manual?
Questions and answers