ClearOne WS800 Quick Start Manual
Hide thumbs
Also See for WS800:
- Application manual (12 pages) ,
- Quick start manual (10 pages) ,
- Manual (5 pages)
Table of Contents
Advertisement
Quick Links
Download this manual
See also:
User Manual
Advertisement
Table of Contents

Related Manuals for ClearOne WS800


Summary of Contents for ClearOne WS800
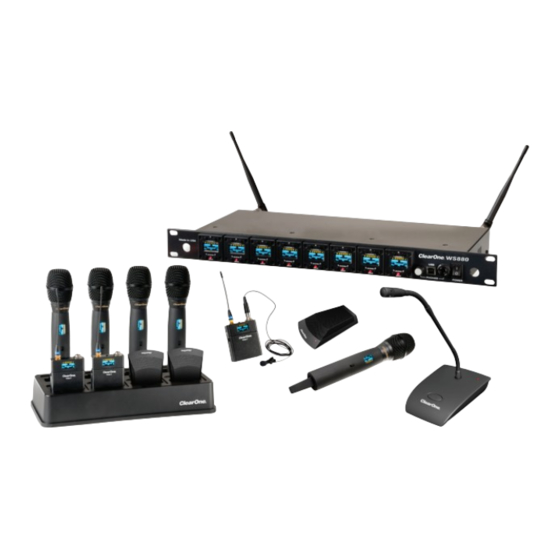
- Page 1 Quick Start Guide WS800 Wireless Microphone System Quick Start Guide...
- Page 2 Setting Up ClearOne WS8000 Wireless Systems for Optimal Performance Open the Cartons: Confirm everything on the packing slip is enclosed. 1. Set up the Docking Station: ClearOne transmitters are shipped with rechargeable batteries. Plug in the charging dock, put the batteries in the transmitters, then place the transmitters in the dock while you set up the rest of the system.
- Page 3 Using the ClearOne remote software: Editing Transmitter Parameters: The easiest and most intuitive way to set the parameters of ClearOne transmitters and receivers is with ClearOne Remote software. Download the latest software from the ClearOne Resource Library, install and run on a computer running Windows XP or Windows 7 (32 or 64 bit), and connect to the receiver via USB or RS232.
- Page 4 G. Set Receiver Name: label each receiver with a unique name using up to 26 characters. 3. RF Scan - RF Plot: Shows the RF strength of each antenna in a ClearOne system and shows if there is out- side interference (see Pg. 5).
- Page 5 RF Scan and choosing transmitter channels: 1. To run an RF Scan, open the WS800 and Dialog20 Remote Software or the ClearOne WS800 Remote Software (older version). Screen shots from the older and newer software are shown below. 2. Turn off all of the transmitters.
-
Page 6: How To Sync Transmitters With The Receiver
How to sync transmitters with the receiver: How to sync transmitters with the receiver: 1. Locate the IR (infrared) Sensor on the transmitter. ON / OFF ON/OFF 2. Power on the transmitter. 3. Hold transmitter about 6 inches from the corresponding receiver module with the IR sensor aimed at the receiver module. -
Page 7: Front Panel
2. Receiver Module (See details below). 3. Mixed audio volume control. 4. USB Port. Connect to computer for ClearOne Remote control. Run software to monitor/edit system parameters, scan for RF interference and download firmware upgrades. 5. Mixed audio output, 1/4” phone jack for monitoring individual channels or mixed channels. -
Page 8: Receiver Back
DB25 to DB25 cable. Do not use a null modem cable. GPIO: GPIO acts like a contact closure. Use ClearOne Remote to assign an event that toggles the GPIO pin. The factory default toggles pins X through X to correspond to muting a receiver module. ClearOne Remote has a feature that lets you assign how the system responds to a transmitter mute (see ClearOne Remote). -
Page 9: Hand-Held Microphone
2. Programmable Switch: Toggle on/off, on/mute/ or on/on. 3. Microphone Connector: TA4 mini XLR style: ClearOne offers a full range of lavaliere and headset mics for optimal performance of your ClearOne transmitter. Works with both snap in and screw-in microphones. -
Page 10: Podium Gooseneck Stem
Transmitters: TABLE-TOP MICROPHONE: The ClearOne WS800 Table-top Microphone combines the professional audio specs and security of a wired mic with wireless convenience. Available in omni or cardioid polar pick-up patterns with 265-bit FIPS 197 encryption. 1. Power LED: When the Table Mic is on, the LED signals: Red = audio mute. -
Page 11: Podium Gooseneck
10. Battery Cassette: Pull tab to remove the battery cassette. Recharge the batteries by inserting the cassette into the ClearOne Charging Dock. (See figure 1 below) The battery cassette holds four, off-the-shelf, AA, NiMH batteries for up to 9.5 hours continuous usage per charge. - Page 12 Dante input devices using the Dante Controller software application, shown below. The Dante card comes pre installed in the WS800 receiver. There are 2 RJ-45 jacks on the rear panel of the WS800 receiver used to connect the Dante card to the network. They are labelled ‘Primary’ and ‘Secondary’.
-
Page 13: Exposure And Compliance
IC: 1970A-HANDHELDMIC IC: 8240A-DS80H Modifications (FCC 15.21) Changes or modifications to this equipment not expressly approved by ClearOne may void the user’s authority to operate this equipment. Clearone Wireless Receivers, Transmitters, and, Antennas are intended for indoor use only. Applies to WS80-T: Under Industry Canada regulations, this radio transmitter may only operate using an antenna of a type and maximum (or lesser) gain approved for the transmitter by Industry Canada. - Page 14 Sales: 800-707-6994 Other product names may be registered trademarks of their respective owners who do not necessarily endorse ClearOne or ClearOne’s products. All rights reserved. Information in Fax: 801-977-0087 this document subject to change without notice. © 2016 ClearOne. LIT-CO-RCVR-OP-EN v10.0 August. 2017...
Need help?
Do you have a question about the WS800 and is the answer not in the manual?
Questions and answers