
Related Manuals for Kramer UTBUS-1xl


Summary of Contents for Kramer UTBUS-1xl
- Page 1 K R A ME R E LE CT R O N IC S L T D . USER MANUAL MODEL: MODULAR UTBUS-1xl Under the Table Connection P/N: 2900-300076 Rev 2...
-
Page 3: Table Of Contents
Technical Specifications of the Assembled UTBUS-1xl Figures Figure 1: UTBUS-1xl under a Table Figure 2: UTBUS-1xl Under the Table Connection Bus Figure 3: Installing a Kramer TOOL Figure 4: Securing the UTBUS-1xl to the Underneath of the Table UTBUS-1xl – Contents... -
Page 4: Introduction
GROUP 7: Scan Converters and Scalers, GROUP 8: Cables and Connectors, GROUP 9: Room Connectivity, GROUP 10: Accessories and Rack Adapters and GROUP 11: Sierra Products. Thank you for purchasing the Kramer UTBUS-1xl, which is ideal for boardrooms, conference and training rooms! UTBUS-1xl - Introduction... -
Page 5: Getting Started
Use Kramer high-performance high-resolution cables Go to http://www.kramerelectronics.com to check for up-to-date user manuals, a complete list of Kramer wall plates and module connectors, application programs, and to check if firmware upgrades are available (where appropriate). Achieving the Best Performance To achieve the best performance: •... -
Page 6: Overview
Australia, Israel, South Africa or “Universal” for use anywhere (see compatibility restrictions in Section Order the power sockets separately from Kramer Electronics • Lets you install a Kramer TOOL or Pico TOOL inside the body of the UTBUS-1xl Figure 1: UTBUS-1xl under a Table UTBUS-1xl - Overview... -
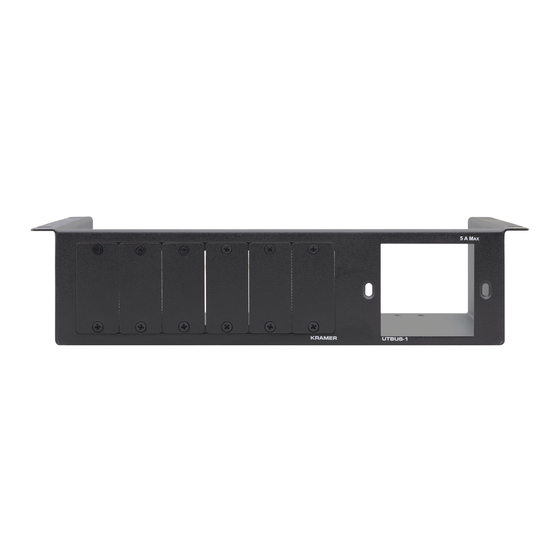
Page 7: Your Utbus-1Xl Enclosure
Outer Rim For mounting under the table TOOL Mounting Holes (8) Screw in the appropriate holes to install a Kramer TOOL or Pico TOOL Tie Holes (12) Insert the self-locking tie through the holes to fix the pass-... -
Page 8: Power Socket Options
Israel: TS-1IL (80-001799) France: 100-240V AC, 50/60Hz, 5A 220V AC, 50/60Hz, 5A Maximum 5A per power Maximum 5A per power outlet outlet South Africa TS-1ZA (80-001699) 100-240V AC, 50/60Hz, 5A Maximum 5A per power outlet UTBUS-1xl - Your UTBUS-1xl Enclosure... -
Page 9: Power Cord Options
6ft/125V (Japan) C-AC/JP (125V) 91-000699 6ft/220V (Europe) C-AC/EU (220V) 91-000199 6ft/220V (Israel) C-AC/IL (220V) 91-000999 6ft/250V (UK) C-AC/UK (250V) 91-000299 6ft/250V (India) C-AC/IN (250V) 91-001099 6ft/250V/10A (China) C-AC/CN (250V) 91-001199 6ft/250V/10A (South Africa) C-AC/ZA (250V) 91-001299 UTBUS-1xl - Your UTBUS-1xl Enclosure... -
Page 10: Installing The Utbus-1Xl
Each blank plate can be removed and replaced with a Kramer passive wall plate insert or connector module for interfacing A/V type signals, if required. To install a wall plate insert or... -
Page 11: Installing The Cables
2. Insert the self-locking ties through the tie holes to secure the cables to the inside walls of the enclosure. Connect the Kramer TOOL or Pico TOOL (Optional) You can install a Kramer TOOL or Pico TOOL, as illustrated in the example Figure To connect the Kramer TOOL to the UTBUS-1xl: 1. -
Page 12: Figure 3: Installing A Kramer Tool
Figure 3: Installing a Kramer TOOL UTBUS-1xl - Installing the UTBUS-1xl... -
Page 13: Securing The Utbus-1Xl Enclosure To The Table
2. Insert the four M4.2X16 wood screws into the four rim screw holes and fix the UTBUS-1xl to the table. Figure 4: Securing the UTBUS-1xl to the Underneath of the Table The UTBUS-1xl is ready for use. UTBUS-1xl - Installing the UTBUS-1xl... -
Page 14: Technical Specifications Of The Assembled Utbus-1Xl
WEIGHT: 0.4kg (0.88lbs) approx. ACCESSORIES: Power cord, self locking ties, wood screws OPTIONS: Passive wall plates and interfaces, power socket kits, power cord Specifications are subject to change without notice at http://www.kramerelectronics.com UTBUS-1xl - Technical Specifications of the Assembled UTBUS-1xl... - Page 15 UTBUS-1xl...
- Page 16 For the latest information on our products and a list of Kramer distributors, visit our Web site where updates to this user manual may be found. We welcome your questions, comments, and feedback. Web site: www.kramerelectronics.com E-mail: info@kramerel.com SAFETY WARNING...
Need help?
Do you have a question about the UTBUS-1xl and is the answer not in the manual?
Questions and answers