Kramer UTBUS-2xl User Manual
Under the table connection bus
Hide thumbs
Also See for UTBUS-2xl:
- Installation instructions (4 pages) ,
- Quick start manual (2 pages)

Related Manuals for Kramer UTBUS-2xl


Summary of Contents for Kramer UTBUS-2xl
- Page 1 USER MANUAL MODEL: UTBUS-2xl Under the Table Connection Bus P/N: 2900-300455 Rev 3 www.kramerAV.com...
-
Page 3: Table Of Contents
Securing the UTBUS-2xl Enclosure to the Table Technical Specifications of the Assembled UTBUS-2xl Figures Figure 1: UTBUS-2xl Under a Table Figure 2: UTBUS-2xl Under the Table Connection Bus Figure 3: Installing the Power Socket Figure 4: Securing the UTBUS-2xl Under the Table UTBUS-2xl – Contents... -
Page 4: Introduction
GROUP 9: Room Connectivity; GROUP 10: Accessories and Rack Adapters; GROUP 11: Sierra Video Products; GROUP 12: Digital Signage; GROUP 13: Audio; and GROUP 14: Collaboration. Thank you for purchasing the Kramer UTBUS-2xl, which is ideal for boardrooms, conference and training rooms! UTBUS-2xl - Introduction... -
Page 5: Getting Started
Avoid interference from neighboring electrical appliances that may adversely influence signal quality Position your Kramer UTBUS-2xl away from moisture, excessive sunlight and dust This equipment is to be used only inside a building. It may only be connected to other equipment that is installed inside a building. -
Page 6: Recycling Kramer Products
Kramer Electronics has made arrangements with the European Advanced Recycling Network (EARN) and will cover any costs of treatment, recycling and recovery of waste Kramer Electronics branded equipment on arrival at the EARN facility. For details of Kramer’s recycling arrangements in your particular country go to our recycling pages at www.kramerav.com/support/recycling/. -
Page 7: Overview
Overview The UTBUS-2xl is a furniture-mounted connection bus that is easily installed underneath a wooden table or podium top. The unit is sturdy, cost-effective, and easy to install. The UTBUS-2xl: Is modular in design, letting you install up to six wall plate inserts, according to your requirements ... -
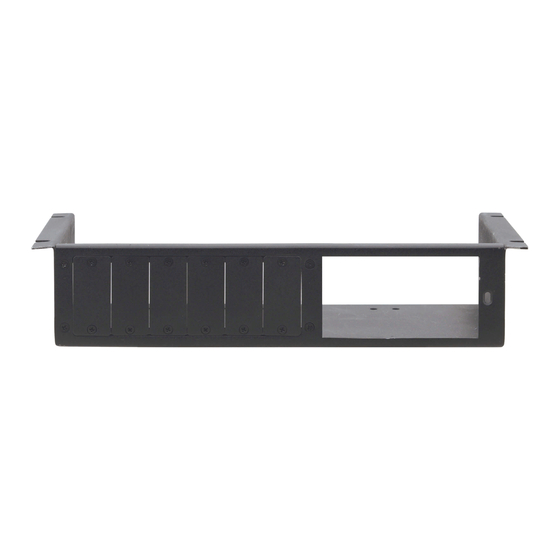
Page 8: Defining The Utbus-2Xl Enclosure
Insert self-locking ties through the holes to fix the pass- through cables to the inside walls of the UTBUS-2xl Rim Screw Holes (4) For fixing the UTBUS-2xl under the table (including two open screw holes) UTBUS-2xl - Defining the UTBUS-2xl Enclosure... -
Page 9: Power Socket Options
Power Socket Options UTBUS-2xl supports installing the following power socket assemblies. Socket Type Power Specs TS-2U (80-001899) Universal 100-240V AC, 50/60Hz, 5A Maximum 5A/2.5A per power outlet USA: TS-2US (80-001999) 100-125V AC, 50/60Hz, 5A Maximum 5A/2.5A per power outlet Belgium and France:... -
Page 10: Power Cord Options
C-AC/JP (125V) 91-000699 6ft/220V (Europe) C-AC/EU (220V) 91-000199 6ft/220V (Israel) C-AC/IL (220V) 91-000999 6ft/250V (UK) C-AC/UK (250V) 91-000299 6ft/250V (India) C-AC/IN (250V) 91-001099 6ft/250V/10A (China) C-AC/CN (250V) 91-001199 6ft/250V/10A (South Africa) C-AC/ZA (250V) 91-001299 UTBUS-2xl - Defining the UTBUS-2xl Enclosure... -
Page 11: Installing The Utbus-2Xl
Each blank plate can be removed and replaced with a Kramer passive wall plate insert or connector module for interfacing A/V type signals, if required. To install a wall plate insert or... -
Page 12: Installing The Cables
Section 4 .1). 2. Tighten the two screws (supplied with the power socket module). The power socket is now installed. Figure 3: Installing the Power Socket UTBUS-2xl - Installing the UTBUS-2xl... -
Page 13: Securing The Utbus-2Xl Enclosure To The Table
Securing the UTBUS-2xl Enclosure to the Table To install the UTBUS-2xl underneath the table, as illustrated in Figure 4, do the following: 1. Place the unit to the underside of the table and mark the correct location. 2. Insert the four M4.2X16 wood screws into the four rim screw holes and fix the UTBUS-2xl to the table. -
Page 14: Technical Specifications Of The Assembled Utbus-2Xl
250.2mm x 137.5mm x 65mm (9.85" x 5.41" x 2.56") W, D, H WEIGHT: 0.7kg (1.54lbs) approx. ACCESSORIES: Self-locking ties, wood screws OPTIONS: Passive wall plates and interfaces, power socket kits, power cord Specifications are subject to change without notice at www.kramerav.com UTBUS-2xl - Technical Specifications of the Assembled UTBUS-2xl... - Page 16 SAFETY WARNING Disconnect the unit from the power supply before opening and servicing For the latest information on our products and a list of Kramer distributors, visit our Web site where updates to this user manual may be found. We welcome your questions, comments, and feedback.
Need help?
Do you have a question about the UTBUS-2xl and is the answer not in the manual?
Questions and answers