Advertisement
Quick Links
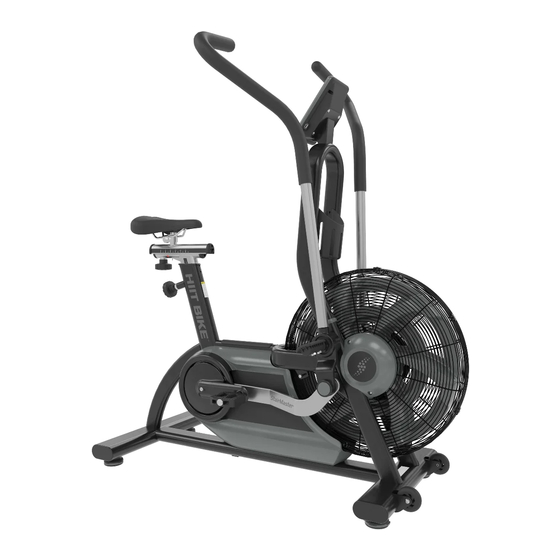
HIIT Bike
ASSEMBLY INSTRUCTIONS
STEP 1: Connect the RPM sensor lower cable to the upper
cable, slide the beauty ring onto the mast, then slide the mast
down onto the frame of the bike. NOTE: The other connection
port on the adapter cable is only used when using an AC wall
power adapter for the HIIT Console.
STEP 4: Finish installing the user left side handlebar
using a 35mm open-ended wrench to secure one (1)
piece of the M24 Axle Nut. Repeat this step for the user
right side handlebar.
Document # 620-8582 Rev. B
STEP 2: Use a 5mm allen key to secure the mast to the
frame using three (3) pieces each of the M8 x 16mm
screws and M8 washers. Repeat this step for the other
side of the mast
STEP 5: Slide the user left foot peg onto the bike, then
secure it using a 13mm socket and two (2) pieces each of
the M8 x 16mm hex head screws and M8 washers.
Repeat this step for the user right side foot peg.
For Installation assistance or missing parts, please call CORE Health & Fitness at 1(800) 503-1221
STEP 3: Slide the user left side handlebar onto the bike
then use a 6mm allen key to secure the handlebar to the
frame using one (1) piece each of the M8 x 20mm screw
and M8 Belleville washer. Cover with the supplied cap.
Repeat this step for the user right side handlebar.
.
STEP 6: Install the user left side pedal, then using a
14mm socket, torque the pedal bolt to 33-37 Lb-Ft (45-50
Nm). Repeat this step for the user right side pedal.
STEP 7: Slide the seat post sleeve onto the seat post
then loosen and pull the height adjustment pin while
sliding the seat post into the bike frame. Finally secure
the seat post sleeve using a #3 phillips screwdriver to
tighten two (2) pieces of the M4 x 8mm screws.
PAGE 1 OF 2
Advertisement

Related Manuals for Stairmaster HIIT Bike


Summary of Contents for Stairmaster HIIT Bike
-
Page 1: Assembly Instructions
HIIT Bike ASSEMBLY INSTRUCTIONS STEP 1: Connect the RPM sensor lower cable to the upper STEP 2: Use a 5mm allen key to secure the mast to the STEP 3: Slide the user left side handlebar onto the bike cable, slide the beauty ring onto the mast, then slide the mast... - Page 2 Use the down arrow to navigate to the 3rd page and press the clock button to change between the following: P1 “tread” - HIITMill and HIITMill X P2 “bic1” - HIIT Bike P3 “ergo” - HIIT UBE P4 "Step" - Not Used Currently LR14 1.5V...
Need help?
Do you have a question about the HIIT Bike and is the answer not in the manual?
Questions and answers