
Subscribe to Our Youtube Channel
Related Manuals for NIMO ETS 1700E


Summary of Contents for NIMO ETS 1700E
- Page 1 Installation and User Manual Drying Cabinet ETS 1700E/1900E ETS 1700 / 1900 Doc. No: 427000723 Keep this user manual in a safe place, so that it will always be on hand for future reference.
- Page 2 NIMO offers you all of these features. When you buy a NIMO product you can be sure that the inside is as good as the outside and that the ethics and morality that go into buil- ding this product are just as high as the quality and functionality you are getting.
-
Page 3: Table Of Contents
USING FOR THE FIRST TIME SAFE USE POSITIONING THE WASHING USES USER TIPS TECHNICAL SAFETY AIRFLOW FOR A GOOD ENVIRONMENT USING THE ETS 1700E / ETS 1900E DRYING CABINET PACKAGING MATERIAL CONTROL PANEL MANAGEMENT OF END-OF-LIFE DRYING CABINET DISPLAY DRYING PROGRAMME... -
Page 4: About This User Manual
ABOUT THIS USER MANUAL The contents of this user manual des- cribe the drying cabinet’s functions and how it should be used. The manual also includes instructions for installa- tion and maintenance. -
Page 5: Safe Use
SAFE USE This drying cabinet meets applicable safety requirements. Incorrect use may, however, lead to injuries and damage to property. This advice on safe use is intended to enable you to avoid incorrect use and to reduce the risk of unnecessary accidents, and should be read prior to installation and use of the drying cabinet. -
Page 6: For A Good Environment
FOR A GOOD ENVIRONMENT PACKAGING MATERIAL MANAGEMENT OF END-OF-LIFE DRYING CABINET The packaging that protects the dry- ing cabinet against damage in transit When the drying cabinet has reached has been chosen with concern for the the end of its life, it must be taken to environment in mind and is therefore a recycling centre for disposal. -
Page 7: Description Of The Drying Cabinet
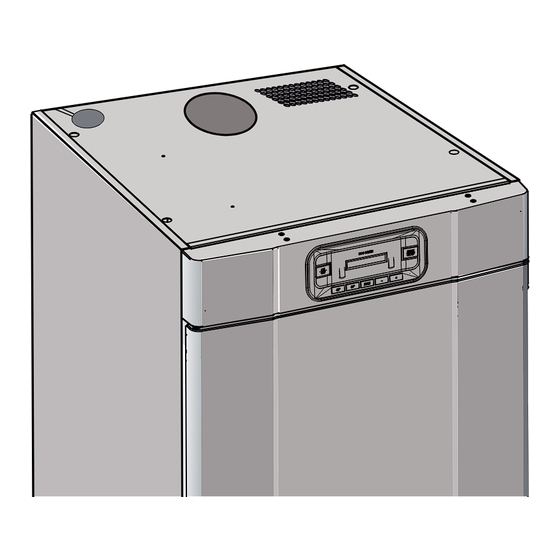
DESCRIPTION OF THE DRYING CABINET Air intake Moist air out Hole for connecting cable Control panel Three expandable hangers Door, can be changed to open from the left or the right Adjustable feet (4x) Figure shows the ETS 1700/1900 drying cabinet Service module The heating and fan components are combined in a removable... -
Page 8: Installation
INSTALLATION UNPACKING After unpacking, check that the goods are The drying cabinet should in good condition. Damage, faults and be handled carefully if it is any missing parts should be immediately only standing on its wooden pallet. RISK OF TIPPING reported to your dealer. -
Page 9: Fitting The Door Handle
INSTALLATION FITTING THE DOOR HANDLE Fit the door handle with the fixing screws supplied. REHANGING THE DOOR The door can be hung on the right or to the left. A LOWER HINGES ARE PRE-MOUNTED ON BOTH SIDES 1 Lay the drying cabinet on its back. 4 Undo the hinge pin from the top hinge (2) and place it on the opposite 2 Undo the hinge pin from the bottom... - Page 10 INSTALLATION B NO LOWER HINGE ON THE OPPOSITE SIDE Rehanging the door when the appli- Some models do not have a lower hinge ance is resting on its back mounted on both sides. In this case the existing hinges must be moved to the 1 Undo the hinge screws (3).
- Page 11 INSTALLATION Rehanging the door when the cabinet is fixed to the wall The door can also be rehung when the cabinet is already bolted to the wall and thus cannot be laid on its back. 1 Undo the lower hinge pin (1) from the bottom hinge and lift off the door.
-
Page 12: Positioning / Fixing The Cabinet
The drying cabinet should stand level on a flat surface and rest on all four feet. Figure shows the ETS 1700E/1900E Use the Allen wrench provided, and drying cabinet correct the position of all four adjustable feet through the holes in the base plate of the drying cabinet. -
Page 13: Exhaust / Supply Air
INSTALLATION EXHAUST / SUPPLY AIR When the drying cabinet is working, about 45 m³ of moist is are evacuated per hour. This air is taken from the room where the dryer is sited. Hence make sure air can enter the room to replace the moist air leaving. EXHAUST CONNECTION The drying cabinet should be connected to a standard exhaust air ventilation system. - Page 14 INSTALLATION 2. Permanently installed and connected to a mechanical exhaust air ventilation system When the drying cabinet is permanently The insert is not supplied. connected to the evacuation duct, the whole room is ventilated by way of the The air intake must not be blocked. drying cabinet.
-
Page 15: Electrical Connections
INSTALLATION ELECTRICAL CONNECTIONS The drying cabinet should be connec- If the power cable is damaged in any ted to a 230 V single-phase 50 - 60 Hz way, it must be replaced. Genuine re- grounded socket. placement power cables are available from your dealer. -
Page 16: Using For The First Time
USING FOR THE FIRST TIME Read these directions for CAUTION! Read the safety instruc- use before using the drying tions on page 5 before using the cabinet. cabinet for the first time. 1 Check that the cabinet is firmly se- cured to the wall. -
Page 17: Positioning The Washing
POSITIONING THE WASHING In the cabinet there are three sec- Remember not to hang knitted tions with hangers. Every section has a articles. These can be needlessly number of bars on which to hang the stretched when they are heavy with washing. -
Page 18: Using The Ets 1700E / Ets 1900E Drying Cabinet
USING THE ETS 1700E / ETS 1900E DRYING CABINET CONTROL PANEL ECO DRYER START MAN 40° 2:30 STOPP 40° 60° Main power switch Automatic programme 60° Main power on indicator - ON Manual time control - Step function Display Reduces standard time for time... -
Page 19: Drying Programme
USING THE ETS 1700E / ETS 1900E DRYING CABINET DRYING PROGRAMME The drying cabinet is equipped with two automatic programmes: AUT 40° AUT 60° In addition, the drying cabinet has four time-controlled programmes: MAN 30° MAN 40°... - Page 20 USING THE ETS 1700E / ETS 1900E DRYING CABINET Door open If the door is open when the drying programme is started and the START/STOP button (4) is activated, the display shows ”CLOSE DOOR”. Close the door and the selected drying programme will start.
-
Page 21: Breakdowns
USING THE ETS 1700E / ETS 1900E DRYING CABINET BREAKDOWNS Protection against overheating The drying cabinet is equipped with an overheating protection device which trips if the temperature in the cabinet becomes too high. When the protection device trips, the power supply to the drying cabinet main power switch (1) is interrupted and the green indicator light (2) goes out. -
Page 22: Using The Ets 1700 / 1900 Drying Cabinet
USING THE ETS 1700 / 1900 DRYING CABINET Temperature Drying time SETTINGS The cabinet is provided with two selec- If a quick drying result is needed, turn the tor knobs for setting the positions for temperature selector knob to its maxi- mum and set the timer to two hours. -
Page 23: Care
This information can be found on the data plate located inside the cabinet. ETS 1700E/1900E Name of the drying cabinet Article number Serial number (12 digits) Follow NIMO instructions when car- rying out repairs or replacing parts. -
Page 24: Technical Data
TECHNICAL DATA ETS 1700E / 1900E Capacity: approx. 4,0 kg washing (cotton) M A N U FAC TO R I N G Dewatering capacity: 4/10/17 g/min. STANDARD See the identifica- Electrical connections: single-phase 230 V, 50-60 Hz tion plate Motor:... -
Page 25: Technical Data
TECHNICAL DATA ETS 1700 / 1900 Capacity: approx. 4,0 kg washing (cotton) Dewatering capacity: 17 g/min. M A N U FAC TO R I N G STANDARD Electrical connections: single-phase 230 V, 50-60 Hz See the identifica- Motor: 35 W tion plate Heating element: 1500 W... -
Page 26: Parameter Adjustment Ets 1700E / 1900E
PARAMETER ADJUSTMENT ETS 1700E / 1900E INTRODUCTION These are the two main parameters The drying cabinet has two automatic to be adjusted to optimise the drying programmes, one for 40 °C and one process of the automatic programme. for 60 °C. -
Page 27: Parameter Adjustment
PARAMETER ADJUSTMENT ETS 1700E / 1900E PARAMETER ADJUSTMENT NOTE: How to restore the parameters to the factory settings: Use the control panel to access the pa- 1 Go to parameter display mode as rameter list of the drying cabinet. The parameter list appears one line at a time explained at steps 1 and 2 above.
Need help?
Do you have a question about the ETS 1700E and is the answer not in the manual?
Questions and answers