
Subscribe to Our Youtube Channel
Related Manuals for NIMO ECO Dryer 2.0 HP


Summary of Contents for NIMO ECO Dryer 2.0 HP
- Page 1 Installation and User Manual Drying Cabinet ECO Dryer 2.0 HP Art. No: 427000851...
- Page 2 NIMO offers you all these features. When you buy a NIMO product you can be sure that the inside is just as good as the outside and that the ethics and morality that go into building this product are just as high as the quality and function you are getting.
-
Page 3: Table Of Contents
HOW TO DEAL WITH MINOR BUTTONS FAULTS YOURSELF START-UP TECHNICAL DATA HOW TO PLACE THE WASHING USER TIPS Manufacturer: NIMO-VERKEN AB BOX124 S-548 22 HOVA SWEDEN PH +46 (0) 506 488 00 FAX +46 (0) 506 488 10 nimo@nimoverken.com www.nimoverken.com... -
Page 4: This User Manual
THIS USER MANUAL The contents of this user manual describe NOTE Keep the user the drying cabinet’s functions and manual so that it is always how it should be used. It also includes available for future use. instructions for installation and main- tenance. -
Page 5: Safe Operation
SAFE OPERATION This advice on safe operation has been compiled so that you can avoid incorrect use and unnecessary risks of accidents and should be read before the drying cabinet is installed and used. CAUTION: This equipment is only intended to be used to dry textiles washed in water. -
Page 6: Description Of The Cabinet
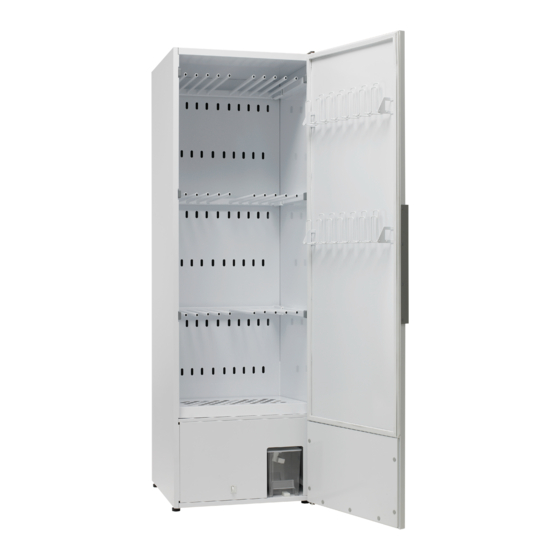
DESCRIPTION OF THE CABINET The ECO Dryer 2.0 HP drying cabinet No exhaust air connection is required. works according to the principle of the The moisture condenses during the heat pump, with a dehumidifier unit process, and the water that is formed is instead of a conventional hot-air unit. -
Page 7: Air Flow In The Cabinet
AIR FLOW IN THE CABINET Air inflow in 6 rows of holes Cleaning filter beneath the shoe rack Return air after dehumidification. Goes into a duct on the back of the drying cabinet. Dehumidifier unit NOTE Make sure that shoes and similar items placed in the cabinet do not block the air flow. -
Page 8: Condensation Water
CONDENSATION WATER Condensation water can be discharged in two ways, either by being collected in a detachable water tank or by being conveyed through a hose to the floor drain. DETACHABLE WATER TANK The water tank is dimensioned to be easily adequate for a complete wash. -
Page 9: Connection To Floor Drain
CONDENSATION WATER CONNECTION TO FLOOR DRAIN The floor drain is supplied from the factory with a hose to the de- tachable water tank. To change to discharging condensation to a floor drain, proceed as follows: 1 Carefully pull the upper part of the hose out around 2-3 cm. -
Page 10: Installation
INSTALLATION UNPACKING The drying cabinet must After unpacking, check that the product be handled carefully if is fee of faults. Damage, defects and it is only standing on its any missing parts must be immediately wooden pallet. reported to the dealer. RISK OF TIPPING OVER. -
Page 11: Reversing The Door Swing Opening
INSTALLATION REVERSING THE DOOR SWING OPENING The cabinet is supplied from the factory If this is required, contact with the door hung on the right. The the manufacturer or the door can be changed to being hung on manufacturer’s service the left. -
Page 12: Electrical Connections
INSTALLATION ELECTRICAL CONNECTIONS The drying cabinet should be connec- ted to a 220 - 240V single-phase 50 Hz grounded socket. The drying cabinet is supplied ready for connection with a cable with a groun- ded plug. Fuse 10 A. The drying cabinet should be connected using the plug supplied to a grounded wall socket, and should not be permanently connected. -
Page 13: Control Panel
CONTROL PANEL HELLO ECO DRYER 2.0 BUTTONS The user interface has 4 touch buttons. ON/OFF Start/Stop, starts and stops the programme. OK, confirms selection and moves on to next menu level. Increase the value or step in one direction through the programmes. Reduce the value or step in one direction through the programmes. -
Page 14: Start-Up
START-UP Read this user manual WARNING Read the safety instructions before using the drying on page 5 before using the drying cabinet for the first time. cabinet. After the cabinet has been installed and connected, you should wait at least three hours before using it for the first time. -
Page 15: How To Place The Washing
HOW TO PLACE THE WASHING USER TIPS The cabinet contains three sections with hangers. Each section has a number of bars on which to hang the washing. CAUTION Do not dry garments or similar items that have been treated with Hang the articles in the drying cabinet petrol or other volatile and flammable according to how much space they re-... -
Page 16: Drying Programme
DRYING PROGRAMME The drying cabinet is equipped with two automatic programmes: NORMAL DRY EXTRA DRY The automatic programmes switch the drying process off automatically when the items of clothing are dry. SELECTION OF DRYING PROGRAMME NORMAL DRY – Used for drying of garments of normal thickness EXTRA DRY –... -
Page 17: Drying Function
DRYING FUNCTION START THE DRYING PROGRAMME LAST USED DRYING PROGRAMME Press the ON/OFF switch to the ON position – indicated by the display lighting up and showing the most recently run programme. After a few seconds the display shows the most recently run programme. If this is the programme you want, press START/STOP. -
Page 18: Stop
DRYING FUNCTION PROGRAMME END When the cooling period has ended, the drying process is finished, and the display “END” shows the text (flashing). When the START/STOP button is pressed after the door is opened, the current programme is stopped and the display shows the most recently used programme. NOTE In waiting mode the display goes off after 15 min and lights up again when any of the buttons on the control panel is activated or the door is opened. -
Page 19: Automatic Programmes - Parameter Setting
AUTOMATIC PROGRAMMES – PARAMETER SETTING There are ways of optimising the drying cabinet’s two automatic programmes in relation to prevailing installation conditions. This is done by adjusting the parameter values for the automatic programme con- cerned on the control panel. This is only to be done if you find that: The washing is not dried sufficiently The washing is over-dried –... -
Page 20: Parameter Adjustment
PARAMETER ADJUSTMENT INTRODUCTION The drying cabinet is equipped with two automatic programmes, Normal and Extra Dry. The automatic programmes end automatically when the washing is dry. To decide when the washing is dry, a measured value is compared with a factory-set parameter, parameter P 2072 for automatic programme normal dry and para- meter P 2071 for automatic programme extra dry. - Page 21 PARAMETER ADJUSTMENT PROCEDURE: 1 Make sure that the main ON/OFF switch of the drying cabinet is in the OFF position. The display is not lit. 2 Hold down the UP and DOWN buttons and press the main ON/OFF switch to the “ON”...
-
Page 22: Care
CARE CLEANING REPLACEMENT PARTS Follow the NIMO instructions in repair NOTE High-pressure cleaning should and replacement of parts. not be used! If the connecting cable for any reason is damaged, it must be replaced. A ge- Cleaning and maintenance should... -
Page 23: How To Deal With Minor Faults Yourself
CARE HOW TO DEAL WITH MINOR FAULTS YOURSELF Questions What you can do The drying cabinet does 1. Check that the mains lead is connected to a power not work socket 2. Check that no fuse has blown 3. Have you pressed the start button? 4. - Page 24 CARE HOW TO DEAL WITH MINOR FAULTS YOURSELF (cont.) Questions What you can do The washing does not 1. Check that the correct programme has been selected become dry for the type of washing 2. Check that too much washing has not been hung up 3.
-
Page 25: Technical Data
TECHNICAL DATA Capacity: approx. 4,0 kg washing (cotton) Dewatering capacity: 22 g/min. Electrical connections: single-phase 220 - 240 V, 50 Hz, 10A Output: 900 W Capacity of main fan: 945 m³/h (free blow) Capacity of secondary fan: 160 m³/h (free blow) Hanging length: 16 metres Dimensions:...
Need help?
Do you have a question about the ECO Dryer 2.0 HP and is the answer not in the manual?
Questions and answers