
Related Manuals for LAVAZZA LB2317


Summary of Contents for LAVAZZA LB2317
- Page 1 Automatic Machine for Espresso Coffee and Hot Beverages WARNING: Read these instructions carefully before using the machine.
-
Page 2: Main Parts
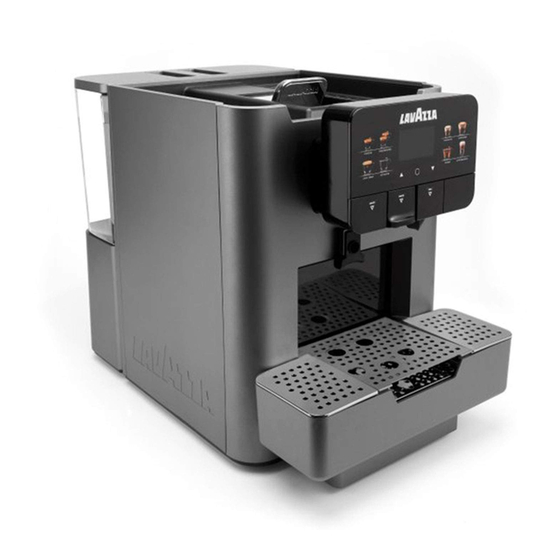
English MAIN PARTS Water tank lid Cup holder (small cups) Water tank Cup holder (mugs) Used capsule drawer Drip tray Power cord Power button Capsule loading tray Chassis plug Cup holder surface USB port Touch control panel Ventilation fan Hot water dispensing spout Display Moving coffee dispensing spout Double espresso dispensing spout... - Page 3 English SAFETY INSTRUCTIONS Never allow water to The machine may be used come into contact by children older than 8 and with upwards or by persons with electrical parts of the reduced physical, mental or machine: danger sensory abilities or lacking short circuit! sufficient experience and/or...
- Page 4 English Power Supply Do not use the power cord to carry or pull the machine. Do not pull out The machine must be the plug by the power connected to the power cord or touch it with wet supply service hands or feet.
- Page 5 English Fire Safety Precautions Avoid placing open flames and/or incandescent In case of fire, use carbon objects near the machine dioxide (CO2) so as not to damage or extinguishers. Do not use melt the machine housing. water powder extinguishers. Do not use in places Suitable Location where...
- Page 6 English Cleaning Using Milk Before cleaning Milk must be used and machine, the power button stored in accordance with must be switched to OFF the instructions given on (0) and the plug must be the manufacturer's original removed from the power packaging.
- Page 7 English Milk Dosage Repairs / Maintenance The machine has a default dose set-up for all milk In case of breakdown, defect beverages. However, the or a suspected fault resulting dose of beverage in the from a fall, immediately cup may vary according to remove the plug from the the type of milk used.
-
Page 8: Table Of Contents
TECHNICIAN 12 STORAGE - DISPOSAL 2.2 DESCRIPTION AND INTENDED USE 12.1 LOCATION CHANGE 2.3 APPLIANCE IDENTIFICATION 12.2 INACTIVITY AND STORAGE 2.4 TECHNICAL SERVICE LAVAZZA 13 INSTRUCTIONS FOR END OF 2.5 TECHNICAL SPECIFICATIONS OPERATIONAL LIFE DISPOSAL 3 SAFETY 3.1 PREAMBLE 3.2 GENERAL SAFETY INSTRUCTIONS 3.3 OPERATOR REQUIREMENTS... -
Page 9: Introduction To The Manual
English INTRODUCTION TO THE MANUAL This product has been manufactured by SaGa Coffee S.p.A. Preamble and sold under its own responsibility. SaGa Coffee S.p.A. is the guarantor of the product. Saeco is a registered trademark of Koninklijke Philips N.V. and its use is licensed This publication by Koninklijke Philips N.V. -
Page 10: Icons Used
English Icons Used Various kinds of warnings are contained in this manual to highlight the different hazard or competence levels. Each icon is followed by a message suggesting operating and behaviour procedures and providing useful information for the correct operation of the machine. Warning It is used to highlight danger situations for the persons in charge of using, refilling and servicing the machine. -
Page 11: Information About The Machine
Manufacturer and performed carrying out any operation on the machine. by unauthorised personnel; • using capsules other than compatible LAVAZZA BLUE capsules. • use of the machine outdoors. In such cases, the user shall bear the costs of repair. -
Page 12: Appliance Identification
English Appliance Identification Technical Service Lavazza The appliance is identified by the model name and serial In the event of a failure or malfunction that can not be number shown on the special plate. solved, please contact: Technical Service Lavazza... -
Page 13: Technical Specifications
Power cord length approx. 1,200 mm Capacity Water tank 4 litres Used capsule drawer 25 capsules Capsule Type Lavazza BLUE Control panel Front panel A-weighted sound pressure level less than 70 dB Pump pressure Max. 1.9 MPA (19.0 bar) Operating conditions Minimum temperature: above 2°C... -
Page 14: Safety
English SAFETY It is mandatory to: Preamble • check conformity of the power supply; The manufacturer acknowledged the following standards in • use original spare parts; the design and certification stages: • carefully read the instructions contained in this manual and in the attached documents;... -
Page 15: Operator Requirements
English case failure Maintenance technician malfunctioning, please refer The maintenance technician is the only person authorised to service the machine, start the programming procedures and only qualified perform the adjustment, set up and maintenance operations. personnel of the technical Access to the internal area service. -
Page 16: Handling And Storage
English HANDLING AND STORAGE Storage operations described in this chapter The machine is packed in cardboard and expanded polystyrene packaging. must performed If the appliance is not immediately installed, it shall be kept exclusively by the service in a sheltered place according to the following instructions: provider or a specialised •... -
Page 17: Installation
English INSTALLATION Cautions operations described in this chapter The appliance cannot be must performed installed in external areas. exclusively by the service Avoid placing it in areas provider or a specialised where the temperature is technician, shall lower than 2°C or higher organise all the operating than 32°C... -
Page 18: Unpacking And Positioning
English supporting surface The presence of magnetic must be adequate to bear fields proximity the machine weight and electrical machines which clean. generate interference could cause the electronic Access to the machine and controls of the machine to the plug should be kept malfunction. - Page 19 English Power cord: to connect the machine to the mains. List of Optional Accessories (not included) Water hardness test: quick test to determine the actual hardness of the water used to prepare beverages; this test is of fundamental importance to set the water hardness in the machine.
-
Page 20: Connection To The Electric Network
English Connection to the Electric Network This operation must only be performed by specialised technical personnel or by the service provider. Maintenance Technician, charge of the appliance's installation, shall make sure that: • the power supply system complies with the safety instructions in force;... -
Page 21: Description Of Controls
English DESCRIPTION OF CONTROLS Power button "Double Espresso" button "Espresso" button "Caffè Crema" button It is located in the lower left part in the rear of the "Hot Water" button machine. "Up" button If set to the "I" position the machine turns on (electrical "MENU/OK"... - Page 22 English "Cappuccino" button When this button is pressed, a cappuccino is brewed. Press it twice consecutively - within three seconds after the first time you pressed it - to brew a large cappuccino. "Latte Macchiato" button When this button is pressed, a Latte Macchiato is brewed. Press it twice consecutively - within three seconds after the first time you pressed it - to dispense a frothed milk.
-
Page 23: Supply And Start Up
English SUPPLY AND START UP Remove the tank; lift it using the inside handle. Filling the Water Tank Before using the machine for the first time, wash the water tank carefully. Fill the water tank with fresh drinking water only. Hot or carbonated water, as well other liquids,... -
Page 24: Measuring And Adjusting Water Hardness
English Scroll the menu until you reach the "Settings" option. Measuring and Adjusting Water Hardness Measuring water hardness is very important in order to correctly manage the anti-scale filter and the frequency with which the machine must be descaled. Immerse the water hardness test strip (not included) in water for 1 second. - Page 25 English Measuring water hardness We recommend to buy a is very important in order new filter when its capacity to correctly manage the drops to 10% and the filter anti-scale filter and the icon starts blinking slowly. frequency with which the In this way you can replace machine must be descaled.
- Page 26 English Select "YES" and press the "OK" button. The following screen is displayed: Press the "OK" button and scroll until you reach the "AquaClean" filter. The display shows the number of AquaClean filters previously installed, from 0 to 8. Remove the tank from the machine and empty it. Remove the small white filter from the tank and store it in a dry place sheltered from dust.
- Page 27 English After emptying it put the drip tray back into place. The Pour 250 ml of descaling solution and 750 ml of water into following screen is displayed: the water tank. The following screen is displayed: Check that the Cappuccinatore is correctly positioned. The first descaling phase starts.
- Page 28 English Check that the Cappuccinatore is correctly positioned. The following screen is displayed: Press the "OK" button The following screen is displayed: In case machine descaling is not necessary or when replacing one of the 8 filters, the activation procedure starts from this point.
-
Page 29: Hot Water Dispensing Spout
English Fill the water tank again up to the MAX level with fresh Replace the AquaClean filter drinking water. The following screen is displayed: at least each 3 months, even if the machine is yet to inform you that it needs to be replaced. -
Page 30: Intenza+" Water Filter
English Once the button is pressed the following screen is displayed: Remove the "INTENZA+" water filter from its packaging. The filter should be set according to the measurements performed to set water hardness. Use the water hardness test strip (not provided with the machine). - Page 31 English Remove the tank from the machine and empty it. Press the "Down" button to select "ON" and press the Remove the small white filter from the tank and store it in "OK" button to confirm. The following screen is displayed: a dry place sheltered from dust.
-
Page 32: Adjusting The Coffee Dispensing Spout
English Place a container under the hot water dispensing spout. It is important to reinstall the small The following screen is displayed: white filter that was previously removed while installing the "INTENZA+" water filter. Adjusting the Coffee Dispensing Spout Most of the cups available on the market can be used with Press the "OK"... -
Page 33: Turning On/Off The Machine
English Manually move the dispensing spout up or down to adjust its height. Lift or lower the central grill. The recommended positions are: • When using small cups. Turning on/off the Machine The machine can be turned on/off by pressing the button located to the rear of the machine. - Page 34 English 7.7.1 At First Start-up 7.7.2 After a Period of Inactivity Press the power button on the back of the machine to Empty the water tank, wash and rinse it and fill it with turn it on. The control panel display shows the wording fresh water (see section "Filling the Water Tank").
-
Page 35: Washing The Parts Coming Into Contact With Food
English When the hot water dispensing procedure has been completed, empty the container. Fill the water tank again up to the MAX level. The machine is now ready for use. Washing the Parts coming into Contact with Food Rinse all the parts coming into contact with food. •... -
Page 36: Programming Menu
English PROGRAMMING MENU Button Description in This chapter contains Programming Mode instructions on how to set Use the buttons described below to scroll the appliance change menus. programming parameters of the appliance. Therefore it is necessary to carefully read it and to understand exact sequence... - Page 37 The menus should be by entering a PUK code. PASSWORD-protected. You have to request the PUK code to the Lavazza Technical Service, who will The PASSWORD will not guide you through the be requested if set on the procedure.
- Page 38 English 8.2.3 Description of Messages in the User Menu MENU ITEM Description CLEAN BREWING UNIT This function allows the user to wash the brew group using hot water CLEAN CAPPUCCINATORE This function allows the user to start the Cappuccinatore washing cycle This function allows to wash the Cappuccinatore using hot water passing through the frothing device Cappuccinatore Light Clean system...
-
Page 39: Maintenance Programming
PASSWORD-protected. by entering a PUK code. You have to request the The PASSWORD will not PUK code to the Lavazza be requested if set on the Technical Service, who will default value (0000). It guide you through the should be changed upon procedure. - Page 40 English 8.3.2 Structure of the Maintenance Back to Main Screen Menu This menu allows you to manage certain machine operation parameters. The main options of the maintenance menu are: MENU ITEM Statistics Product Counters Product Quantities Descale counters Warning Active Descales Executed Tot Desc Refused Last Desc Refused...
- Page 41 English 8.3.3 Description of Messages in the Maintenance Menu MENU ITEM Description Statistics This function allows the user to view: - Product Counters - Product Quantities - Descale counters - Rinsing Counters Through this function the user can view the number of products brewed by the machine, distinguished Product Counters according to the beverage type Product Quantities...
- Page 42 English MENU ITEM Description This function allows you to adjust the capsule product temperature (excluded instant Coffee temperature products): - MAX - MED - MIN Press the OK button on the EXIT option to go back to the top level Through this function you can enable the request for the Cappuccinatore cleaning cycle at the end of each milk Request clean Cappuccinatore...
- Page 43 English MENU ITEM Description This function allows you to manage installation and maintenance of the Brita filter. Brita Filter Available options depend on the presence of an already installed filter. In case the Brita or Aquaclean filters are installed: - OFF: keeps the Brita filter status unchanged - ON: allows to start the activation procedure of the Brita filter and goes to the "Activate Brita...
- Page 44 English MENU ITEM Description This function allows you to manage installation and maintenance of the AquaClean filter. AquaClean Filter Available options depend on the presence of an already installed filter. In case a Brita filter is already active, the screen "Turn off and Remove Brita to Enable AquaClean"...
- Page 45 English MENU ITEM Description This function allows to write the parameters for machine configuration, the counters and Save to USB the error list on a USB key. - Save configuration - Save statistics Press the OK button on the EXIT option to go back to the top level This function allows to save the machine configuration parameters on a USB.
-
Page 46: Technical Programming
PASSWORD forgotten, you can reset it The menus should be by entering a PUK code. PASSWORD-protected. You have to request the PUK code to the Lavazza After this change, Technical Service, who will password must be entered guide you through the... - Page 47 English 8.4.2 Structure of the Technical Back to Main Screen Menu This menu allows you to manage certain machine operation parameters. The main items of the programming menu are: MENU ITEM Machine Data Memo Doses Set doses Extended range Settings Recipes management Second recipes One Touch Recipes...
- Page 48 English 8.4.3 Description of Messages in the Technical Menu MENU ITEM Description Machine Data Through this function you can view: - Machine Model - Voltage and Network Frequency - Version of the Firmware installed on the CPU Press the OK button on the EXIT option to go back to the top level This feature allows you to access the dose setting functions for single product and the function Memo Doses for range extension of the dose that can be stored for storing coffee and milk products.
- Page 49 English MENU ITEM Description This function allows the user to individually enable or disable all recipes indicated with an One Touch Recipes icon on the keypad. By pressing the OK button the enabled recipes are signalled by the corresponding LED light turning on on the keypad.
- Page 50 English MENU ITEM Description Stop Brewing Out of This function allows the user to adjust machine operation when the credits have been Credits used up. - OFF: the user can dispense products even when there are no more credits - ON: the user cannot dispense products if there are no more credits.
- Page 51 English MENU ITEM Description This function allows you to adjust the contrast of the display to better view the Display contrast messages. The user, by means of the navigation arrows, can change the display contrast settings. The modification of the contrast level is shown by the bar. The user must press the OK button to confirm the choice and go back to the menu top level.
- Page 52 English MENU ITEM Description This function allows you to adjust the time after which the machine must go into the "stand-by" mode. In case Stand-by Time it is not used: - NO STANDBY: the machine is always active - 30 MIN: the machine goes into the standby mode after 30 minutes of inactivity - 60 MIN: the machine goes into the standby mode after 60 minutes of inactivity...
- Page 53 English MENU ITEM Description This function allows to set the 4-digit code to access the maintenance menu The user must set the desired number, increasing or decreasing it by means of the navigation buttons. By pressing the OK button the cursor under the digit is moved towards right. By pressing the OK button, after the fourth digit you access the screen "Confirm Password".
- Page 54 English MENU ITEM Description By means of this option the user can select two different modes to download the firmware: Firmware Update - Reboot and Update from SerProg - Reboot and Update from USB NOTE: for more detailed information on these options, please refer to the specific manuals Reboot and Update from By means of this option the user can download the firmware using the SerProgr SAECO SerProg...
- Page 55 English Press the "Down" or "Up" button to select the option 8.4.4 Password setting "Set". Press the "OK" button to confirm and access the password programming. The following screen is displayed: The PASSWORD must be set by the service provider in order to prevent access by unauthorised personnel who could change the machine settings and cause malfunctions.
- Page 56 English Repeat the steps until the desired number of credits has been entered. Once the 8.4.5 Setting Credits last number has been inserted the following screen is displayed: Credits can be set to control sales. To set the credits, proceed as follows: Switch to machine programming mode as described in section "Access to the Technical Menu".
-
Page 57: Operation And Use
English OPERATION AND USE Warm-up and Rinsing The use by children older Upon start-up, the machine activates the warm-up phase than 8 years or by persons to perform a cleaning cycle. The display will show: with reduced physical, mental or sensory abilities or with lack of experience skills allowed,... -
Page 58: Loading Capsules
LAVAZZA BLUE capsules. Capsules other than compatible LAVAZZA BLUE capsules, coffee beans, Do not force the tray ground and/or freeze-dried further than its limit. coffee should not be used. The capsules supplied for Pick up a single capsule and insert it into its seat. -
Page 59: Using The Suction Tube
Do not insert fingers or any other object other than Lavazza BLUE capsule into the tray. The capsule is now inserted, and the user may select the At this point the suction tube is in the non-use position. -
Page 60: Brewing A Single Coffee/Product
English To suck the milk from a container, remove the tube from Brewing a Single the open slot of the clip and insert it into the container. Coffee/Product Before brewing the coffee/product, ensure that: • the machine is ready for use; •... - Page 61 English The machine checks whether a capsule is inserted by Brewing a Long Espresso detecting the opening and closing of the capsule tray. In To brew a long espresso, we recommend using the moving case no capsule is inserted, a display message will prompt coffee dispensing spout in the low position (double spout) the user to insert one.
- Page 62 English Brewing a Coffee with a Dash of Milk The display shows the brewing stage. Danger burning! Dispensing preceded by small jets of hot water. Insert the suction tube into the milk container. Product brewing stops automatically when the preset level is reached.
- Page 63 English Brewing a Large Cappuccino For hygienic reasons, make By pressing twice the "Cappuccino" button you can brew a larger cappuccino. sure that the outer surface of the suction tube is clean. Press the "Cappuccino" button. The machine automatically brews the beverage. If the option "Request Clean Cappuccinatore"...
- Page 64 English Press the "Latte Macchiato" button. The machine Brewing Frothed Milk automatically brews the beverage. By pressing twice the "Latte Macchiato" button you can brew a frothed milk. If the option "Request Clean Cappuccinatore" in the maintenance menu has been set to "ON", the display shows the wording "Quick Clean? YES - NONE"...
-
Page 65: Brewing A Double Espresso
English The display shows the brewing stage. Load a double dose capsule as described in section "Loading Capsules". Press the "Double Espresso" button. The machine automatically brews two cups of coffee. Product brewing stops automatically when the preset level is reached. When brewing has been completed, the display will show: The display shows the brewing stage. -
Page 66: Dispensing Hot Water
English The display will show: Dispensing Hot Water Danger burning! Dispensing preceded by small jets of hot water and steam. The hot water dispensing Product brewing stops automatically when the preset level is reached. The user can stop product brewing once the spout reach high... - Page 67 English In order to brew coffee, the capsule drawer must be Lift the capsule drawer. emptied of used capsules. Remove the drip tray and the capsule drawer. Empty the capsule drawer and the drip tray. When removing the capsule drawer the machine will inform the user that the alarm will be reset within 5 The capsule drawer also seconds.
-
Page 68: Drip Tray
English Before reinserting capsule drawer into the machine, ensure that it is correctly placed and that grill properly arranged. If the drip tray is inserted without the capsule drawer the machine will not brew products. After emptying, insert the capsule drawer. The display will show: The machine is now ready to brew coffee. -
Page 69: Cleaning And Maintenance
English CLEANING AND MAINTENANCE 10.1 General Notes for Correct Before performing Operation maintenance and/or Non-removable cleaning operation, unplug components the power cord. machine itself must be cleaned, when differently specified, only The Manufacturer is not by using cold or lukewarm liable damage water, with a non-abrasive... -
Page 70: Cleaning And Scheduled Maintenance
English 10.2 Cleaning and Scheduled Do not clean the electric Maintenance parts with cloths All parts requiring cleaning and/or with degreasing are easily accessible, so no detergents. Remove any tools are needed. dust residues with a jet of dry compressed air or with an antistatic cloth. -
Page 71: Maintenance
English 10.2.1 Maintenance Schedule 10.2.2 Cleaning the Drip Tray and the Capsule Drawer Operation to be carried out The capsule drawer is to be emptied and cleaned Emptying and cleaning the capsule drawer. yes yes - whenever indicated by the machine. However, it is recommended to empty it daily. - Page 72 English 10.2.4 Cleaning the Water Tank 10.2.6 Double espresso spout cleaning Remove the lid from the water tank. Clean the double espresso spout using the brush as indicated in the image. 10.2.7 Cleaning the Cappuccinatore (After Each Use) Remove the tank; lift it using the inside handle. Failure clean Cappuccinatore after use...
- Page 73 English After each milk dispensing, the display shows the following screen for a few seconds. Remove the container. In case you do not want to perform the rinse cycle, select Proceed as follows to perform the rinse cycle: "NONE" using the arrow key. Press the "OK" button Select "YES"...
- Page 74 English Press "Down" button select "CLEAN The machine dispenses a quantity of water sufficient to CAPPUCCINATORE" and press the "OK" button to rinse the milk circuit. The following screens are displayed: confirm. Select the option "CAPPUCCINATORE LIGHT CLEAN" and confirm with the "OK" button. In this case, the washing cycle is performed with hot water only and the suction tube is not used.
- Page 75 English Make sure that the Cappuccinatore complete with all its The following screen is displayed: parts is correctly inserted. Pour a solution bag into a container and let it dissolve in fresh water (refer to the water quantity indicated by the manufacturer). Press "Down"...
- Page 76 English Lower the coffee dispensing spout. Remove the suction tube from the Cappuccinatore. Remove the fitting from the milk suction hose. Remove the Cappuccinatore cover from the machine. Clean the inside of the milk suction hose using the scraper, as shown in the figure. Push the button on the left side and remove the Cappuccinatore.
- Page 77 English Remove the ring from the Cappuccinatore. Rotate the Cappuccinatore cover and remove it from the Cappuccinatore body. Remove the valve from the Cappuccinatore. Wash the parts under running water. Remove possible deposits/milk crusts using the brush as indicated in the image.
- Page 78 English After washing, reassemble the parts following the same procedure used for disassembly, but in reverse order. Take particular care in reassembling the ring on cappuccinatore, pushing the area of the suction tube connector/milk exit, shown in the image. After washing reassembling Cappuccinatore, it can be...
- Page 79 English After properly Never use vinegar as a disassembling it, the milk descaling solution. Cappuccinatore washed in the dishwasher Turn on the machine by pressing the ON/OFF button. no more than once in a Wait for the machine to complete the rinse and warm-up process.
- Page 80 English Remove the tank from the machine and empty it. Check that the Cappuccinatore is correctly positioned. Press the "OK" button The following screen is displayed: Remove the anti-scale filter. The following screen is displayed: Place a large container under the dispensing spouts (hot water, coffee and cappuccino).
- Page 81 English The first descaling phase starts. When the solution in the Place a large container under the dispensing spouts (hot tank is finished, the machine requests to empty and rinse water, coffee and cappuccino). Press the "OK" button The the tank with fresh drinking water. following screen is displayed: Rinse the water tank thoroughly and fill it with fresh Once the operation is complete the following screen is...
-
Page 82: Troubleshooting
English TROUBLESHOOTING 11.1 Warning signals This chapter describes all the warning messages that the machine may display to the user and the actions that can and/or must be performed by the user. Warning Signals How to reset the message The machine is starting up. Machine in Stand-by. - Page 83 English Warning Signals How to reset the message The machine is out of credits. To brew products, contact the service provider to restore the credits. The machine reminds that after a few cycles it will be necessary to perform a descaling cycle. The machine requires a descaling cycle.
- Page 84 English Warning Signals How to reset the message The selected operation requires milk dispensing. Ensure that the Cappuccinatore is correctly and fully assembled. Insert the Cappuccinatore in the machine as specified in the manual. Turn off the machine. Turn it back on after 30 seconds. Try this 2 or 3 times.
-
Page 85: Problems - Causes - Solutions
English 11.2 Problems - Causes - Solutions The following table indicates the possible error or alarm cause which may lead to a partial or total shutdown of the appliance. Error code Description Error 3: COD_BU_CANT_REACH_WORK_FAILURE Indicates that the brew group could not be set to the Work position for capsule closing Error 4: COD_BU_CANT_REACH_HOME_FAILURE Indicates that the brew group could not be released from the Work position... -
Page 86: Storage - Disposal
English STORAGE - DISPOSAL 12.1 Location Change Should the machine be placed in a different location, it is necessary to: • disconnect the appliance from the supply network; • carry out the general cleaning of the appliance as indicated in chapter "Cleaning and Maintenance"; •... -
Page 87: Instructions For End Of Operational Life Disposal
English INSTRUCTIONS FOR END OF OPERATIONAL LIFE DISPOSAL INFORMATION FOR THE USER in compliance with art. 13 of the Italian Legislative Decree dated 25 July 2005, no. 151 "Implementation of the directives 2002/95/EC, 2002/96/EC and 2003/108/EC on the restriction of the use of certain hazardous substances in electrical and electronic equipment, as well as waste disposal".
Need help?
Do you have a question about the LB2317 and is the answer not in the manual?
Questions and answers
I plug in and power on the machine and it says system booting then the screen goes black whats wrong with it?
The LAVAZZA LB2317 machine displaying "system booting" followed by a black screen could be caused by a firmware issue, a failed startup process, or a malfunction requiring a factory reset. Try restarting the machine. If the issue persists, a firmware update or factory reset using the USB or SerProg method may be needed.
This answer is automatically generated
Hi, how do I know what my password is in the service menu?
To find or reset the password for the service menu on the LAVAZZA LB2317, you must request a PUK code from Lavazza Technical Service. They will guide you through the reset procedure.
This answer is automatically generated
What means error E08 ?