PLUSOPTIX S16 User Manual
Vision screener
Hide thumbs
Also See for S16:
- Short manual (6 pages) ,
- Software update (3 pages) ,
- User manual (14 pages)

Related Manuals for PLUSOPTIX S16


Summary of Contents for PLUSOPTIX S16
- Page 1 Vision Screener „plusoptiX S16” User Manual Edition: 10/31/2018 - CAD Plusoptix GmbH Neumeyerstrasse 48 90411 Nürnberg Germany www.plusoptix.com Englisch...
-
Page 2: Table Of Contents
Integrated interfaces....................9 Connecting an external monitor (optional) ..............9 Connecting the USB keyboard and mouse (optional) ..........9 Switching the “plusoptiX S16” on and off and adjusting settings ........10 Screen displays and training videos ................11 Preparing the measurement area ................12 Performing measurements .................. -
Page 3: Intended Use And Responsibility Of The Operator
1 Intended use and responsibility of the operator Thank you for choosing to purchase the “plusoptiX S16”! Plusoptix is the global leader in the development, production and distribution of medical measuring devices for pediatric Vision Screening. If you have any further questions after reading this user manual, please do not hesitate to contact us. - Page 4 Intended use The “plusoptiX S16” is used for the early detection of visual disorders (preventative eye care). These visual disorders can cause permanent loss of vision in an eye (amblyopia) if they are not discovered and treated in the early years.
- Page 5 - Training must at least include reading the user manual and a briefing about the operation of the “plusoptiX S16”. The briefing about the operation of the “plusoptiX S16” can be carried out by a previously trained user. In addition to this, briefings are also provided by Plusoptix and by Plusoptix dealers authorised by Plusoptix.
-
Page 6: Checking The Scope Of Delivery
2 Checking the scope of delivery The “plusoptiX S16” is delivered in a box with foam inserts, which protect the “plusoptiX S16” from damage. If the box shows any signs of damage upon delivery, please immediately inform the vendor of the “plusoptiX S16”. -
Page 7: Learning About The „Plusoptix S16" And Connecting It
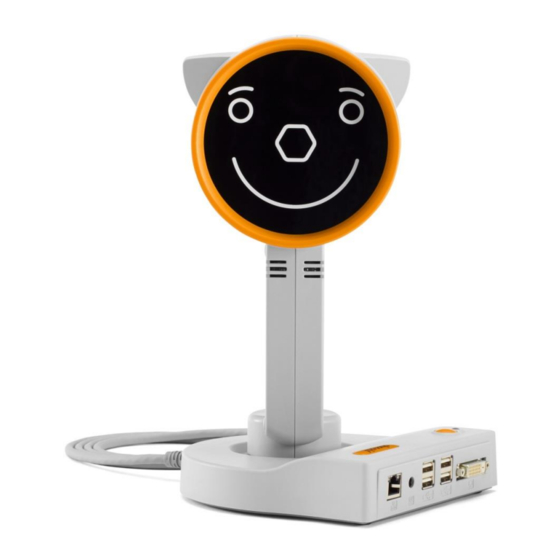
3 Learning about the „plusoptiX S16“ and connecting it The “plusoptiX S16” is made up of the device with a smiley, which is connected to the cradle with the device cable. 4 x USB LAN (RJ-45) Figure 2: View of the device’s cradle During a measurement, the “plusoptiX S16”... -
Page 8: Connecting The „Plusoptix S16
There is a 4.3” screen (resistive touchscreen) on the back of the “plusoptiX S16”. To access a function displayed on the screen, simply tap the screen with your fingernail. The screen and contact sensor are protected behind a thin plastic cover. -
Page 9: Integrated Interfaces
This allows the results pages to be discussed easily with the patient. Connect your monitor with the DVI interface in the cradle of the “plusoptiX S16”. When the device is mounted on the cradle, the image is shown on the external monitor and the screen of the “plusoptiX S16”... -
Page 10: Switching The "Plusoptix S16" On And Off And Adjusting Settings
Press the On / Off button briefly to turn the device on. The screen will come on immediately and the “plusoptiX S16” will start up. After approx. 30 seconds, the “plusoptiX S16” is ready to operate. The first time you start the device up, you will see the data and time settings page. -
Page 11: Screen Displays And Training Videos
5 Screen displays and training videos All the screen displays of the “plusoptiX S16” are the same. The header is above, the information part in the middle and the navigation bar below. The button with the blue "?" (1) takes you to the help page, which explains the displayed buttons. The button with the blue "? ►"... -
Page 12: Preparing The Measurement Area
(www.plusoptix.com), under support. 7 Performing measurements The “plusoptiX S16” measures both eyes at the same time (binocular) in 0.5 seconds from a distance of one meter. This means that even infants with a short attention span can be measured from the age of 5 months. -
Page 13: Voraussetzungen Für Eine Erfolgreiche Messung
The patient is looking at the camera lens The “plusoptiX S16” and the eyes of the patient must be aligned with one another. The patient must look at the nose of the smiley face. For this reason, an attention grabbing warble sound is emitted at the beginning of the measurement. -
Page 14: Selecting The Referral Criteria
Characteristic) curve. Select a group by touching the relevant button (2) and confirm by touching the green checkmark (3). Starting the measurement and adjusting the “plusoptiX S16” After you have set the time and date, the home page will be displayed every time you turn the “plusoptiX S16”... -
Page 15: Figure 10: Selection Of The Age Group
It is easier to hold the “plusoptiX S16” somewhat further away at the start of the measurement and then slowly move it towards the child. -
Page 16: Checking And Documenting The Measurement Results
Move the “plusoptiX S16” towards the patient until the camera image can be seen in high- definition on the screen and both pupils are encircled in green. -
Page 17: Maintenance, Calibration, Service And Guarantee
Posting the “plusoptiX S16” If case of a guarantee claim or service, please send to “plusoptiX S16” to us in its box at your expense. We will then return it to you at our expense after we have repaired it. If patient data is stored on the device, it must be removed from the device for data protection reasons. -
Page 18: Technical Details About The "Plusoptix S16
Diagonal 4.3‘‘, aspect ratio 5:3 (800 x 480 pixels) Resistive contact sensor Standards IEC 60601-1 Plusoptix devices use infrared light with a wavelength of 870nm and a maximum intensity of 135mW/sr. WLAN interface standards: Physical layer Supports 802.11 b and g standards... - Page 19 The plusoptiX 16 has been designed for the environment category "Environment in areas of domestic health care, except for vehicles and planes”. “plusoptiX 12” can be stored in its box. Do not put the box near heat sources (radiators, fan heaters, etc.). When you remove the “plusoptiX 12”...
- Page 20 RF Emission CISPR 11 Group 1 electronic devices found nearby. RF Emission CISPR 11 Category B The “plusoptiX S16” can be used in all areas which Harmonic Emissions Category A are connected to the public mains supply. IEC 61000-3-2 Voltage fluctuations /...
- Page 21 IEC 61000-4-6 0.15 MHz – 80 MHz 0.15 MHz – 80 MHz to „plusoptiX 16“ (including the electrical lines) less than the recommenced safe in ISM and amateur in ISM and amateur distance calculated using the...
- Page 22 The “plusoptiX S16” is intended for use in an electromagnetic environment with controlled HF disturbance variables. The customer or user of the “plusoptiX S16” can contribute to avoiding electromagnetic disturbances, by complying with the minimum distance between portable and mobile HF telecommunication devices (transmitters) and the “plusoptiX S16” – depending on the output power of the communication device, as stated below.
Need help?
Do you have a question about the S16 and is the answer not in the manual?
Questions and answers