PLUSOPTIX A12R Short Manual
Binocular autorefractor
Hide thumbs
Also See for A12R:
- Software update (2 pages) ,
- User manual (68 pages) ,
- Short manual (11 pages)

Related Manuals for PLUSOPTIX A12R


Summary of Contents for PLUSOPTIX A12R
- Page 1 Binocular Autorefractor Short Manual 1 „Checking the scope of delivery and learning about the device” Plusoptix GmbH Neumeyerstrasse 48 90411 Nürnberg Deutschland www.plusoptix.com Version: 16.12.2019...
-
Page 2: Table Of Contents
Plusoptix device. It can also be downloaded from our homepage (plusoptix.com) under "Support". List of supplementary short manuals 1. -
Page 3: Checking The Scope Of Delivery And Learning About The Device
- Mini-USB-Interface - DVI interface Optionale Accessories - Neck strap for „plusoptiX A12C“ - Wireless label printer „plusoptiX P12“ - Carrying case for „plusoptiX A12R / - Self-adhesive labels for „plusoptiX P12“ A12C“ - Wireless label printer „plusoptiX P12“ - Self-adhesive labels for „plusoptiX P12“... -
Page 4: Putting The Device Into Operation
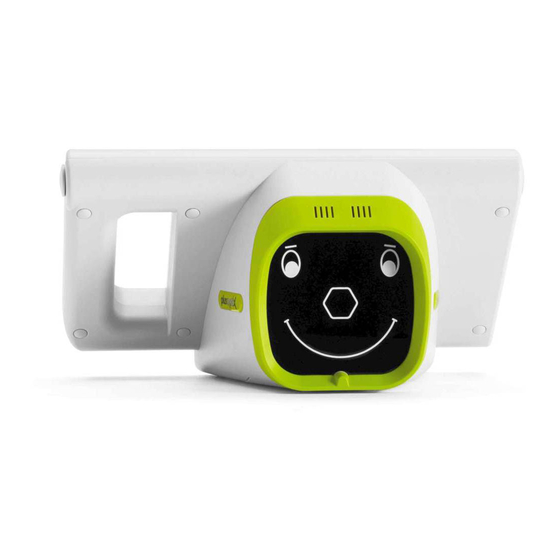
If necessary, you can force the device to shut down by holding the power button. 3 Learning about the „plusoptiX A12R / A12C“ The „plusoptiX A12R / A12C“ is made up of the device with a child-friendly smiley face. Speaker... -
Page 5: Figure 2: Rear View Of The Device
The screen and touch sensor are protected from damage behind a thin glass shield. „plusoptiX A12R“ has a 4.3 inch screen with resistive touch sensor located on the rear side of the device. To call up a function displayed on the monitor screen, it is sufficient to tap the screen with the tip of your finger or with your finger nail. -
Page 6: Mini Usb Interface
WLAN connection, the Mini-USB interface is deactivated. Note: All interfaces of the “plusoptiX A12C / A12R” and are positioned upside down, i.e. the plugs must also be turned upside down before plugging in (i.e. the USB symbol points downwards). -
Page 7: Inserting And Charging The Rechargeable Batteries
Battery compartment Type plate Figure 3: Battery compartment view of the device (plusoptiX A12C) Attention: If you need to put the device on its rear side, e.g. to insert or replace the rechargeable batteries, please place a soft cloth under the device. -
Page 8: Learning About The „Plusoptix A16"And Connecting It
4 Learning about the „plusoptiX A16“and connecting it The “plusoptiX A16” is made up of the device with a smiley, which is connected to the cradle with the device cable. Der „plusoptiX A16“ besteht aus dem Messkopf mit einem Smiley, der über das Messkopfkabel mit der Auflage verbunden ist. -
Page 9: Connecting The „Plusoptix A16
The type plate with serial number (S/N 1601A-xxx-xxxx xxxx) can be found on the bottom of the cradle. If you contact us regarding ongoing service or guarantee issues, please make sure you always have the serial number of your “plusoptiX A16”. The serial number helps us to answer your question quickly. -
Page 10: Connecting An External Monitor (Dvi-Interface)
This allows the results pages to be discussed easily with the patient. Connect your monitor with the DVI interface in the cradle of the “plusoptiX A16”. When the device is mounted on the cradle, the image is shown on the external monitor and the screen of the “plusoptiX A16”... -
Page 11: Connection The Usb Keyboard And Mouse (Optional)
3.3. Connection the USB keyboard and mouse (optional) To ease patient data entry on the “plusoptiX A12”, you can use a stylus (i.e Touchpen e.g. Stylus). Alternatively, you can connect a USB mouse or a USB keyboard. Connect your input device to the USB interface of the device.
Need help?
Do you have a question about the A12R and is the answer not in the manual?
Questions and answers