PLUSOPTIX S12R User Manual
Mobile vision screener
Hide thumbs
Also See for S12R:
- User manual (14 pages) ,
- Short manual (11 pages) ,
- Software update (2 pages)
Table of Contents
Advertisement
Quick Links
Mobile Vision Screener
"plusoptiX S12R"
User Manual
Release: 2014-06-02
Plusoptix GmbH
Neumeyerstrasse 48
90411 Nuremberg
Germany
www.plusoptix.de
Please read this user manual before use! It explains the basic functioning of the
device. Once the device has been switched on, additional information can be
called up by touching the blue "i" button on screen. This additional information
describes the individual screenshots in detail.
Page 1/38
Advertisement
Table of Contents

Related Manuals for PLUSOPTIX S12R


Summary of Contents for PLUSOPTIX S12R
- Page 1 Mobile Vision Screener "plusoptiX S12R" User Manual Release: 2014-06-02 Plusoptix GmbH Neumeyerstrasse 48 90411 Nuremberg Germany www.plusoptix.de Please read this user manual before use! It explains the basic functioning of the device. Once the device has been switched on, additional information can be called up by touching the blue "i"...
-
Page 2: Table Of Contents
Contents Use According to Purpose and Responsibility of the Operator ........4 Commissioning the Device ..................6 Checking the scope of delivery .................6 Learning about the device ..................7 Inserting and charging the batteries .................9 Switching the device on and off ................10 Screen displays and help texts ................ - Page 3 Table of figures Figure 1: Device in cardboard box ..................6 Figure 2: Front view of the device ..................7 Figure 3: Rear view of the device ..................8 Figure 4: Battery compartment view of the device ..............9 Figure 5: Switching between a screen and the help text ............11 Figure 6: Measuring environment ..................12 Figure 7: Holding the camera and operating the shutter ............14 Figure 8: Positioning camera at the correct angle ..............14...
-
Page 4: Use According To Purpose And Responsibility Of The Operator
Mobile Vision Screener "plusoptiX S12R" complies with the specifications of 0123 Guideline 2007/47/EG for medical devices. Mobile Vision Screener "plusoptiX S12R" complies with the specifications of an application part of type B in EN 60601-1. Only connect Mobile Vision Screener "plusoptiX S12R" to the supplied medical power adapter MES30B-3P1J. - Page 5 Use according to purpose Mobile Vision Screener "plusoptiX S12R" measures the sphere, cylinder, axis, gaze and pupil diameter in both eyes simultaneously (binocular) in a non-dilated pupil (miosis). These measurement values are used to calculate gaze asymmetry and inter pupillary distance.
-
Page 6: Commissioning The Device
2 Commissioning the Device Thank you for purchasing a Mobile Vision Screener "plusoptiX S12R". Plusoptix is the world leader in the development, production and distribution of medical devices for pediatric ophthalmic examination. Please contact us should you have further questions after reading the user manual. -
Page 7: Learning About The Device
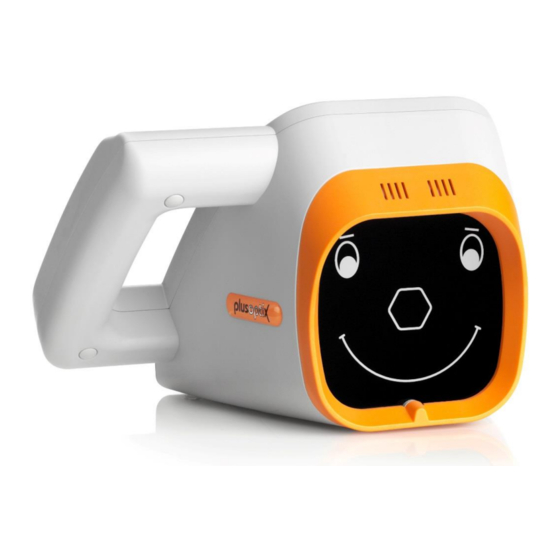
Learning about the device During a measurement, the device records a series of images. To attract the attention of the child during the measurement, the device plays a "warble" sound. The speaker required for this is located behind the vertical slits on the front side of the device. The camera lens and the LEDs required for illuminating the images are located behind the black protective shield with the stylized face. -
Page 8: Figure 3: Rear View Of The Device
The 4.3 inch screen with resistive touch sensor is located on the rear side of the device. To activate a function shown on the screen, all you need to do is tap the screen with your fingertip. Screen and touch sensor are protected behind a thin transparent plastic cover. Please note that this plastic cover can scratch with improper use. -
Page 9: Inserting And Charging The Batteries
Inserting and charging the batteries To insert the batteries, please put the device on a level working surface on its rear side. Please place a soft cloth under the device to prevent the glass shield from becoming scratched. Now remove the battery compartment cover using a 1-cent coin, and insert the supplied batteries. -
Page 10: Switching The Device On And Off
Switching the device on and off To switch on the device, briefly press the On/Off button. The screen switches on immediately and the device is booted. The device is ready for use after approx. 25 seconds. After inserting the batteries, the date and time settings page is displayed on the screen. Buttons for time format Buttons for... -
Page 11: Screen Displays And Help Texts
Screen displays and help texts All screen displays are designed in the same manner. The Header is located at the top, the Information section in the center, and the Navigation bar at the bottom. Header Information section Navigation bar Help text Buttons explained in the help text... -
Page 12: Performing Measurements
3 Performing Measurements Mobile Vision Screener "plusoptiX S12R" measures both eyes simultaneously (binocular) in 0.5 seconds at a distance of one meter (3.3 feet). Therefore even small children with a short attention span can be measured starting at age six months. The simultaneous measurement of both eyes also enables a reliable comparison of the measurement values of both eyes. -
Page 13: Preparing For A Measurement
The attention span of small children is extremely short. Take advantage of the fact that the examination room is new to the child. An unusual "warble" sound in this unfamiliar environment always evokes interest. Enter the patient data into the device before calling the child into the examination room or after completing the measurement. -
Page 14: Starting A Measurement And Positioning The Camera
Starting a measurement and positioning the camera Hold the device as you would hold a tablet PC and press the Shutter with your right thumb. Figure 7: Holding the camera and operating the shutter Place the device approximately 1.2 meters (4 feet) away from the child at eye level. Although the measurement distance is one meter (3.3 feet), a degree of practice is required to estimate this distance. -
Page 15: Figure 9: Recognizing Correct Measurement Distance
Align camera so that both eyes can be seen on the screen. Then slowly move towards patient until camera picture on screen is in clear focus. In the beginning the pupils are framed with white boxes (i.e. the picture is blurred), then by red circles and finally by green circles. Stop moving once a green line is plotted in between both pupils and a second “warble”... - Page 16 If you do not obtain measurement results, check whether the following measurement prerequisites are met: a) Measurement distance is correct: Measurement distance must be in between 95 cm (3.1 feet) and 105 cm (3.9 feet). Check whether the camera image on screen is in focus. You should be able to see individual hairs of eyelashes and eyebrows on screen.
-
Page 17: Checking And Documenting Measurement Results
Checking and documenting measurement results Screen size is limited and therefore measurement results are presented on two screens for better readability. These two measurement result screens are: Review video screen Check measurement results screen To exit these two measurement result screens, i.e. to return to the Start screen and to perform another measurement, you have to press the Shutter. -
Page 18: Screenshot 3: Review Video Screen
Review video screen A “pass” or “refer” screening result is displayed in the status line immediately after a measurement was performed. After an inconclusive measurement, an error message is displayed in the status line. In this case read chapter 4.2.3 "Error messages when performing a measurement". -
Page 19: Screenshot 4: Check Measurement Result Screen
Check measurement result screen Measurement results for Spherical equivalent (SE), Cylinder (CYL), Axis (A) and Pupil diameter (Ø) are displayed separately for right eye (OD) and left eye (OS). Measurement results for Pupil distance (PD) and Gaze asymmetry (ASY) are displayed below. Gaze chart OS Gaze chart OD Status line... -
Page 20: Perform Next Measurement
Perform next measurement Press Shutter to return to start screen. You can return directly to start screen from any measurement result page or settings page or help text page by pressing the shutter. Pressing Shutter deletes video file and measurement results from RAM memory. Once Shutter has been pressed last video file cannot be reviewed and measurement results cannot be printed or saved any more. -
Page 21: Practical Tips
4 Practical Tips These practical tips are divided into two categories: Handling clues and trouble shooting. You can read these sequentially or you can refer to the relevant sections only. Handling clues Handling clues explain additional features that are not essential for performing a measurement. -
Page 22: Customize Basic Settings
4.1.2 Customize basic settings Touch Basic settings button (1) in Settings to move to this screen: Screenshot 7: Basic settings Basic settings include: Astigmatism display Astigmatism can be displayed as a plus cylinder or a minus cylinder. Volume setting A setting of 0% switches off the "warble" sound. Screen brightness A lower screen brightness saves electricity and allows the batteries to last longer. -
Page 23: Choose Referral Criteria
4.1.3 Choose referral criteria To choose your referral criteria, proceed to settings (1) and touch button (2). Screenshot 8: Choose referral criteria There are five validated sets of referral criteria to choose from. These five sets are called ROC 1, ROC 2, ROC 3, ROC 4 and ROC 5. Each of those sets defines different age-specific threshold values which lead to a „Refer“-screening result. -
Page 24: Figure 11: Sensitivity, Specificity, False-Positive-Rate And False-Negative-Rate
Performance of health screening is evaluated in terms of sensitivity and specificity. Sensitivity indicates how many of the children with a vision disorder are recognized by the device as a “Refer”. Specificity indicates how many of the children without a vision disorder are recognized by the device as „Pass“. -
Page 25: Compatible Printer
4.1.6 Micro-USB and SD card interface The device features a micro-USB and a SD card interface. They are used by Plusoptix as part of the production process and in the case of a service and warranty issue. They have no function in customer operation. -
Page 26: Trouble-Shooting Guide
Trouble-shooting guide Vast majority of service queries relate to malfunctions when switching device on, malfunctions when using touch screen or error messages when performing a measurement. It is only in rare cases that these malfunctions are caused by broken hardware. The following chapters provide a step-by-step guide for trouble-shooting. -
Page 27: Malfunctions When Using Touch Screen
4.2.2 Malfunctions when using touch screen The following faults are classified together in this category: a) The device is operational but the screen suddenly switches off of its own accord, i.e. the screen turns black b) The buttons on screen do not function, i.e. -
Page 28: Error Messages When Performing A Measurement
4.2.3 Error messages when performing a measurement If no measurement results are available, an error message and an action recommendation followed by a "Refer or try again" status message are displayed. Error message Action recommendation Status Screenshot 10: Measurement result page after a "Measurement cancellation" Causes of error recognized by the device are highlighted in red on the measurement result page and review video page. - Page 29 a) Picture out of focus In this example the patient is too far away; besides the eyes, half the patient’s face can be seen in the camera image. In this example the patient is too close to the camera; both eyes are close to the left and right edges of the camera image.
- Page 30 b) Patient does not focus on camera! In this example the patient is looking to the left of the camera (from the patient’s perspective). The red dots in the gaze chart illustrate this line of vision. Cause: This error message is displayed if the patient is not looking at the hexagonal nose in the camera face.
- Page 31 Pupils too big! In this example the pupils are larger than 8.0 mm. Cause: This error message is displayed if one or both of the pupil diameters is larger than 8.0 mm. Reason: In the case of large pupils, the pupillary reflex may be overexposed, which results in cancellation of the measurement without result.
- Page 32 e) Pupils not found! In this example both pupils are not completely visible on the camera image. In this example the patient is wearing glasses and the pupils are partially covered due to infrared light reflections on the frame of the glasses and on the lenses. The error message "No pupils found!"...
- Page 33 Too much IR ambient light! In this example the sun is shining onto the patient’s face from the left side. This is apparent from the shadow caused by the nose. Cause: This error message is displayed if too much infrared light is present in the examination room.
- Page 34 In this example the patient has tilted her head slightly down and is looking up into the camera. The pupils are partially covered by the upper eyelids. In this example the right pupil is covered by the upper eyelashes and the left pupil by hair.
- Page 35 h) Corneal reflexes are too dark! In this example too little infrared light is reflected from the retina. Cause: This error message is displayed if the pupillary reflexes are too dark. Reason: The measurement takes place with infrared light, which is reflected from the cornea.
-
Page 36: Maintenance, Calibration, Servicing And Warranty
Mobile Vision Screener "plusoptiX S12R" is an optoelectronic measurement device. The mechanical design and mode of operation can be compared to a video camera. By handling the device as carefully as your own video camera, your Mobile Vision Screener "plusoptiX S12R" will be operational for many years. -
Page 37: Technical Specifications
6 Technical specifications Measurements Metered value Measurement range and tolerance Sphere -7 to +5 dpt in 0,25 dpt increments ± 0,25 dpt Cylinder -7 to +5 dpt in 0,25 dpt increments ± 0,25 dpt Axis 1 to 180° in 1° increments ± 15° Spherical equivalent -7 to +5 dpt in 0,25 dpt increments ±... -
Page 38: Guidance And Manufacturer´s Declaration - Electromagnetic Emissions/ Immunity
Guidance and manufacturer´s declaration – electromagnetic emissions/ immunity Emissions Test Compliance Electromagnetic environment - Guidance RF emissions are very low and are not likely to RF Emission CISPR 11 Group 1 cause any interference in nearby electronic equipment. The device is suitable for use in all RF Emission CISPR 11 Class B establishments, including domestic...
Need help?
Do you have a question about the S12R and is the answer not in the manual?
Questions and answers