
Related Manuals for Stryker 1089


Summary of Contents for Stryker 1089
- Page 1 Eye Surgery Stretcher 1089 Operations Manual 2017/05 A.1 1089-109-001 REV A www.stryker.com...
- Page 2 sample text...
- Page 3 Symbols Operating instructions General warning Caution No pushing Do not store the oxygen bottle Catalogue number Serial number For US Patents see www.stryker.com/patents CE mark EC REP Manufacturer Safe working load Lubricate Type B applied part www.stryker.com 1089-109-001 REV A...
- Page 4 sample text...
-
Page 5: Table Of Contents
Attaching and positioning the removable IV pole ..................27 Attaching the upright oxygen bottle holder ....................28 Extending or stowing the serving tray holder/footboard................29 Attaching the siderail pads ........................29 Locating the patient restraint strap tie-ins ....................29 www.stryker.com 1089-109-001 REV A... - Page 6 Cleaning the product.......................... 32 Cleaning the mattress ........................32 Remove iodine..........................33 Special instructions ........................... 33 Disinfecting............................34 Disinfecting the product ........................34 Disinfecting the mattress ........................34 Preventive maintenance ........................... 36 Lubrication points ..........................37 1089-109-001 REV A www.stryker.com...
-
Page 7: Warning/Caution/Note Definition
Note: Provides special information to make maintenance easier or important instructions clearer. www.stryker.com 1089-109-001 REV A... -
Page 8: Summary Of Safety Precautions
Do not use the IV pole as a push/pull device. Product damage may occur. • Do not place objects that exceed 40 lb (18 kg) in the upright oxygen bottle holder. • Do not place objects that exceed 30 lb (14 kg) on the serving tray. 1089-109-001 REV A www.stryker.com... - Page 9 Do not sit, step, or stand on the base hood. • Always raise the IV pole before you attach the defibrillator tray/foot extender to the product. If you do not raise the IV pole, the foot extender will not operate. www.stryker.com 1089-109-001 REV A...
-
Page 10: Introduction
(treatment and recovery). Expected service life The Stryker Model 1089 Eye Surgery Stretcher has a 10 year expected service life under normal use conditions and with appropriate periodic maintenance. Contraindications None known. - Page 11 13 in. x 55 in. 33 cm x 139.5 cm Minimum under product clearance 6 in. nominal 15 cm 1.75 in. under the 4.5 cm hydraulic cylinders and fifth wheel Stryker reserves the right to change specifications without notice. www.stryker.com 1089-109-001 REV A...
-
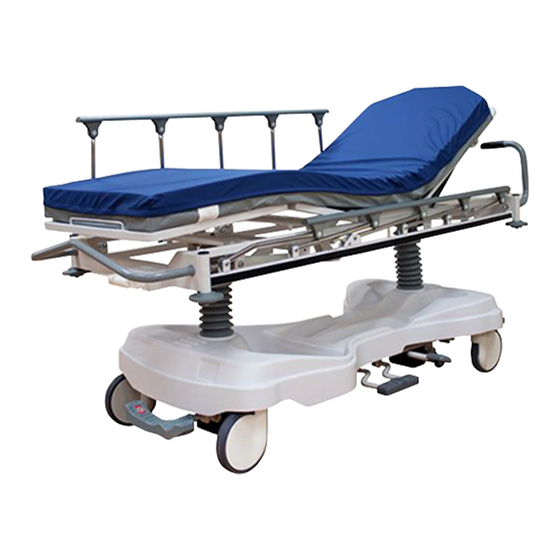
Page 12: Product Illustration
Introduction Product illustration 1089-109-001 REV A www.stryker.com... -
Page 13: Contact Information
Portage, MI 49002 To view your operations or maintenance manual online, see https://techweb.stryker.com/. Have the serial number (A) of your Stryker product available when calling Stryker Customer Service or Technical Support. Include the serial number in all written communication. www.stryker.com... -
Page 14: Serial Number Location
Introduction Serial number location Date of manufacture The year of manufacture is the first 2 digits of the serial number. 1089-109-001 REV A www.stryker.com... -
Page 15: Setup
6. Make sure that the siderails raise, lower, and lock in place. 7. Raise and lower the Fowler backrest (head end). 8. Rotate the headpiece in both directions to make sure that the headpiece adjusts to all positions. www.stryker.com 1089-109-001 REV A... -
Page 16: Operation
(C) closest to the head end of the product. To lower the foot end of the litter, press down on the foot end release pedal (B) or press on the side of the uni-lower pedal (C) closest to the foot end of the product. 1089-109-001 REV A www.stryker.com... -
Page 17: Positioning The Product In Trendelenburg
To lower the product from Trendelenburg position, press down on the foot end release pedals (B and D) at the same time or press down on the center of the uni-lower pedal (C) until the litter is flat. www.stryker.com 1089-109-001 REV A... -
Page 18: Positioning The Product In Reverse Trendelenburg
Always lock the siderails in the full up position with the sleep surface horizontal in the lowest position when you transport a patient. • Always keep the patient’s limbs away from the siderail spindles when you lower the siderail. 1089-109-001 REV A www.stryker.com... -
Page 19: Raising Or Lowering The Fowler Backrest
To raise the Fowler backrest, squeeze the Fowler backrest release handles (A). Pull the Fowler backrest up to the desired position (Figure 2 on page 15 To lower the Fowler backrest, squeeze the Fowler backrest release handles (A). Push the Fowler backrest down to the desired position. Figure 2: Fowler backrest www.stryker.com 1089-109-001 REV A... -
Page 20: Raising Or Lowering The Fowler Backrest Or The Gatch With The Crank Option
Note: For ease of use, release only one latch at a time. Storing objects in the base hood CAUTION • Do not place objects that exceed 60 lb (27 kg) in the base hood. • Do not sit, step, or stand on the base hood. 1089-109-001 REV A www.stryker.com... - Page 21 Operation Storing objects in the base hood (Continued) You can store patient belongings in the base hood. Do not use the oxygen bottle holder cutout to store oxygen bottles or patient belongings. www.stryker.com 1089-109-001 REV A...
-
Page 22: Accessories
Accessories These accessories may be available for use with your product. Confirm availability for your configuration or region. Call Stryker Customer Service: 1-800-327-0770. Name Part number Air delivery and drape support 1068-168-000 Armboard clamp, adjustable 1068-056-000 Defibrillator tray 1105-045-200 1105-045-400... -
Page 23: Transferring A Patient With The Patient Transfer Board
Note: The transfer board (C) is located between the siderail (A) and the mattress (B) (Figure 4 on page 19). Pivot the board downward onto the mating support surface. Transfer the patient to the mating support surface. Figure 4: Transfer the patient www.stryker.com 1089-109-001 REV A... -
Page 24: Hanging Devices From The Surgery Accessory Rail
The pre-op and post-op head extensions provide additional litter surface to protect the patient’s head during transport. • The head extension can be used as push handles when you move the product. Figure 5: Red knob location 1089-109-001 REV A www.stryker.com... -
Page 25: Positioning The Wrist Rest
The optional drape support air delivery system has a flexible drape support with air tubing inside the support for patient comfort. Place the mounting tab (A) into the IV socket at the head end of the product. www.stryker.com 1089-109-001 REV A... -
Page 26: Positioning Or Stowing The Push Handles (Optional)
Push down on the handles to lock them into position. Reverse steps to stow the handles. Note: Only use the push handles as push or pull devices unless otherwise specified to avoid product damage. Figure 8: Positioning the head end push handles 1089-109-001 REV A www.stryker.com... -
Page 27: Attaching The Defibrillator Tray
Use the strap to secure devices to the defibrillator tray. Notes • Do not use the defibrillator tray/foot extender as a push/pull device. Product damage may occur. • Do not attach items to the foot extender. www.stryker.com 1089-109-001 REV A... -
Page 28: Converting The Defibrillator Tray/Foot Extender To A Foot Extender
Release the bottom knob (D). Push on the foot extender to make sure that the foot extender is locked in place. Notes • Do not use the defibrillator tray/foot extender as a push/pull device. Product damage may occur. • Do not attach items to the foot extender. 1089-109-001 REV A www.stryker.com... -
Page 29: Attaching The Footboard/Chart Holder
Do not hang IV bags that exceed 40 lb (18 kg) on the IV pole. • Always make sure that the IV pole is at a low height to pass safely through door openings when you transport a patient. www.stryker.com 1089-109-001 REV A... -
Page 30: Positioning The Three-Stage Permanently Attached Iv Pole Option
Do not hang IV bags that exceed 9.3 lb (4.2 kg) on a single IV hanger. • Always make sure that the IV pole is at a low height to allow the pole to pass safely through door openings when you transport a patient. 1089-109-001 REV A www.stryker.com... -
Page 31: Attaching And Positioning The Removable Iv Pole
Do not hang IV bags that exceed 40 lb (18 kg) on the IV pole. • Always make sure that the IV pole is at a low height to pass through door openings when you transport a patient. www.stryker.com 1089-109-001 REV A... -
Page 32: Attaching The Upright Oxygen Bottle Holder
Insert the support bar into any of the IV sockets. Insert the cotter pin through the hole in the support bar to secure the bottle holder to the product. Note: Do not use the upright oxygen bottle holder as a push/pull device. 1089-109-001 REV A www.stryker.com... -
Page 33: Extending Or Stowing The Serving Tray Holder/Footboard
Always refer to the applicable state and federal restrictions and the appropriate facility protocols before you use any restraint strap or device. There are six patient restraint strap tie-in locations on the litter assembly for attaching patient restraint straps (Figure 13 on page 30). www.stryker.com 1089-109-001 REV A... - Page 34 Accessories Locating the patient restraint strap tie-ins (Continued) Figure 13: Restraint strap tie-in locations 1089-109-001 REV A www.stryker.com...
-
Page 35: Cleaning And Disinfecting With Wipes
For United States only. Confirm availability for your configuration or region. Call Stryker Customer Service: 1-800-327- 0770. Stryker’s preferred wipes (2060-000-001 6'' x 10'' or 2060-000-002 9'' x 12'') include the following active ingredients: • n-Alkyl (60% C14, 30% C16, 5% C12, 5% C18) dimethyl benzyl ammonium chloride - 0.154% •... -
Page 36: Cleaning
Use a clean, soft cloth to wipe down the entire mattress with a mild soap and water solution to remove foreign material. Wipe down the mattress with a clean, dry cloth to remove any excess liquid or cleaning agents. 1089-109-001 REV A www.stryker.com... -
Page 37: Remove Iodine
Use standard household cleansers or vinyl cleansers and a soft bristle brush on troublesome spots or stains. Pre- soak dried-on soil. Laundering Laundering is not recommended. Laundering may substantially decrease the useful life of the mattress. www.stryker.com 1089-109-001 REV A... -
Page 38: Disinfecting
Phenolic disinfectant (active ingredient - o-phenylphenol) • Chlorinated bleach solution (5.25% bleach diluted 1 part bleach to 100 parts water which equals 520 ppm available chlorine (40 mL of a 5.25% bleach solution per 4000 mL water)) 1089-109-001 REV A www.stryker.com... - Page 39 • Frequent or prolonged exposure to higher concentrations of disinfectant solutions may prematurely age the cover fabric. • The use of accelerated hydrogen peroxides or quaternaries that contain glycol ethers may damage the cover. www.stryker.com 1089-109-001 REV A...
-
Page 40: Preventive Maintenance
Preventive maintenance At a minimum, check all items listed during annual preventive maintenance for all Stryker Medical products. You may need to perform preventive maintenance checks more frequently based on your level of product usage. Remove product from service before you perform preventive maintenance. -
Page 41: Lubrication Points
Lubrication points With the Fowler backrest at 0 degrees, apply Syntech grease (3000-200-719) through the slot and hole in the crank screw assembly (Figure 14 on page 37). Wipe off excess grease. Figure 14: Crank screw lubrication www.stryker.com 1089-109-001 REV A... - Page 42 Stryker Medical 3800 E. Centre Avenue Portage, MI 49002 2017/05 1089-109-001 REV A www.stryker.com...
Need help?
Do you have a question about the 1089 and is the answer not in the manual?
Questions and answers