
Related Manuals for Stryker Gynnie OB/GYN Stretcher


Summary of Contents for Stryker Gynnie OB/GYN Stretcher
- Page 1 G G y y n n n n i i e e ® ® O O B B / / G G Y Y N N S S t t r r e e t t c c h h e e r r O O p p e e r r a a t t i i o o n n s s M M a a n n u u a a l l 1061 1061-009-005 Rev B.0...
- Page 3 Operating instructions/Consult instructions for use General warning Caution No pushing Do not store the oxygen bottle Catalogue number Serial number For US Patents see www.stryker.com/patents CE mark Authorized representative in the European Community European medical device Manufacturer Safe working load Lubricate Type B applied part 1061-009-005 Rev B.0...
- Page 5 T T a a b b l l e e o o f f C C o o n n t t e e n n t t s s Symbols ................................1 Warning/Caution/Note Definition ........................2 Summary of safety precautions .......................2 Introduction ..............................4 Product description ..........................4 Indications for use ..........................4...
- Page 6 W W a a r r n n i i n n g g / / C C a a u u t t i i o o n n / / N N o o t t e e D D e e f f i i n n i i t t i i o o n n The words W W A A R R N N I I N N G G , C C A A U U T T I I O O N N , and N N O O T T E E carry special meanings and should be carefully reviewed.
- Page 7 • Always attach restraint straps or devices only at the identified attachment points of the product. Failure to do so may result in patient or operator injury. Do not attach restraints straps to the siderail. • Always refer to the applicable state and federal restrictions and regulations and the appropriate facility protocols before you use any restraint strap or device.
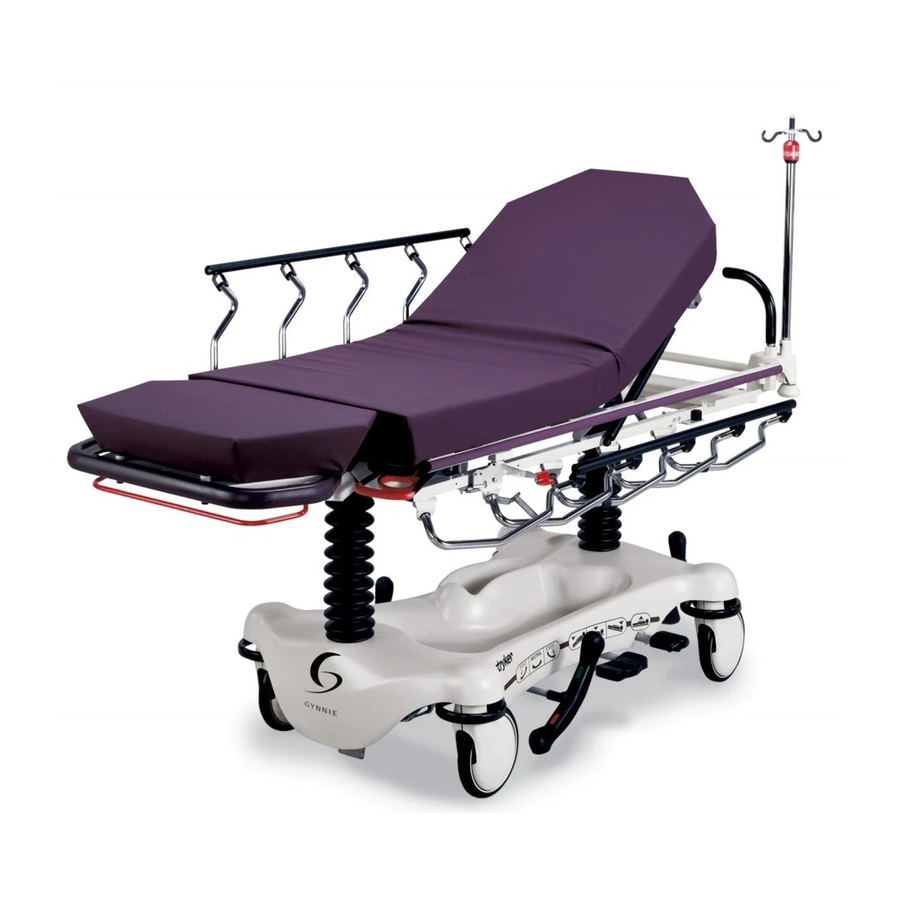
- Page 8 P P r r o o d d u u c c t t d d e e s s c c r r i i p p t t i i o o n n The Stryker Model 1061 G G y y n n n n i i e e ® ® OB/GYN stretcher is a wheeled stretcher consisting of a platform mounted on a wheeled frame to transport patients in a horizontal position while providing a platform for the clinical treatment or examination of patients within the interior of a healthcare facility.
- Page 9 66 cm x 191.5 cm Siderails 13 in. x 39 in. 34 cm x 99 cm Caster diameter 8 in. 20 cm Break away from wall point 68 in. 172.7 cm Stryker reserves the right to change specifications without notice. 1061-009-005 Rev B.0...
- Page 10 O O p p e e r r a a t t i i o o n n S S t t o o r r a a g g e e a a n n d d t t r r a a n n s s p p o o r r t t a a t t i i o o n n E E n n v v i i r r o o n n m m e e n n t t a a l l c c o o n n d d i i t t i i o o n n s s 100 °F 140 °F...
- Page 11 Competent authority of the European Member State where the user and/or patient is established. To view your operations or maintenance manual online, see https://techweb.stryker.com/. Have the serial number (A) of your Stryker product available when calling Stryker Customer Service or Technical Support. Include the serial number in all written communication.
- Page 12 S S e e t t u u p p Make sure that the product works before the product is put into service. 1. Apply the brake. Push on the product to make sure that all four casters are locked. 2.
- Page 13 O O p p e e r r a a t t i i o o n n A A p p p p l l y y i i n n g g a a n n d d r r e e l l e e a a s s i i n n g g t t h h e e b b r r a a k k e e s s W W A A R R N N I I N N G G - - Always apply the brakes when a patient is getting on the product or off the product or when the product is not moving.
- Page 14 F F i i g g u u r r e e 2 2 – – R R a a i i s s i i n n g g o o r r l l o o w w e e r r i i n n g g t t h h e e l l i i t t t t e e r r P P o o s s i i t t i i o o n n i i n n g g t t h h e e p p r r o o d d u u c c t t i i n n T T r r e e n n d d e e l l e e n n b b u u r r g g W W A A R R N N I I N N G G - - Always remove any devices that may be in the way before you raise or lower the litter.
- Page 15 T T r r a a n n s s p p o o r r t t i i n n g g a a p p a a t t i i e e n n t t w w i i t t h h t t h h e e r r e e t t r r a a c c t t a a b b l l e e f f i i f f t t h h w w h h e e e e l l W W A A R R N N I I N N G G •...
- Page 16 N N o o t t e e - - Do not use siderails as restraint devices to keep the patient from exiting the product. The siderails keep the patient from rolling off the product. The operator must determine the degree of restraint necessary to make sure that the patient is safe.
- Page 17 F F i i g g u u r r e e 5 5 – – P P o o s s i i t t i i o o n n i i n n g g t t h h e e f f o o o o t t s s u u p p p p o o r r t t s s S S t t o o r r i i n n g g t t h h e e f f o o o o t t s s u u p p p p o o r r t t s s C C A A U U T T I I O O N N •...
- Page 18 P P o o s s i i t t i i o o n n i i n n g g t t h h e e w w a a s s t t e e b b i i n n h h o o l l d d e e r r ( ( o o p p t t i i o o n n a a l l ) ) C C A A U U T T I I O O N N •...
- Page 19 A A c c c c e e s s s s o o r r i i e e s s a a n n d d p p a a r r t t s s These accessories may be available for use with your product. Confirm availability for your configuration or region. Call Stryker Customer Service: 1-800-327-0770. N N a a m m e e...
- Page 20 • Always make sure that the IV pole is at a low height to pass through door openings when you transport a patient. To attach and position the removable IV pole (Figure 7): 1. Insert the IV pole into a socket at the head end or foot end of the product. 2.
- Page 21 To fit the serving tray on the siderail, pull out on both sides of the serving tray and position the tray over the siderails. To stow the serving tray: 1. Remove the serving tray from the siderails. 2. Push in the sides of the serving tray. 3.
- Page 22 There are six patient restraint strap tie-in locations on the litter assembly for attaching patient restraint straps (Figure 9). F F i i g g u u r r e e 9 9 – – R R e e s s t t r r a a i i n n t t s s t t r r a a p p t t i i e e - - i i n n l l o o c c a a t t i i o o n n s s 1061-009-005 Rev B.0...
- Page 23 C C l l e e a a n n i i n n g g C C l l e e a a n n i i n n g g t t h h e e p p r r o o d d u u c c t t W W A A R R N N I I N N G G - - Do not clean, service, or perform maintenance while the product is in use.
- Page 24 Recommended cleaning method: 1. Use a clean, soft cloth to wipe down the entire mattress with a mild soap and water solution to remove foreign material. 2. Wipe down the mattress with a clean, dry cloth to remove any excess liquid or cleaning agents. 3.
- Page 25 D D i i s s i i n n f f e e c c t t i i n n g g D D i i s s i i n n f f e e c c t t i i n n g g t t h h e e p p r r o o d d u u c c t t W W A A R R N N I I N N G G •...
- Page 26 • Phenolic disinfectant (active ingredient - o-phenylphenol) • Chlorinated bleach solution (5.25% bleach diluted 1 part bleach to 100 parts water which equals 520 ppm available chlorine (40 mL of a 5.25% bleach solution per 4000 mL water)) • 70% isopropyl alcohol Recommended disinfection method: 1.
- Page 27 Remove product from service before you perform the preventive maintenance inspection. Check all items listed during annual preventive maintenance for all Stryker Medical products. You may need to perform preventive maintenance checks more often based on your level of product usage. Service only by qualified personnel.
- Page 29 G G y y n n n n i i e e ® ® G G y y n n ä ä k k o o l l o o g g i i e e - - T T r r a a g g e e B B e e d d i i e e n n u u n n g g s s a a n n l l e e i i t t u u n n g g 1061 1061-009-005 Rev B.0...
- Page 31 S S y y m m b b o o l l e e Bedienungsanleitung/Gebrauchsanweisung beachten Allgemeine Warnung Vorsicht Nicht schieben Sauerstoffflasche nicht lagern Bestellnummer Seriennummer Für Informationen zu US-Patenten siehe www.stryker.com/patents CE-Kennzeichnung Bevollmächtigter in der Europäischen Gemeinschaft Europäisches Medizinprodukt Hersteller Sichere Arbeitslast Schmierstelle Anwendungsteil vom Typ B...
- Page 33 I I n n h h a a l l t t s s v v e e r r z z e e i i c c h h n n i i s s Symbole ................................27 Definition von Warnung/Vorsicht/Hinweis......................2 Zusammenfassung der Sicherheitsvorkehrungen ..................2 Einführung ..............................4 Produktbeschreibung ..........................4...
- Page 34 D D e e f f i i n n i i t t i i o o n n v v o o n n W W a a r r n n u u n n g g / / V V o o r r s s i i c c h h t t / / H H i i n n w w e e i i s s Die Begriffe W W A A R R N N U U N N G G , V V O O R R S S I I C C H H T T und H H I I N N W W E E I I S S haben eine besondere Bedeutung und müssen sorgfältig durchgelesen werden.
- Page 35 • Keine Gegenstände mit einem Gewicht von mehr als 40 US-Pfund (18 kg) in den aufrechten Sauerstoffflaschenhalter legen. • Stets Vorsicht walten lassen, wenn die Defibrillator-Tablett-/Fußteilverlängerung, der Fußteil-Krankenaktenhalter oder der aufrechte Sauerstoffflaschenhalter angebracht ist, um ein Einklemmen der Finger zu vermeiden, wenn der optionale Schiebegriff am Fußende positioniert wird.
- Page 36 P P r r o o d d u u k k t t b b e e s s c c h h r r e e i i b b u u n n g g Die Stryker G G y y n n n n i i e e ® ® Gynäkologie-Trage Modell 1061 ist eine Fahrtrage, die aus einer Liegefläche besteht, die an einem fahrbaren Gestell befestigt ist;...
- Page 37 66 cm x 191,5 cm Seitengitter 13 Zoll x 39 Zoll 34 cm x 99 cm Laufrollendurchmesser 8 Zoll 20 cm Von der Wandstelle ablösen 68 Zoll 172,7 cm Stryker behält sich das Recht vor, technische Daten ohne Vorankündigung zu ändern. 1061-009-005 Rev B.0...
- Page 38 U U m m w w e e l l t t b b e e d d i i n n g g u u n n g g e e n n B B e e t t r r i i e e b b A A u u f f b b e e w w a a h h r r u u n n g g u u n n d d T T r r a a n n s s p p o o r r t t 100 °F 140 °F...
- Page 39 Die Betriebsanleitung bzw. das Wartungshandbuch steht unter der folgenden Adresse im Internet zur Verfügung: https:// techweb.stryker.com/. Bei Anrufen beim Stryker-Kundendienst oder technischen Support bitte die Seriennummer (A) des jeweiligen Stryker- Produkts bereithalten. Seriennummer bei allen schriftlichen Mitteilungen angeben. P P o o s s i i t t i i o o n n d d e e r r S S e e r r i i e e n n n n u u m m m m e e r r A A b b b b i i l l d d u u n n g g 1 1 –...
- Page 40 E E i i n n r r i i c c h h t t u u n n g g Vor der Inbetriebnahme sicherstellen, dass das Produkt ordnungsgemäß funktioniert. 1. Bremse betätigen. Das Produkt anschieben um sicherzustellen, dass alle vier Laufrollen festgestellt sind. 2.
- Page 41 B B e e t t r r i i e e b b A A k k t t i i v v i i e e r r e e n n u u n n d d L L ö ö s s e e n n d d e e r r B B r r e e m m s s e e n n W W A A R R N N U U N N G G - - Stets die Bremsen aktivieren, wenn sich ein Patient auf das oder vom Produkt begibt oder wenn das Produkt nicht bewegt wird.
- Page 42 A A b b b b i i l l d d u u n n g g 2 2 – – A A n n h h e e b b e e n n u u n n d d A A b b s s e e n n k k e e n n d d e e r r L L i i e e g g e e f f l l ä ä c c h h e e P P o o s s i i t t i i o o n n i i e e r r u u n n g g d d e e s s P P r r o o d d u u k k t t s s i i n n d d e e r r T T r r e e n n d d e e l l e e n n b b u u r r g g - - P P o o s s i i t t i i o o n n W W A A R R N N U U N N G G - - Vor dem Anheben oder Absenken der Liegefläche immer alle evtl.
- Page 43 T T r r a a n n s s p p o o r r t t i i e e r r e e n n e e i i n n e e s s P P a a t t i i e e n n t t e e n n m m i i t t h h i i l l f f e e d d e e s s e e i i n n z z i i e e h h b b a a r r e e n n f f ü ü n n f f t t e e n n R R a a d d e e s s W W A A R R N N U U N N G G •...
- Page 44 Zum Anheben der Seitengitter das Seitengitter mit zwei Händen ergreifen. Das Seitengitter anheben, bis der Freigabehebel einrastet. Am Seitengitter ziehen, um zu überprüfen, ob es eingerastet ist. Zum Absenken der Seitengitter den Freigabehebel nach oben ziehen, bis er einrastet. Das Seitengitter in die niedrigste Position bringen.
- Page 45 5. Die Füße des Patienten in die Fußstützen stellen. A A b b b b i i l l d d u u n n g g 5 5 – – P P o o s s i i t t i i o o n n i i e e r r e e n n d d e e r r F F u u ß ß s s t t ü ü t t z z e e n n E E i i n n k k l l a a p p p p e e n n d d e e r r F F u u ß...
- Page 46 Das Fußteil anheben, um ihn abzusenken. Den roten Entriegelungsgriff (A) drücken. Das Fußteil absenken. Um das Fußteil anzuheben, den Rahmen des Fußteils anheben, bis das Fußteil einrastet. Sicherstellen, dass das Fußteil sicher befestigt ist, bevor das Fußteil durch das Gewicht des Patienten belastet wird. P P o o s s i i t t i i o o n n i i e e r r e e n n d d e e r r A A b b f f a a l l l l s s c c h h a a l l e e n n h h a a l l t t e e r r u u n n g g ( ( o o p p t t i i o o n n a a l l ) ) V V O O R R S S I I C C H H T T •...
- Page 47 Z Z u u b b e e h h ö ö r r - - u u n n d d E E r r s s a a t t z z t t e e i i l l e e Diese Zubehörteile sind möglicherweise für die Verwendung mit Ihrem Produkt verfügbar. Bestätigen Sie die Verfügbarkeit für Ihre Konfiguration oder Region. Fragen zu Verfügbarkeit und Preisen beantwortet gerne der Stryker-Kundendienst unter der Nummer 1-800-327-0770.
- Page 48 A A n n b b r r i i n n g g e e n n u u n n d d P P o o s s i i t t i i o o n n i i e e r r e e n n d d e e s s a a b b n n e e h h m m b b a a r r e e n n I I n n f f u u s s i i o o n n s s s s t t ä ä n n d d e e r r s s V V O O R R S S I I C C H H T T •...
- Page 49 H H i i n n w w e e i i s s - - Den aufrechten Sauerstoffflaschenhalter nicht als Schub- oder Zugvorrichtung verwenden. H H e e r r a a u u s s z z i i e e h h e e n n o o d d e e r r V V e e r r s s t t a a u u e e n n d d e e s s T T a a b b l l e e t t t t h h a a l l t t e e r r s s / / d d e e r r F F u u ß ß s s t t ü ü t t z z e e W W A A R R N N U U N N G G - - Keine Gegenstände mit einem Gewicht von mehr als 14 kg auf das Tablett legen.
- Page 50 A A b b b b i i l l d d u u n n g g 8 8 – – Z Z u u g g a a n n g g z z u u m m R R ö ö n n t t g g e e n n k k a a s s s s e e t t t t e e n n h h a a l l t t e e r r d d e e r r R R ü ü c c k k e e n n l l e e h h n n e e ( ( F F o o w w l l e e r r ) ) A A u u f f f f i i n n d d e e n n d d e e r r V V e e r r b b i i n n d d u u n n g g e e n n d d e e r r P P a a t t i i e e n n t t e e n n h h a a l l t t e e g g u u r r t t e e W W A A R R N N U U N N G G •...
- Page 51 A A b b b b i i l l d d u u n n g g 9 9 – – B B e e f f e e s s t t i i g g u u n n g g s s p p o o s s i i t t i i o o n n e e n n d d e e s s H H a a l l t t e e g g u u r r t t s s 1061-009-005 Rev B.0...
- Page 52 R R e e i i n n i i g g u u n n g g R R e e i i n n i i g g e e n n d d e e s s P P r r o o d d u u k k t t s s W W A A R R N N U U N N G G - - Keine Reinigungs-, Instandhaltungs- oder Wartungsarbeiten durchführen, während das Produkt verwendet wird.
- Page 53 Empfohlene Reinigungsmethode: 1. Die gesamte Matratze mit einem sauberen, weichen Tuch und milder Seifenlauge abwischen, um Fremdkörper zu entfernen. 2. Die Matratze mit einem sauberen, trockenen Tuch abwischen, um ggf. überschüssige Flüssigkeit oder Reinigungsmittel zu entfernen. 3. Die Bezüge nach der Reinigung abspülen und trocknen. 4.
- Page 54 D D e e s s i i n n f f e e k k t t i i o o n n D D e e s s i i n n f f i i z z i i e e r r e e n n d d e e s s P P r r o o d d u u k k t t s s W W A A R R N N U U N N G G •...
- Page 55 • Quartäre Reiniger (aktiver Bestandteil: Ammoniumchlorid), die weniger als 3 % Glycolether enthalten • Phenolische Desinfektionsmittel (Wirkstoff: o-Phenylphenol) • Chlorbleichelösung (5,25%ige Bleichmittellösung, 1 Teil Bleichmittellösung gelöst in 100 Teilen Wasser, entsprechend 520 ppm verfügbarem Chlor [40 ml einer 5,25%igen Bleichmittellösung pro 4000 ml Wasser]) •...
- Page 56 Bevor die vorbeugende Wartung vorgenommen wird, muss das Produkt außer Betrieb genommen werden. Alle aufgeführten Punkte müssen bei allen Produkten von Stryker Medical im Rahmen der jährlichen vorbeugenden Wartung überprüft werden. Je nach Ausmaß der Produktnutzung können auch häufigere vorbeugende Wartungsprüfungen erforderlich sein.
- Page 57 C C a a m m i i l l l l a a g g i i n n e e c c o o l l ó ó g g i i c c a a G G y y n n n n i i e e ® ® O O B B / / G G Y Y N N M M a a n n u u a a l l d d e e u u s s o o 1061 1061-009-005 Rev B.0...
- Page 59 Advertencia general Precaución No empujar No almacenar la botella de oxígeno Número de catálogo Número de serie Para ver las patentes estadounidenses, visite www.stryker.com/patents Marca CE Representante autorizado en la Comunidad Europea Producto sanitario europeo Fabricante Carga de trabajo segura...
- Page 61 Í Í n n d d i i c c e e Símbolos ................................27 Definición de advertencia, precaución y nota ....................2 Resumen de las precauciones de seguridad ....................2 Introducción ..............................4 Descripción del producto ........................4 Indicaciones de uso..........................4 Beneficios clínicos..........................4 Vida útil prevista.............................5 Eliminación/reciclado..........................5 Contraindicaciones..........................5 Especificaciones ............................5...
- Page 62 D D e e f f i i n n i i c c i i ó ó n n d d e e a a d d v v e e r r t t e e n n c c i i a a , , p p r r e e c c a a u u c c i i ó ó n n y y n n o o t t a a Las palabras A A D D V V E E R R T T E E N N C C I I A A , P P R R E E C C A A U U C C I I Ó...
- Page 63 • Tenga siempre cuidado si la bandeja para desfibrilador/extensión para los pies, el pie de cama/soporte de historias o el soporte vertical para la botella de oxígeno están acoplados, para evitar pillarse los dedos al colocar la opción de los mangos de empuje del extremo de los pies.
- Page 64 I I n n t t r r o o d d u u c c c c i i ó ó n n Este manual le ayudará a utilizar o mantener su producto de Stryker. Lea este manual antes de utilizar este producto o de realizar su mantenimiento.
- Page 65 13 in x 39 in 34 cm x 99 cm Diámetro de las ruedas giratorias 8 in 20 cm Punto de separación desde la pared 68 in 172,7 cm Stryker se reserva el derecho a cambiar las especificaciones sin previo aviso. 1061-009-005 Rev B.0...
- Page 66 F F u u n n c c i i o o n n a a m m i i e e n n t t o o A A l l m m a a c c e e n n a a m m i i e e n n t t o o y y t t r r a a n n s s p p o o r r t t e e C C o o n n d d i i c c i i o o n n e e s s a a m m b b i i e e n n t t a a l l e e s s 100 °F 140 °F...
- Page 67 Para ver en línea el manual de uso o de mantenimiento de su producto, visite https://techweb.stryker.com/. Tenga a mano el número de serie (A) del producto de Stryker cuando llame al Servicio de Atención al Cliente o al Servicio de Asistencia Técnica de Stryker. Incluya el número de serie en todas las comunicaciones escritas.
- Page 68 I I n n s s t t a a l l a a c c i i ó ó n n Antes de poner el producto en servicio, asegúrese de que funcione. 1. Aplique el freno. Empuje el producto para asegurarse de que las cuatro ruedas giratorias estén bloqueadas. 2.
- Page 69 F F u u n n c c i i o o n n a a m m i i e e n n t t o o A A p p l l i i c c a a c c i i ó ó n n y y l l i i b b e e r r a a c c i i ó ó n n d d e e l l o o s s f f r r e e n n o o s s A A D D V V E E R R T T E E N N C C I I A A - - Aplique siempre los frenos cuando un paciente vaya a subir o bajar del producto, o cuando el producto no se esté...
- Page 70 F F i i g g u u r r a a 2 2 – – E E l l e e v v a a c c i i ó ó n n o o d d e e s s c c e e n n s s o o d d e e l l a a m m e e s s a a C C o o l l o o c c a a c c i i ó...
- Page 71 T T r r a a n n s s p p o o r r t t e e d d e e u u n n p p a a c c i i e e n n t t e e c c o o n n l l a a q q u u i i n n t t a a r r u u e e d d a a r r e e t t r r á á c c t t i i l l A A D D V V E E R R T T E E N N C C I I A A •...
- Page 72 Para subir las barras laterales, utilice las dos manos para agarrar la barra lateral. Suba la barra lateral hasta que el pasador de liberación encaje con un clic en su sitio. Tire de la barra lateral para asegurarse de que está bloqueada. Para bajar las barras laterales, tire del pasador de liberación hacia arriba.
- Page 73 5. Coloque los pies de la paciente en los soportes de los pies. F F i i g g u u r r a a 5 5 – – C C o o l l o o c c a a c c i i ó ó n n d d e e l l o o s s s s o o p p o o r r t t e e s s d d e e l l o o s s p p i i e e s s A A l l m m a a c c e e n n a a m m i i e e n n t t o o d d e e l l o o s s s s o o p p o o r r t t e e s s d d e e l l o o s s p p i i e e s s P P R R E E C C A A U U C C I I Ó...
- Page 74 Para bajar la sección de los pies, levante por la sección de los pies. Apriete el asa liberadora roja (A). Baje la sección de los pies. Para subir la sección de los pies, tire hacia arriba de la estructura de la sección de los pies hasta que esta quede fijada. Asegúrese de que la sección de los pies esté...
- Page 75 Estos accesorios pueden estar disponibles para su uso con el producto. Confirme la disponibilidad para su configuración o región. Llame al Servicio de Atención al Cliente de Stryker: 1-800-327-0770. N N o o m m b b r r e e N N ú...
- Page 76 F F i i j j a a c c i i ó ó n n y y c c o o l l o o c c a a c c i i ó ó n n d d e e l l a a p p e e r r c c h h a a i i . . v v . . d d e e s s m m o o n n t t a a b b l l e e P P R R E E C C A A U U C C I I Ó...
- Page 77 N N o o t t a a - - No utilice el soporte vertical para la botella de oxígeno como dispositivo de empuje o tracción. E E x x t t e e n n s s i i ó ó n n o o a a l l m m a a c c e e n n a a m m i i e e n n t t o o d d e e l l s s o o p p o o r r t t e e d d e e l l a a b b a a n n d d e e j j a a d d e e s s e e r r v v i i r r / / p p i i e e d d e e c c a a m m a a A A D D V V E E R R T T E E N N C C I I A A - - No coloque objetos que superen los 14 kg en la bandeja de servir.
- Page 78 F F i i g g u u r r a a 8 8 – – A A c c c c e e s s o o a a l l s s o o p p o o r r t t e e d d e e l l c c h h a a s s i i s s r r a a d d i i o o g g r r á á f f i i c c o o d d e e l l r r e e s s p p a a l l d d o o F F o o w w l l e e r r L L o o c c a a l l i i z z a a c c i i ó...
- Page 79 F F i i g g u u r r a a 9 9 – – U U b b i i c c a a c c i i o o n n e e s s d d e e l l o o s s a a m m a a r r r r e e s s d d e e l l a a s s c c o o r r r r e e a a s s d d e e s s u u j j e e c c i i ó ó n n 1061-009-005 Rev B.0...
- Page 80 L L i i m m p p i i e e z z a a L L i i m m p p i i e e z z a a d d e e l l p p r r o o d d u u c c t t o o A A D D V V E E R R T T E E N N C C I I A A - - No limpie el producto, no lo repare ni le realice el mantenimiento mientras se esté...
- Page 81 Método de limpieza recomendado: 1. Use un paño suave y limpio para limpiar todo el colchón con una solución de agua y un jabón suave, y retirar los materiales extraños. 2. Pase un paño limpio y seco sobre el colchón para eliminar cualquier exceso de líquido o productos de limpieza. 3.
- Page 82 D D e e s s i i n n f f e e c c c c i i ó ó n n D D e e s s i i n n f f e e c c c c i i ó ó n n d d e e l l p p r r o o d d u u c c t t o o A A D D V V E E R R T T E E N N C C I I A A •...
- Page 83 • Desinfectante fenólico (ingrediente activo: o-fenilfenol) • Solución de lejía clorada (1 parte de solución de lejía [hipoclorito de sodio al 5,25 %] por 100 partes de agua, lo que equivale a 520 ppm de cloro disponible [40 mL de una solución de lejía al 5,25 % por 4000 mL de agua]) •...
- Page 84 Retire el producto del servicio antes de realizar la inspección de mantenimiento preventivo. Revise todos los componentes incluidos en la lista durante el mantenimiento preventivo anual de todos los productos de Stryker Medical. Es posible que deba realizar revisiones de mantenimiento preventivo con más frecuencia en función de su nivel de uso del producto. Las reparaciones solo puede realizarlas personal cualificado.
- Page 85 B B r r a a n n c c a a r r d d d d e e g g y y n n é é c c o o l l o o g g i i e e - - o o b b s s t t é é t t r r i i q q u u e e G G y y n n n n i i e e ® ® M M a a n n u u e e l l d d ' ' u u t t i i l l i i s s a a t t i i o o n n 1061 1061-009-005 Rev B.0...
- Page 87 Avertissement général Mise en garde Ne pas pousser Ne pas stocker la bouteille d'oxygène Référence Numéro de série Pour les brevets américains, consulter www.stryker.com/patents Marquage CE Mandataire établi dans la Communauté européenne Dispositif médical européen Fabricant Charge maximale admissible Lubrifier Pièce appliquée de type B...
- Page 89 T T a a b b l l e e d d e e s s m m a a t t i i è è r r e e s s Symboles................................27 Définition de « Avertissement », « Mise en garde » et « Remarque » ..............2 Résumé...
- Page 90 D D é é f f i i n n i i t t i i o o n n d d e e « « A A v v e e r r t t i i s s s s e e m m e e n n t t » » , , « « M M i i s s e e e e n n g g a a r r d d e e » » e e t t « « R R e e m m a a r r q q u u e e » » Les termes A A V V E E R R T T I I S S S S E E M M E E N N T T , M M I I S S E E E E N N G G A A R R D D E E et R R E E M M A A R R Q Q U U E E ont une signification particulière et doivent faire l’objet d’une lecture attentive.
- Page 91 • Toujours faire preuve de prudence si le plateau porte-défibrillateur/rallonge de lit, le pied de lit/porte-dossiers ou le support vertical pour bouteille d'oxygène est fixé afin d'éviter de se pincer les doigts lors du positionnement de la poignée de poussée du côté pieds en option. •...
- Page 92 D D e e s s c c r r i i p p t t i i o o n n d d u u p p r r o o d d u u i i t t Le brancard de gynécologie-obstétrique G G y y n n n n i i e e ® ® modèle 1061 de Stryker est un brancard roulant qui comporte une plate- forme montée sur un châssis à...
- Page 93 13 po x 39 po 34 cm x 99 cm Diamètre des roulettes 8 po 20 cm Distance de retenue du mur 68 po 172,7 cm Stryker se réserve le droit de modifier ces caractéristiques sans préavis. 1061-009-005 Rev B.0...
- Page 94 F F o o n n c c t t i i o o n n n n e e m m e e n n t t S S t t o o c c k k a a g g e e e e t t t t r r a a n n s s p p o o r r t t C C o o n n d d i i t t i i o o n n s s a a m m b b i i a a n n t t e e s s 100 °F 140 °F...
- Page 95 Pour consulter votre mode d'emploi ou votre manuel d'entretien en ligne, consulter https://techweb.stryker.com/. Avoir le numéro de série (A) du produit Stryker à disposition avant d’appeler le service clientèle ou le support technique de Stryker. Inclure le numéro de série dans toutes les communications écrites.
- Page 96 I I n n s s t t a a l l l l a a t t i i o o n n Avant de mettre le produit en service, vérifier qu'il fonctionne correctement. 1. Enclencher le frein. Pousser le produit pour vérifier que les quatre roulettes sont bloquées. 2.
- Page 97 F F o o n n c c t t i i o o n n n n e e m m e e n n t t E E n n c c l l e e n n c c h h e e m m e e n n t t e e t t d d é é b b l l o o c c a a g g e e d d e e s s f f r r e e i i n n s s A A V V E E R R T T I I S S S S E E M M E E N N T T - - Toujours enclencher les freins lorsqu’un patient s’installe sur le produit ou en descend, ou lorsque le produit n'est pas en mouvement.
- Page 98 F F i i g g u u r r e e 2 2 – – É É l l é é v v a a t t i i o o n n o o u u a a b b a a i i s s s s e e m m e e n n t t d d u u p p l l a a n n d d e e c c o o u u c c h h a a g g e e P P o o s s i i t t i i o o n n n n e e m m e e n n t t d d u u p p r r o o d d u u i i t t e e n n d d é...
- Page 99 T T r r a a n n s s p p o o r r t t d d ' ' u u n n p p a a t t i i e e n n t t e e n n u u t t i i l l i i s s a a n n t t l l a a c c i i n n q q u u i i è è m m e e r r o o u u e e r r é é t t r r a a c c t t a a b b l l e e A A V V E E R R T T I I S S S S E E M M E E N N T T •...
- Page 100 Pour élever les barrières, les saisir des deux mains. Élever la barrière jusqu'à ce que le loquet de déblocage s'enclenche. Tirer sur la barrière pour s'assurer qu'elle est verrouillée. Pour abaisser les barrières, tirer le loquet de déblocage vers le haut. Guider la barrière à la position la plus basse. R R e e m m a a r r q q u u e e - - Ne pas utiliser les barrières comme dispositifs de retenue pour empêcher le patient de sortir du produit.
- Page 101 5. Placer les pieds de la patiente dans les appui-pieds. F F i i g g u u r r e e 5 5 – – P P o o s s i i t t i i o o n n n n e e m m e e n n t t d d e e s s a a p p p p u u i i - - p p i i e e d d s s R R a a n n g g e e m m e e n n t t d d e e s s a a p p p p u u i i - - p p i i e e d d s s M M I I S S E E E E N N G G A A R R D D E E •...
- Page 102 Pour abaisser la section pieds, soulever la section pieds. Comprimer la poignée de déblocage rouge (A). Abaisser la section pieds. Pour élever la section pieds, tirer le châssis de la section pieds vers le haut jusqu’à ce que la section pieds se bloque. S’assurer que la section pieds est fixée avant d’y placer une patiente, quel que soit son poids.
- Page 103 A A c c c c e e s s s s o o i i r r e e s s e e t t p p i i è è c c e e s s Les accessoires suivants peuvent être disponibles pour le produit. Confirmer la disponibilité en fonction de la configuration du produit ou du pays. Contacter le service clientèle de Stryker : +1-800-327-0770. N N o o m m N N u u m m é...
- Page 104 • Ne pas suspendre des poches de perfusion de plus de 40 lb (18 kg) sur le support de perfusion. • Toujours s’assurer que la hauteur du support de perfusion est suffisamment basse pour franchir les ouvertures de porte lors du transport d’un patient. Pour fixer et positionner le support de perfusion amovible (Figure 7) : 1.
- Page 105 D D é é p p l l o o i i e e m m e e n n t t o o u u r r a a n n g g e e m m e e n n t t d d u u p p o o r r t t e e - - p p l l a a t t e e a a u u d d e e s s e e r r v v i i c c e e / / p p i i e e d d d d e e l l i i t t A A V V E E R R T T I I S S S S E E M M E E N N T T - - Ne pas placer d'objets de plus de 14 kg sur le plateau de service.
- Page 106 F F i i g g u u r r e e 8 8 – – A A c c c c è è s s a a u u p p o o r r t t e e - - c c a a s s s s e e t t t t e e r r a a d d i i o o d d u u r r e e l l è è v v e e - - b b u u s s t t e e E E m m p p l l a a c c e e m m e e n n t t d d e e s s p p o o i i n n t t s s d d ’...
- Page 107 F F i i g g u u r r e e 9 9 – – E E m m p p l l a a c c e e m m e e n n t t d d e e s s p p o o i i n n t t s s d d ’ ’ a a r r r r i i m m a a g g e e d d e e s s s s a a n n g g l l e e s s d d e e r r e e t t e e n n u u e e 1061-009-005 Rev B.0...
- Page 108 N N e e t t t t o o y y a a g g e e N N e e t t t t o o y y a a g g e e d d u u p p r r o o d d u u i i t t A A V V E E R R T T I I S S S S E E M M E E N N T T - - Ne pas procéder au nettoyage, à...
- Page 109 Méthode de nettoyage recommandée : 1. À l’aide d’un chiffon propre et doux, essuyer le matelas tout entier en utilisant une solution de savon doux et d’eau pour enlever tout corps étranger. 2. Essuyer le matelas à l’aide d’un chiffon propre et sec afin d’enlever tout excès de liquide ou d’agent de nettoyage. 3.
- Page 110 D D é é s s i i n n f f e e c c t t i i o o n n D D é é s s i i n n f f e e c c t t i i o o n n d d u u p p r r o o d d u u i i t t A A V V E E R R T T I I S S S S E E M M E E N N T T •...
- Page 111 • Désinfectant phénolique (substance active : o-phénylphénol) • Solution d’eau de Javel (1 volume d’eau de Javel [hypochlorite de sodium à 5,25 %] dilué dans 100 volumes d’eau, ce qui équivaut à 520 ppm de chlore actif [40 ml d’une solution d’eau de Javel à 5,25 % pour 4 000 ml d’eau]) •...
- Page 112 Mettre le produit hors service avant d’effectuer les vérifications d'entretien préventif. Vérifier tous les éléments mentionnés pendant l’entretien préventif annuel pour tous les produits Stryker Medical. Il peut être nécessaire d’effectuer les vérifications d’entretien préventif plus fréquemment en fonction du degré d’utilisation du produit. Toute réparation doit être effectuée exclusivement par du personnel qualifié.
- Page 113 B B a a r r e e l l l l a a G G y y n n n n i i e e ® ® O O B B / / G G Y Y N N M M a a n n u u a a l l e e d d ’...
- Page 115 Avvertenza generale Attenzione Vietato spingere Non conservare la bombola di ossigeno Numero di listino Numero di serie Per i brevetti USA, vedere www.stryker.com/patents Marcatura CE Rappresentante autorizzato per la Comunità Europea Dispositivo medico europeo Produttore Carico operativo di sicurezza Lubrificare Parte applicata di tipo B 1061-009-005 Rev B.0...
- Page 117 I I n n d d i i c c e e Simboli ................................27 Definizione dei termini Avvertenza, Attenzione e Nota ..................2 Riepilogo delle precauzioni di sicurezza ....................2 Introduzione ..............................4 Descrizione del prodotto .........................4 Indicazioni per l’uso ..........................4 Benefici clinici ............................4 Vita utile prevista............................5 Smaltimento/riciclaggio...........................5 Controindicazioni ...........................5...
- Page 118 D D e e f f i i n n i i z z i i o o n n e e d d e e i i t t e e r r m m i i n n i i A A v v v v e e r r t t e e n n z z a a , , A A t t t t e e n n z z i i o o n n e e e e N N o o t t a a I termini A A V V V V E E R R T T E E N N Z Z A A , A A T T T T E E N N Z Z I I O O N N E E e N N O O T T A A indicano condizioni particolari a cui occorre prestare attenzione.
- Page 119 • Non collocare oggetti di peso superiore a 30 libbre (14 kg) sul vassoio portavivande. • Usare sempre cautela nel fissare le cinghie di contenimento, per evitare lesioni al paziente o all’operatore. I dispositivi di contenimento fisico, anche se ben fissati, possono danneggiare gravemente pazienti e operatori, causando, ad esempio, aggrovigliamenti, intrappolamenti, lesioni fisiche o persino il decesso.
- Page 120 D D e e s s c c r r i i z z i i o o n n e e d d e e l l p p r r o o d d o o t t t t o o La barella Stryker Modello 1061 G G y y n n n n i i e e ® ® OB/GYN è una barella con ruote costituita da una piattaforma montata su di un telaio con ruote, utilizzabile per il trasporto di pazienti in posizione orizzontale e come piattaforma per il trattamento o l'esame clinico di pazienti all'interno di una struttura sanitaria.
- Page 121 13 pollici x 39 pollici 34 cm x 99 cm Diametro ruote piroettanti 8 pollici 20 cm Distacco dal punto a parete 68 pollici 172,7 cm Stryker si riserva il diritto di modificare le specifiche tecniche senza preavviso. 1061-009-005 Rev B.0...
- Page 122 A A z z i i o o n n a a m m e e n n t t o o C C o o n n s s e e r r v v a a z z i i o o n n e e e e t t r r a a s s p p o o r r t t o o C C o o n n d d i i z z i i o o n n i i a a m m b b i i e e n n t t a a l l i i 100 °F 140 °F...
- Page 123 Prima di chiamare il servizio di assistenza clienti o il servizio di assistenza tecnica Stryker, accertarsi di avere a disposizione il numero di serie (A) del prodotto Stryker. Tale numero di serie va incluso in tutte le comunicazioni per iscritto.
- Page 124 I I n n s s t t a a l l l l a a z z i i o o n n e e Assicurarsi che il prodotto funzioni prima di metterlo in servizio. 1. Inserire il freno. Spingere il prodotto per assicurarsi che tutte e quattro le ruote piroettanti siano bloccate. 2.
- Page 125 O O p p e e r r a a z z i i o o n n e e I I n n s s e e r r i i m m e e n n t t o o e e d d i i s s i i n n s s e e r r i i m m e e n n t t o o d d e e l l f f r r e e n n o o A A V V V V E E R R T T E E N N Z Z A A - - Inserire sempre il freno quando un paziente sale o scende dal prodotto o quando il prodotto è...
- Page 126 F F i i g g u u r r a a 2 2 – – S S o o l l l l e e v v a a m m e e n n t t o o e e a a b b b b a a s s s s a a m m e e n n t t o o d d e e l l l l e e t t t t i i n n o o P P o o s s i i z z i i o o n n a a m m e e n n t t o o d d e e l l p p r r o o d d o o t t t t o o i i n n T T r r e e n n d d e e l l e e n n b b u u r r g g A A V V V V E E R R T T E E N N Z Z A A - - Prima di alzare o abbassare il lettino, togliere sempre tutti i dispositivi che potrebbero costituire un ostacolo.
- Page 127 T T r r a a s s p p o o r r t t o o d d i i u u n n p p a a z z i i e e n n t t e e c c o o n n l l a a q q u u i i n n t t a a r r u u o o t t a a r r e e t t r r a a t t t t i i l l e e A A V V V V E E R R T T E E N N Z Z A A •...
- Page 128 Per abbassare le sponde laterali, tirare verso l’alto il fermo. Guidare la sponda laterale nella posizione più bassa. N N o o t t a a - - Non usare le sponde laterali come dispositivi di contenimento per impedire che il paziente scenda dal prodotto. Le sponde laterali impediscono al paziente di cadere dal prodotto.
- Page 129 F F i i g g u u r r a a 5 5 – – P P o o s s i i z z i i o o n n a a m m e e n n t t o o d d e e i i p p o o g g g g i i a a p p i i e e d d i i R R i i p p o o r r r r e e i i p p o o g g g g i i a a p p i i e e d d i i A A T T T T E E N N Z Z I I O O N N E E •...
- Page 130 P P o o s s i i z z i i o o n n a a m m e e n n t t o o d d e e l l s s u u p p p p o o r r t t o o p p e e r r c c o o n n t t e e n n i i t t o o r r e e d d e e i i r r i i f f i i u u t t i i ( ( o o p p z z i i o o n n a a l l e e ) ) A A T T T T E E N N Z Z I I O O N N E E •...
- Page 131 P P a a r r t t i i e e a a c c c c e e s s s s o o r r i i Questi accessori possono essere disponibili per essere utilizzati con il prodotto. Confermare la disponibilità per la propria configurazione o nella propria zona. Per la disponibilità e i prezzi, rivolgersi al servizio di assistenza clienti Stryker: 1-800- 327-0770.
- Page 132 C C o o l l l l e e g g a a m m e e n n t t o o e e p p o o s s i i z z i i o o n n a a m m e e n n t t o o d d e e l l l l ’ ’ a a s s t t a a p p o o r r t t a a f f l l e e b b o o r r i i m m o o v v i i b b i i l l e e A A T T T T E E N N Z Z I I O O N N E E •...
- Page 133 N N o o t t a a - - Non usare il portabombola di ossigeno verticale come dispositivo di spinta o di trazione. E E s s t t e e n n s s i i o o n n e e o o r r i i p p i i e e g g a a m m e e n n t t o o d d e e l l v v a a s s s s o o i i o o p p o o r r t t a a v v i i v v a a n n d d e e / / p p e e d d i i e e r r a a A A V V V V E E R R T T E E N N Z Z A A - - Non collocare oggetti di peso superiore a 14 kg sul vassoio portavivande.
- Page 134 F F i i g g u u r r a a 8 8 – – A A c c c c e e s s s s o o a a l l p p o o r r t t a a c c a a s s s s e e t t t t a a r r a a d d i i o o g g r r a a f f i i c c a a F F o o w w l l e e r r I I n n d d i i v v i i d d u u a a z z i i o o n n e e d d e e i i p p u u n n t t i i d d i i f f i i s s s s a a g g g g i i o o d d e e l l l l e e c c i i n n g g h h i i e e d d i i c c o o n n t t e e n n i i m m e e n n t t o o d d e e l l p p a a z z i i e e n n t t e e A A V V V V E E R R T T E E N N Z Z A A •...
- Page 135 F F i i g g u u r r a a 9 9 – – P P o o s s i i z z i i o o n n i i d d i i f f i i s s s s a a g g g g i i o o p p e e r r l l e e c c i i n n g g h h i i e e d d i i c c o o n n t t e e n n i i m m e e n n t t o o 1061-009-005 Rev B.0...
- Page 136 P P u u l l i i z z i i a a P P u u l l i i z z i i a a d d e e l l p p r r o o d d o o t t t t o o A A V V V V E E R R T T E E N N Z Z A A - - Non pulire, riparare o sottoporre a manutenzione il prodotto mentre è...
- Page 137 Metodo di pulizia consigliato: 1. Passare sull’intero materasso un panno pulito e morbido, imbevuto di una soluzione di acqua e sapone delicato, per rimuovere le tracce di materiale estraneo. 2. Passare sul materasso un panno pulito e asciutto per rimuovere l’eventuale liquido in eccesso o le tracce di detergente. 3.
- Page 138 D D i i s s i i n n f f e e z z i i o o n n e e D D i i s s i i n n f f e e z z i i o o n n e e d d e e l l p p r r o o d d o o t t t t o o A A V V V V E E R R T T E E N N Z Z A A •...
- Page 139 • fenolici (principio attivo: o-fenilfenolo) • Soluzione di candeggina clorata [1 parte di candeggina al 5,25% diluita in 100 parti di acqua, il che equivale a 520 ppm di cloro disponibile (40 ml di una soluzione di candeggina al 5,25% per 4000 ml di acqua)] •...
- Page 140 Rimuovere il prodotto dal servizio prima di eseguire gli interventi di manutenzione preventiva. Nel corso della manutenzione preventiva annuale di tutti i prodotti Stryker Medical, eseguire tutti i controlli qui elencati. È probabile che sia necessario eseguire interventi di manutenzione preventiva più di frequente, in base al grado di utilizzo del prodotto. Eventuali interventi di assistenza o riparazione devono essere eseguiti esclusivamente da personale qualificato.
- Page 141 G G y y n n n n i i e e ® ® O O B B / / G G Y Y N N - - b b r r a a n n c c a a r r d d B B e e d d i i e e n n i i n n g g s s h h a a n n d d l l e e i i d d i i n n g g 1061 1061-009-005 Rev B.0...
- Page 143 Bedieningsinstructies/raadpleeg gebruiksaanwijzing Algemene waarschuwing Let op Niet duwen De zuurstoffles niet opslaan Catalogusnummer Serienummer Zie www.stryker.com/patents voor Amerikaanse octrooien CE-markering Gemachtigde in de Europese Gemeenschap Europees medisch hulpmiddel Fabrikant Veilig draagvermogen Smeren Met de patiënt in aanraking komend onderdeel van type B...
- Page 145 I I n n h h o o u u d d s s o o p p g g a a v v e e Symbolen .................................27 Definitie van Waarschuwing/Let op/Opmerking ....................2 Samenvatting van de veiligheidsmaatregelen ...................2 Inleiding ...............................4 Productbeschrijving ..........................4 Gebruiksindicaties..........................4 Klinische voordelen ..........................4...
- Page 146 D D e e f f i i n n i i t t i i e e v v a a n n W W a a a a r r s s c c h h u u w w i i n n g g / / L L e e t t o o p p / / O O p p m m e e r r k k i i n n g g De woorden W W A A A A R R S S C C H H U U W W I I N N G G , L L E E T T O O P P en O O P P M M E E R R K K I I N N G G hebben een speciale betekenis en dienen aandachtig te worden bestudeerd.
- Page 147 • Wees altijd voorzichtig als het defibrillatorblad-voetverlengstuk, de voetenbord-dossierhouder of de verticale zuurstoffleshouder is bevestigd, om beknelling van de vingers bij het in positie brengen van de optionele duwhandgreep aan het voeteneinde te voorkomen. • Plaats geen voorwerpen zwaarder dan 30 lb (14 kg) op het dienblad. •...
- Page 148 P P r r o o d d u u c c t t b b e e s s c c h h r r i i j j v v i i n n g g De G G y y n n n n i i e e ® ® OB/GYN-brancard model 1061 van Stryker is een brancard op wielen bestaande uit een platform aangebracht op een frame met wielen om patiënten in een horizontale stand te vervoeren en biedt tevens een platform voor...
- Page 149 13 inch x 39 inch 34 cm x 99 cm Diameter zwenkwielen 8 inch 20 cm Punt van ontkoppeling van wand 68 inch 172,7 cm Stryker behoudt zich het recht voor om de specificaties zonder kennisgeving te wijzigen. 1061-009-005 Rev B.0...
- Page 150 O O m m g g e e v v i i n n g g s s o o m m s s t t a a n n d d i i g g h h e e d d e e n n B B e e d d i i e e n n i i n n g g O O p p s s l l a a g g e e n n v v e e r r v v o o e e r r 100 °F...
- Page 151 Ga naar https://techweb.stryker.com/ als u de bedienings- of onderhoudshandleiding online wilt bekijken. Zorg dat u het serienummer (A) van uw Stryker-product bij de hand hebt wanneer u de klantenservice of technische ondersteuning van Stryker belt. Vermeld het serienummer in al uw correspondentie.
- Page 152 O O p p z z e e t t t t e e n n Verzeker u ervan dat het product werkt voordat u het in gebruik neemt. 1. Activeer de rem. Duw tegen het product om te controleren of alle vier de zwenkwielen vergrendeld zijn. 2.
- Page 153 B B e e d d r r i i j j f f D D e e r r e e m m m m e e n n a a c c t t i i v v e e r r e e n n e e n n l l o o s s z z e e t t t t e e n n W W A A A A R R S S C C H H U U W W I I N N G G - - Activeer altijd de remmen wanneer een patiënt op het product gaat liggen of eraf komt, en ook wanneer het product niet in beweging is.
- Page 154 A A f f b b e e e e l l d d i i n n g g 2 2 – – D D e e m m a a t t r r a a s s d d r r a a g g e e r r o o m m h h o o o o g g - - o o f f o o m m l l a a a a g g z z e e t t t t e e n n H H e e t t p p r r o o d d u u c c t t i i n n d d e e t t r r e e n n d d e e l l e e n n b b u u r r g g s s t t a a n n d d p p l l a a a a t t s s e e n n W W A A A A R R S S C C H H U U W W I I N N G G - - Verwijder altijd alle voorwerpen die mogelijk in de weg kunnen zitten voordat u de matrasdrager hoger of lager zet.
- Page 155 E E e e n n p p a a t t i i ë ë n n t t v v e e r r v v o o e e r r e e n n m m e e t t h h e e t t i i n n t t r r e e k k b b a a r r e e v v i i j j f f d d e e w w i i e e l l W W A A A A R R S S C C H H U U W W I I N N G G •...
- Page 156 Om een onrusthek omhoog te zetten, pakt u het onrusthek met twee handen vast. Licht het onrusthek op totdat de vrijgavepal op zijn plaats vastklikt. Trek aan het onrusthek om te controleren of het onrusthek is vastgeklikt. Om een onrusthek omlaag te zetten trekt u de vrijgavepal omhoog. Geleid het onrusthek naar de laagste stand. O O p p m m e e r r k k i i n n g g - - Gebruik onrusthekken niet als middel om te voorkomen dat de patiënt van het product af komt.
- Page 157 5. Plaats de voeten van de patiënt in de voetensteunen. A A f f b b e e e e l l d d i i n n g g 5 5 – – D D e e v v o o e e t t e e n n s s t t e e u u n n e e n n i i n n p p o o s s i i t t i i e e b b r r e e n n g g e e n n D D e e v v o o e e t t e e n n s s t t e e u u n n e e n n w w e e g g b b e e r r g g e e n n L L E E T T O O P P •...
- Page 158 Om de voetsectie omlaag te zetten, licht u de voetsectie op. Knijp de rode vrijzethendel (A) in. Zet de voetsectie omlaag. Om de voetsectie omhoog te zetten, trekt u het voetsectieframe omhoog totdat de voetsectie vastklikt. Verzeker u ervan dat de voetsectie goed vastzit voordat u het gewicht van de patiënt op de voetsectie plaatst.
- Page 159 A A c c c c e e s s s s o o i i r r e e s s e e n n o o n n d d e e r r d d e e l l e e n n Deze accessoires zijn mogelijk verkrijgbaar voor gebruik bij uw product. Vraag na of ze verkrijgbaar zijn voor uw configuratie of regio. Bel de klantenservice van Stryker: +1-800-327-0770. N N a a a a m m...
- Page 160 • Hang geen infuuszakken zwaarder dan 40 lb (18 kg) aan de infuuspaal. • Zorg dat de infuuspaal altijd op lage hoogte staat wanneer u een patiënt vervoert, zodat de paal door deuropeningen heen kan. De verwijderbare infuuspaal bevestigen en in positie brengen (Afbeelding 7): 1.
- Page 161 D D i i e e n n b b l l a a d d h h o o u u d d e e r r / / v v o o e e t t e e n n b b o o r r d d u u i i t t k k l l a a p p p p e e n n o o f f w w e e g g b b e e r r g g e e n n W W A A A A R R S S C C H H U U W W I I N N G G - - Plaats geen voorwerpen zwaarder dan 14 kg op het dienblad.
- Page 162 A A f f b b e e e e l l d d i i n n g g 8 8 – – T T o o e e g g a a n n g g t t o o t t d d e e r r ö ö n n t t g g e e n n c c a a s s s s e e t t t t e e h h o o u u d d e e r r i i n n d d e e r r u u g g l l e e u u n n i i n n g g D D e e b b e e v v e e s s t t i i g g i i n n g g s s p p u u n n t t e e n n v v o o o o r r d d e e p p a a t t i i ë...
- Page 163 A A f f b b e e e e l l d d i i n n g g 9 9 – – B B e e v v e e s s t t i i g g i i n n g g s s p p u u n n t t e e n n v v o o o o r r v v e e i i l l i i g g h h e e i i d d s s r r i i e e m m e e n n 1061-009-005 Rev B.0...
- Page 164 R R e e i i n n i i g g i i n n g g H H e e t t p p r r o o d d u u c c t t r r e e i i n n i i g g e e n n W W A A A A R R S S C C H H U U W W I I N N G G - - Voer geen reiniging, reparatie of onderhoud uit terwijl het product in gebruik is.
- Page 165 Aanbevolen reinigingsmethode: 1. Neem de gehele matras af met een schone, zachte doek en een oplossing van water en milde zeep om vreemd materiaal te verwijderen. 2. Neem de matras af met een schone, droge doek om overtollige vloeistof of reinigingsmiddel te verwijderen. 3.
- Page 166 D D e e s s i i n n f f e e c c t t i i e e H H e e t t p p r r o o d d u u c c t t d d e e s s i i n n f f e e c c t t e e r r e e n n W W A A A A R R S S C C H H U U W W I I N N G G •...
- Page 167 • middelen op basis van quaternaire ammoniumverbindingen (werkzame stof – ammoniumchloride) die minder dan 3% glycolether bevatten • fenolhoudend desinfectiemiddel (werkzame stof – o-fenylfenol) • chloorhoudende bleekoplossing (1:100-verdunning van 5,25% bleekmiddel in water, wat overeenkomt met 520 ppm beschikbaar chloor [40 ml van een 5,25% bleekoplossing per 4000 ml water]) •...
- Page 168 Stel het product buiten gebruik voordat u de preventieve onderhoudsinspectie uitvoert. Controleer bij het jaarlijkse preventieve onderhoud alle vermelde punten voor alle producten van Stryker Medical. Afhankelijk van de intensiteit van het gebruik van het product kan het nodig zijn vaker preventieve onderhoudscontroles uit te voeren. Onderhoud en reparaties mogen uitsluitend door bevoegd personeel worden uitgevoerd.
- Page 169 N N o o s s z z e e p p o o ł ł o o ż ż n n i i c c z z e e / / g g i i n n e e k k o o l l o o g g i i c c z z n n e e G G y y n n n n i i e e ® ® P P o o d d r r ę...
- Page 171 Instrukcje obsługi/sprawdzić w instrukcji obsługi Ogólne ostrzeżenie Przestroga Nie popychać Nie wolno przechowywać butli z tlenem Numer katalogowy Numer seryjny Patenty amerykańskie: www.stryker.com/patents Oznaczenie CE Autoryzowany przedstawiciel we Wspólnocie Europejskiej Europejski wyrób medyczny Producent Bezpieczne obciążenie robocze Smarować Część typu B wchodząca w kontakt z ciałem pacjenta...
- Page 173 S S p p i i s s t t r r e e ś ś c c i i Symbole ................................27 Definicja Ostrzeżenia/Przestrogi/Uwagi ......................2 Wykaz środków ostrożności w zakresie bezpieczeństwa ................2 Wstęp ................................4 Opis produktu ............................4 Wskazania do stosowania........................4 Korzyści kliniczne...........................4 Przewidywany okres eksploatacji ......................5 Utylizacja/recykling..........................5...
- Page 174 D D e e f f i i n n i i c c j j a a O O s s t t r r z z e e ż ż e e n n i i a a / / P P r r z z e e s s t t r r o o g g i i / / U U w w a a g g i i Słowa O O S S T T R R Z Z E E Ż...
- Page 175 • W pionowym uchwycie na butlę z tlenem nie wolno umieszczać przedmiotów o masie przekraczającej 40 funtów (18 kg). • Aby nie doszło do przyciśnięcia palców przy ustawianiu opcji uchwytu po stronie podnóżka, należy zawsze zachować ostrożność, jeżeli podłączono tacę defibrylatora/przedłużenie na nogi, płytę podnóżka/uchwyt na kartę leczenia lub pionowy uchwyt na butlę...
- Page 176 O O p p i i s s p p r r o o d d u u k k t t u u Nosze położnicze/ginekologiczne G G y y n n n n i i e e ® ® Model 1061 firmy Stryker to nosze kołowe składające się z platformy zamontowanej na ramie kołowej do transportu pacjentek w pozycji poziomej, zapewniające jednocześnie platformę...
- Page 177 Poręcze boczne 13 cali × 39 cali 34 cm × 99 cm 8 cali 20 cm Średnica kółek samonastawnych Odstęp od ściany 68 cali 172,7 cm Firma Stryker zastrzega sobie prawo do zmiany parametrów technicznych bez wcześniejszego powiadomienia. 1061-009-005 Rev B.0...
- Page 178 C C z z y y n n n n o o ś ś ć ć P P r r z z e e c c h h o o w w y y w w a a n n i i e e i i t t r r a a n n s s p p o o r r t t W W a a r r u u n n k k i i ś...
- Page 179 Dostęp online do podręcznika obsługi lub konserwacji produktu można uzyskać na stronie https://techweb.stryker.com/. Telefonując do Działu Obsługi Klienta lub Działu Pomocy Technicznej firmy Stryker należy mieć w zasięgu ręki numer seryjny (A) danego produktu Stryker. Należy powoływać się na numer seryjny we wszelkiej korespondencji.
- Page 180 P P r r z z y y g g o o t t o o w w a a n n i i e e Przed oddaniem produktu do eksploatacji należy upewnić się, że działa prawidłowo. 1. Aktywować hamulec. Pchnąć produkt, aby się upewnić, że wszystkie cztery kółka samonastawne są zablokowane. 2.
- Page 181 C C z z y y n n n n o o ś ś ć ć W W ł ł ą ą c c z z a a n n i i e e i i z z w w a a l l n n i i a a n n i i e e h h a a m m u u l l c c ó ó w w O O S S T T R R Z Z E E Ż...
- Page 182 R R y y s s u u n n e e k k 2 2 – – P P o o d d n n o o s s z z e e n n i i e e l l u u b b o o p p u u s s z z c c z z a a n n i i e e b b l l a a t t u u n n o o s s z z y y U U s s t t a a w w i i a a n n i i e e p p r r o o d d u u k k t t u u w w p p o o z z y y c c j j i i T T r r e e n n d d e e l l e e n n b b u u r r g g a a O O S S T T R R Z Z E E Ż...
- Page 183 T T r r a a n n s s p p o o r r t t o o w w a a n n i i e e p p a a c c j j e e n n t t a a p p r r z z y y u u ż ż y y w w a a n n i i u u c c h h o o w w a a n n e e g g o o p p i i ą ą t t e e g g o o k k o o ł ł a a O O S S T T R R Z Z E E Ż...
- Page 184 Aby podnieść poręcz boczną, należy chwycić ją oburącz. Podnieść poręcz boczną, aż do zablokowania w miejscu. Sprawdzić zablokowanie poręczy bocznych, pociągając je. Aby opuścić poręcz boczną, pociągnąć poręcz do góry w celu zwolnienia blokady. Opuścić poręcz boczną do najniższej pozycji. U U w w a a g g a a - - Nie wolno używać...
- Page 185 4. Aby wyregulować pozycję podnóżka, należy go unieść i przesunąć go do środka lub na zewnątrz. 5. Umieścić stopy pacjentki na podnóżku. R R y y s s u u n n e e k k 5 5 – – U U s s t t a a w w i i a a n n i i e e w w s s p p o o r r n n i i k k ó ó w w s s t t ó ó p p P P r r z z e e c c h h o o w w y y w w a a n n i i e e p p o o d d n n ó...
- Page 186 • Gdy podnóżek jest opuszczany, zawsze upewnić się, że nie koliduje z podnóżkiem. • Aby uniknąć obrażeń ciała operatora lub pacjentki, przed użyciem podnóżka należy upewnić się, że podnóżek jest stabilny. Aby opuścić podnóżek, należy unieść podnóżek. Ścisnąć czerwony uchwyt zwalniający (A). Opuścić podnóżek. Aby podnieść...
- Page 187 A A k k c c e e s s o o r r i i a a i i c c z z ę ę ś ś c c i i Te akcesoria mogą być dostępne do stosowania z danym produktem. Należy potwierdzić dostępność dla danej konfiguracji lub regionu. Skontaktować się telefonicznie z działem obsługi klienta firmy Stryker: 1-800-327-0770. N N a a z z w w a a N N u u m m e e r r Podparcie łydki, wolnostojące...
- Page 188 M M o o c c o o w w a a n n i i e e i i u u s s t t a a w w i i a a n n i i e e z z d d e e j j m m o o w w a a l l n n e e g g o o s s t t o o j j a a k k a a n n a a k k r r o o p p l l ó ó w w k k i i P P R R Z Z E E S S T T R R O O G G A A •...
- Page 189 U U w w a a g g a a - - Nie używać pionowego uchwytu na butlę z tlenem do pchania lub ciągnięcia. R R o o z z k k ł ł a a d d a a n n i i e e l l u u b b s s k k ł ł a a d d a a n n i i e e t t a a c c y y d d o o p p o o d d a a w w a a n n i i a a / / p p ł ł y y t t y y p p o o d d n n ó ó ż ż k k a a O O S S T T R R Z Z E E Ż...
- Page 190 R R y y s s u u n n e e k k 8 8 – – D D o o s s t t ę ę p p d d o o u u c c h h w w y y t t u u n n a a k k a a s s e e t t ę ę z z k k l l i i s s z z ą ą R R T T G G w w o o p p a a r r c c i i u u p p l l e e c c ó ó w w L L o o k k a a l l i i z z a a c c j j a a z z a a c c z z e e p p ó...
- Page 191 R R y y s s u u n n e e k k 9 9 – – M M i i e e j j s s c c a a m m o o c c o o w w a a n n i i a a p p a a s s ó ó w w u u n n i i e e r r u u c c h h a a m m i i a a j j ą ą c c y y c c h h 1061-009-005 Rev B.0...
- Page 192 C C z z y y s s z z c c z z e e n n i i e e C C z z y y s s z z c c z z e e n n i i e e p p r r o o d d u u k k t t u u O O S S T T R R Z Z E E Ż...
- Page 193 Zalecana metoda czyszczenia: 1. Należy używać czystej, miękkiej ściereczki i wodnego roztworu łagodnego mydła do przetarcia całego materaca w celu usunięcia ciał obcych. 2. Przetrzeć materac czystą, suchą ściereczką, aby usunąć wszelki nadmiar płynu lub środka czyszczącego. 3. Opłukać i osuszyć pokrowce po czyszczeniu. 4.
- Page 194 D D e e z z y y n n f f e e k k c c j j a a D D e e z z y y n n f f e e k k o o w w a a n n i i e e p p r r o o d d u u k k t t u u O O S S T T R R Z Z E E Ż...
- Page 195 • Związki czwartorzędowe (aktywny składnik – chlorek amonu) zawierające mniej niż 3% eterów glikolowych • Fenolowe środki dezynfekujące (aktywny składnik – o-fenylofenol) • Roztwór wybielacza na bazie chloru (5,25% wybielacz, rozcieńczony w stosunku 1 część wybielacza na 100 części wody, co odpowiada 520 ppm dostępnego chloru (40 ml roztworu wybielacza o stężeniu 5,25% na 4000 ml wody)) •...
- Page 196 K K o o n n s s e e r r w w a a c c j j a a z z a a p p o o b b i i e e g g a a w w c c z z a a Przed przystąpieniem do wykonywania inspekcji konserwacji zapobiegawczej należy wycofać produkt z eksploatacji. Podczas corocznej konserwacji zapobiegawczej wszystkich produktów firmy Stryker Medical należy sprawdzić wszystkie wymienione pozycje. Może wystąpić konieczność częstszego wykonywania kontroli konserwacji zapobiegawczej w zależności od poziomu użytkowania produktu.
- Page 197 M M a a c c a a G G y y n n n n i i e e ® ® O O B B / / G G Y Y N N M M a a n n u u a a l l d d e e u u t t i i l l i i z z a a ç ç ã ã o o 1061 1061-009-005 Rev B.0 2019/11...
- Page 199 Instruções de funcionamento/Consultar as instruções de utilização Advertência geral Precaução Não empurrar Não armazenar a botija de oxigénio Número de catálogo Número de série Para patentes dos EUA, consulte www.stryker.com/patents Marcação CE Representante autorizado na Comunidade Europeia Dispositivo médico Europeu Fabricante Carga de trabalho segura Lubrificar Peça aplicada do tipo B...
- Page 201 Í Í n n d d i i c c e e Símbolos ................................27 Definição de Advertência/Precaução/Nota ......................2 Resumo das precauções de segurança ....................2 Introdução ..............................4 Descrição do produto ..........................4 Indicações de utilização..........................4 Benefícios clínicos ..........................4 Vida útil prevista.............................5 Eliminação/reciclagem..........................5 Contraindicações ...........................5 Especificações............................5 Ilustração do produto..........................6...
- Page 202 D D e e f f i i n n i i ç ç ã ã o o d d e e A A d d v v e e r r t t ê ê n n c c i i a a / / P P r r e e c c a a u u ç ç ã ã o o / / N N o o t t a a Os termos A A D D V V E E R R T T Ê...
- Page 203 • Tenha sempre precaução se o tabuleiro do desfibrilhador/extensão para os pés, a placa para os pés/suporte de fichas clínicas ou o suporte da botija de oxigénio vertical estiverem presos para evitar entalar os dedos quando posicionar a pega de empurrar da extremidade do lado dos pés opcional. •...
- Page 204 D D e e s s c c r r i i ç ç ã ã o o d d o o p p r r o o d d u u t t o o A maca G G y y n n n n i i e e ® ® OB/GYN modelo 1061 da Stryker é uma maca com rodas que consiste numa plataforma montada numa estrutura com rodas concebida para transportar doentes em posição horizontal, fornecendo uma plataforma para o...
- Page 205 13 pol. x 39 pol. 34 cm x 99 cm Diâmetro do rodízio 8 pol. 20 cm Distância do ponto da parede 68 pol. 172,7 cm A Stryker reserva-se o direito de alterar as especificações sem aviso prévio. 1061-009-005 Rev B.0...
- Page 206 C C o o n n d d i i ç ç õ õ e e s s a a m m b b i i e e n n t t a a i i s s F F u u n n c c i i o o n n a a m m e e n n t t o o A A r r m m a a z z e e n n a a m m e e n n t t o o e e t t r r a a n n s s p p o o r r t t e e 100 °F 140 °F...
- Page 207 Para consultar o manual de operações ou manutenção online, vá a https://techweb.stryker.com/. Tenha o número de série (A) do seu produto da Stryker à mão quando telefonar para o Serviço de Apoio ao Cliente ou Assistência Técnica da Stryker. Inclua o número de série em toda a comunicação escrita.
- Page 208 P P r r e e p p a a r r a a ç ç ã ã o o Certifique-se de que o produto funciona antes de o colocar em serviço. 1. Acione o travão. Empurre o produto para se certificar de que os quatro rodízios estão travados. 2.
- Page 209 F F u u n n c c i i o o n n a a m m e e n n t t o o A A c c i i o o n n a a m m e e n n t t o o e e d d e e s s e e n n g g a a t t e e d d o o s s t t r r a a v v õ õ e e s s A A D D V V E E R R T T Ê...
- Page 210 F F i i g g u u r r a a 2 2 – – E E l l e e v v a a r r o o u u b b a a i i x x a a r r a a e e s s t t r r u u t t u u r r a a d d a a c c a a m m a a P P o o s s i i c c i i o o n n a a m m e e n n t t o o d d o o p p r r o o d d u u t t o o n n a a p p o o s s i i ç...
- Page 211 T T r r a a n n s s p p o o r r t t e e d d e e u u m m d d o o e e n n t t e e c c o o m m a a q q u u i i n n t t a a r r o o d d a a r r e e t t r r á á t t i i l l A A D D V V E E R R T T Ê...
- Page 212 Para elevar as grades laterais, utilize as duas mãos para agarrar na grade lateral. Eleve a grade lateral até que o trinco de desengate encaixe com um estalido na sua posição. Puxe a grade lateral para se certificar de que ficou bloqueada na devida posição.
- Page 213 5. Posicione os pés do doente nos apoios para os pés. F F i i g g u u r r a a 5 5 – – P P o o s s i i c c i i o o n n a a m m e e n n t t o o d d o o s s a a p p o o i i o o s s p p a a r r a a o o s s p p é é s s A A r r m m a a z z e e n n a a m m e e n n t t o o d d o o s s a a p p o o i i o o s s p p a a r r a a o o s s p p é...
- Page 214 Para baixar a secção dos pés, levante a secção dos pés. Aperte a pega de libertação vermelha (A). Baixe a secção dos pés. Para elevar a secção dos pés, puxe a estrutura da secção dos pés para cima até que a secção dos pés fique fixa. Certifique-se de que a secção dos pés está...
- Page 215 A A c c e e s s s s ó ó r r i i o o s s e e p p e e ç ç a a s s Estes acessórios podem estar disponíveis para utilização com o seu produto. Confirme a disponibilidade para a sua configuração ou região. Contacte a assistência ao cliente da Stryker: 1-800-327-0770. N N o o m m e e N N ú...
- Page 216 F F i i x x a a ç ç ã ã o o e e p p o o s s i i c c i i o o n n a a m m e e n n t t o o d d a a h h a a s s t t e e d d o o s s u u p p o o r r t t e e d d e e s s o o r r o o s s a a m m o o v v í í v v e e l l P P R R E E C C A A U U Ç...
- Page 217 N N o o t t a a - - Não utilize o suporte da botija de oxigénio vertical para empurrar/puxar. E E x x t t e e n n s s ã ã o o o o u u a a r r m m a a z z e e n n a a m m e e n n t t o o d d o o t t a a b b u u l l e e i i r r o o d d e e r r e e f f e e i i ç ç õ õ e e s s / / p p l l a a c c a a p p a a r r a a o o s s p p é é s s A A D D V V E E R R T T Ê...
- Page 218 F F i i g g u u r r a a 8 8 – – A A c c e e s s s s o o a a o o s s u u p p o o r r t t e e d d a a c c a a s s s s e e t t e e d d e e r r a a i i o o s s X X d d a a c c a a b b e e c c e e i i r r a a d d e e F F o o w w l l e e r r L L o o c c a a l l i i z z a a ç...
- Page 219 F F i i g g u u r r a a 9 9 – – P P r r e e n n d d a a a a s s c c o o r r r r e e i i a a s s d d e e c c o o n n t t e e n n ç ç ã ã o o a a p p e e n n a a s s n n o o s s l l o o c c a a i i s s d d e e f f i i x x a a ç ç ã ã o o 1061-009-005 Rev B.0...
- Page 220 L L i i m m p p e e z z a a L L i i m m p p e e z z a a d d o o p p r r o o d d u u t t o o A A D D V V E E R R T T Ê...
- Page 221 Método de limpeza recomendado: 1. Com um pano macio limpo, limpe todo o colchão com uma solução detergente suave e água para remover materiais estranhos. 2. Limpe o colchão com um pano limpo e seco para remover o excesso de líquido ou de agentes de limpeza. 3.
- Page 222 D D e e s s i i n n f f e e ç ç ã ã o o D D e e s s i i n n f f e e ç ç ã ã o o d d o o p p r r o o d d u u t t o o A A D D V V E E R R T T Ê...
- Page 223 • Desinfetante fenólico (princípio ativo — o-fenilfenol) • Solução de lixívia clorada (1 parte de lixívia diluída a 5,25% para 100 partes de água, o que equivale a 520 ppm de cloro disponíveis [40 ml de uma solução de lixívia a 5,25% por 4000 ml de água]) •...
- Page 224 Retire o produto de utilização antes da realização da inspeção de manutenção preventiva. Verifique todos os itens indicados durante a manutenção preventiva anual para todos os produtos da Stryker Medical. Poderá ter de realizar verificações da manutenção preventiva mais frequentemente, com base no nível de utilização do produto. A assistência deve ser feita apenas por pessoal qualificado.
- Page 226 Stryker Medical 3800 E. Centre Avenue Portage, MI 49002 1061-009-005 Rev B.0 2019/11 WCR: AA.6...
Need help?
Do you have a question about the Gynnie OB/GYN Stretcher and is the answer not in the manual?
Questions and answers