Table of Contents
Advertisement
Quick Links
Advertisement
Table of Contents
Troubleshooting

Related Manuals for Advantech SMARTSWARM 300 Series


Summary of Contents for Advantech SMARTSWARM 300 Series
- Page 1 300 Series MART WARM SmartSwarm 342 USER MANUAL...
- Page 2 SmartSwarm 342 Advantech B+B SmartWorx Americas 707 Dayton Road Ottawa, IL 61350 USA Phone (815) 433-5100 Fax (815) 433-5105 Advantech B+B SmartWorx European Headquarters Westlink Commercial Park Oranmore, Co. Galway, Ireland Phone +353 91-792444 Fax +353 91-792445 www.advantech-bb.com support@advantech-bb.com Hereby, B+B SmartWorx declares that the radio equipment type LTE cellular gateway is in compliance with Directive 2014/53/EU.
-
Page 3: Table Of Contents
SmartSwarm 342 CONTENTS List of Tables .................................. 6 1. INTRODUCTION................................7 2. EXAMPLE SYSTEM SETUP WORKFLOW ........................8 2.1 CONNECT YOUR SMARTSWARM IoT GATEWAY ....................8 2.2 CONFIGURE YOUR SMARTSWARM IOT GATEWAY’s CONNECTIVITY to SMARTWORK HUB ....... 9 2.3 CONFIGURE THE GATEWAY’s MESH INTERFACE....................12 2.4 CONNECT THE WZZARD MESH SENSOR NODE TO THE SMARTSWARM GATEWAY .......... - Page 4 SmartSwarm 342 4.1 STEP #1: CONNECT TO LOCAL WEBSERVER ....................... 24 4.2 STEP #2: CONFIGURE THE CELLULAR APN DETAILS ................... 24 4.3 STEP #3: VERIFY THE SECURE CONNECTION WITH SMARTWORX HUB ............. 24 4.4 STEP #4: VERIFY THAT YOUR DEVICE IS AVAILABLE ON SMARTWORX HUB ............25 4.4.1 Create An Account On SmartWorx Hub ......................
- Page 5 SmartSwarm 342 7.3.4 Aliasing Wzzard ID ............................41 7.3.5 Removing Lines From Files to Maintain Length ..................41 7.3.6 Calculating The Lngth of Files (Number of Lines) ..................42 7.3.7 Subsribe Once and Filter in Node-RED ....................... 42 7.3.8 Node_RED Does NOT “Scan” ........................42 7.4 GETTING DATA FROM WZZARD, ADAM, and WISE UNITS USING NODE-RED ...........
-
Page 6: List Of Tables
11.1.5 Cellular ..............................57 11.1.6 Logs ................................58 11.1.7 Debug and Agents ............................. 59 12. NODE-RED LICENSE ..............................60 Advantech B+B SmartWorx Technical Support ......................64 LIST OF TABLES Table 1. Power Connector ............................19 Table 2. Ethernet Ports ..............................19 Table 3. -
Page 7: Introduction
SmartSwarm 342 is an IoT Integration Gateway powered by B+B SmartWorx SmartSwarm technology. While it is able to integrate data from a number of Advantech and non-Advantech sources, it is primarily intended for use in applications where users need to interface to B+B SmartWorx WZZARD wireless sensor networks and pass data into an IoT platform or application. -
Page 8: Example System Setup Workflow
SmartSwarm 342 Device management is available from the SmartWorx Hub platform, offering the ability to remotely manage configuration, firmware and application downloads. Available in cellular or wired (Ethernet) uplink versions, the SmartSwarm 342 also acts as a simple router, routing traffic from the local LAN to the uplink, and providing firewall and VPN support. -
Page 9: Configure Your Smartswarm Iot Gateway's Connectivity To Smartwork Hub
SmartSwarm 342 2.2 CONFIGURE YOUR SMARTSWARM IOT GATEWAY’S CONNECTIVITY TO SMARTWORK HUB Use an Ethernet cable to connect your local laptop/desktop computer to your SmartSwarm Gateway’s ETH0 port. If you do not intend to use the cellular interface as your WAN connection, this step may not be necessary. ETH1 is configured to accept an IP address from a DHCP server. - Page 10 SmartSwarm 342 That is all you need to do. The device will now attempt to: (a) make a WAN connection using the cellular network, then: (b) make a secure connection to SmartWorx Hub (on hub.bb-smartworx.com). When (a) is successful, the WAN LED will turn on (yellow). When (b) is successful, the USR LED will turn on (yellow).
- Page 11 SmartSwarm 342 Open a browser page, and login to SmartWorx Hub on https://hub.bb-smartworx.com (NOTE: If you do not already have a user account on SmartWorx Hub, you may create one directly from https://hub.bb-smartworx.com, and use it immediately.) In this example, we assume that (a) you have an account to login with SmartWorx Hub, and (b) you are using the cloud instance of SmartWorx Hub to manage your devices.
-
Page 12: Configure The Gateway's Mesh Interface
SmartSwarm 342 2.3 CONFIGURE THE GATEWAY’S MESH INTERFACE Select your SmartSwarm Gateway by clicking on the Device ID. Now, select the Wzzard Mesh App. - Page 13 SmartSwarm 342 To publish the Wzzard Mesh MQTT data to an MQTT you must configure the MQTT client in the SmartSwarm 342 for the broker you wish to publish. Enter the Broker’s IP address in the Host field and enter the Broker’s Port. If a User Name and Password are required for the broker, enter them here.
-
Page 14: Connect The Wzzard Mesh Sensor Node To The Smartswarm Gateway
SmartSwarm 342 Apply your changes. 2.4 CONNECT THE WZZARD MESH SENSOR NODE TO THE SMARTSWARM GATEWAY The SmartSwarm Gateway will look for nodes to appear with the default network ID and join key. 1. Press and hold the Config/Status button for 5 seconds until the Status LED starts blinking. 2. -
Page 15: Explore The Node-Red Environment
SmartSwarm 342 If multiple gateways with advertising left on are used in the same geographic area, then new Wzzard nodes will connect to the first gateway they find. If you have more than one Gateway, please ensure all your other Gateways have the Node Discovery turned off. -
Page 16: Get Data From A Wzzard Node Into The Gateway Using Node-Red
SmartSwarm 342 This will open port 1880, which enables access to the Node-RED Service on all physical interfaces. You may access Node-RED via ETH1, using the WAN IP Address that has been assigned to ETH1 of your Device. Remember to append “:1880” to the ETH1 IP Address. e.g. 10.8.0.198:1880 (assuming the ETH1 WAN IP address that has been assigned is 10.8.0.198) Alternatively, you may access the Node-RED programming environment by connecting your laptop/desktop via Ethernet cable to ETH0 of your device, and pointing your browser at: 192.168.1.1:1880... -
Page 17: Verify Your Setup
SmartSwarm 342 In the Topic field, enter: “BB/+/data”, then click DONE. This will subscribe to all data that is being published by all of the Wzzard wireless sensor nodes that are available on the current Wzzard Mesh Network. From the Node-RED Palette, select the “debug” output node, and drag it onto the editor canvas. Join up the “Wzzard”... -
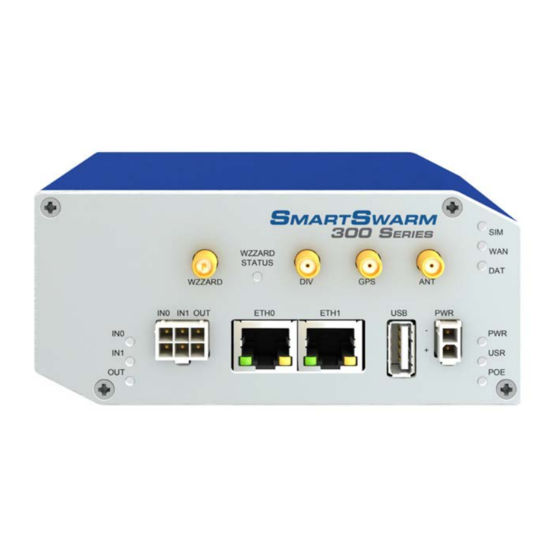
Page 18: Hardware Installation
SmartSwarm 342 3. HARDWARE INSTALLATION 3.1 MOUNTING THE DEVICE The unit may be mounted in any orientation. It can simply be placed on a flat surface or it can be DIN rail mounted using the supplied CKD2 holder. 3.1.1 INSTALLING/REMOVING FROM A DIN RAIL The CKD2 holder, which is used for mounting the gateway on a DIN rail, should be mounted such that the smaller flange on the holder is at the top when the unit is mounted on a DIN rail. -
Page 19: Power Connector "Pwr
SmartSwarm 342 3.2 POWER CONNECTOR “PWR” Panel Socket 2-pin Identification Description GND(-) Negative pole of DC supply voltage VCC(+) Positive pole of DC supply voltage (+10 to +60 V DC) Table 1. Power Connector The unit accepts the connection of power supplies in the range +10 V to +60 V DC. Protection against reverse polarity connection is built into the device. -
Page 20: Cellular Connection
SmartSwarm 342 Ethernet cables plug directly into the sockets. Always use a cable with an operational locking tab to avoid intermittent communications problems. The insulation strength is up to 1.5 kV. By default, ETH0 is set up as a DHCP server and is intended for the connection of diagnostic devices. ETH1 is set up as a DHCP client and may be used as an uplink for MQTT data being sent from the device. -
Page 21: Sim Card Reader
SmartSwarm 342 3.4.2 SIM CARD READER Two SIM card readers for 3 V and 1.8 V SIM cards are placed on the rear panel of the device. Only the first of these (SIM1) is currently supported by SmartSwarm 342. In order to operate on a cellular network it is necessary to insert an activated, data enabled SIM card with an unblocked PIN code. -
Page 22: Wzzard Wireless Sensor Network
SmartSwarm 342 3.5 WZZARD WIRELESS SENSOR NETWORK Please attach the supplied DUST Mesh Antenna to the Wzzard port. The Wzzard LED will be ON (yellow) when the Wzzard application is up and running inside the gateway. The Wzzard LED will blink briefly when there is data being transmitted or received on the Wzzard interface. 3.6 MICROSD CARD READER The MicroSD card socket, located on the rear panel of the unit, may be used to store or read files. -
Page 23: Leds
SmartSwarm 342 3.9 LEDS The following table describes the LED operation on the SmartSwarm device: Color State Description Green No power Device is booting Blinking Device is in normal operating mode Fast Device is updating firmware. Do not power off Blinking Yellow The device does not have a working session established with SmartWorx Hub... -
Page 24: Configure Connectivity To Smartworx Hub
SmartSwarm 342 4. CONFIGURE CONNECTIVITY TO SMARTWORX HUB All configuration of the SmartSwarm 342 IoT Gateway can be performed using the SmartWorx Hub cloud based management platform. SmartWorx Hub is accessed via the primary uplink port on the SmartSwarm 342. This is ETH1 if it is connected to a local LAN providing outbound (internet) access or the cellular connection if no outbound LAN connection exists via ETH1. -
Page 25: Step #4: Verify That Your Device Is Available On Smartworx Hub
2 such devices may be connected to a free account of SmartWorx Hub. If you wish to extend the terms of this automatically allocated License, please contact your local Advantech B+B SmartWorx Sales representative. Now that you have created login credentials for yourself, you may login. -
Page 26: Claim Your Devices On Smartworx Hub
SmartSwarm 342 4.4.2 CLAIM YOUR DEVICES ON SMARTWORX HUB Go to the “Devices”->”Claim Device” screen to bring your new SmartSwarm Device into your Device farm. To Claim a Device, you must be able to verify that you physically have that Device in your possession. We use a 2-factor verification process: You will be asked to enter both the Device ID and the MAC Address for each Device that you wish to Claim. -
Page 27: Factory Defaults
SmartSwarm 342 You will need to refresh this page to see the current status of your devices. 4.5 FACTORY DEFAULTS If the unit is not connecting as expected, it may be reset to Factory Defaults at any time by pressing and holding the Reset button on the back-panel of the device for more than 10 seconds. -
Page 28: Configure The Gateway's Mqtt Client
SmartSwarm 342 With large device populations, use the search textbox to restrict the display to those units with matching information. Find the device that you wish to manage in the “View Devices” screen, and click on it to open the “Manage Device”... -
Page 29: Via Smartworx Hub
SmartSwarm 342 6.1 VIA SMARTWORX HUB 1. From the Device Management Screen, Click the Wzzard Mesh application:... -
Page 30: Via Local Webserver
Host should be set to the Gateway IP address (Default 192.168.1.1) Port should be set to 1883 An External MQTT Broker is a 3rd party service: Advantech B+B SmartWorx does not provide this service. Any MQTT 3.1.1 compliant broker may be used. - Page 31 SmartSwarm 342 2. Go to the Applications/Wzzard Mesh/MQTT configuration screen 3. Fill in the Application Settings to match your MQTT broker To use the internal broker with Node Red running on the gateway: Host should be set to the Gateway IP address (Default 192.168.1.1) Port should be set to 1883...
-
Page 32: Configuration Parameters
SmartSwarm 342 6.3 CONFIGURATION PARAMETERS The same configuration options are available from SmartWorx Hub as from the local webserver. MQTT Configure the MQTT broker to which the MQTT client data will publish Setting Valid Settings Description Host An IP Address or This should be the IP address or URL of the MQTT broker to which you wish to publish. - Page 33 SmartSwarm 342 Default Value: NULL Timeout Integer value Set the amount of time a bridge using the lazy start type must between 1 and be idle before it will be stopped. Defaults to 60 seconds. 65535 Default Value: Retry Integer value The integer number of seconds after a QoS=1 or QoS=2 Interval between 1 and...
- Page 34 SmartSwarm 342 If you wish to have a secure TLS connection to the MQTT server, enable TLS and upload the required certificates and private key. After the Gateway has successfully registered with SmartWorx Hub, any changes made on the local webserver on the Gateway will be automatically replicated and synchronized with SmartWorx Hub (and vice versa).
-
Page 35: Node-Red Applications
SmartSwarm 342 7. NODE-RED APPLICATIONS Node-RED is a tool for wiring together hardware devices, APIs and online services, based on a simple to learn, graphical UI. There are many free external resources explaining how to program using Node-RED and this document will therefore not go into this detail. -
Page 36: Adding Nodes To The Default Palette
For details of the Wzzard topic space and payload conventions, please refer to the ‘MQTT Topics and JSON Data Format’ document, available from our website at: http://advantech-bb.com/wp- content/uploads/2015/12/MQTT_Topics_and_JSON_Data_Format_R3_User_Manual_0316.pdf 7.1.2.2 FILE NODES Due to the containerization of the Node-RED application, any filename used should be preceded by ‘/’ if it is to be stored in flash, or /tmp/ if it is to be stored in RAM. - Page 37 SmartSwarm 342 7.1.3.2 ADDING NODES VIA SWH Navigate to the manage device window for the device in question and click on the Node-RED application. Enter the name of the desired node in the node field of the Add or Remove nodes pane, and click on ‘Apply Changes’. To uninstall, repeat the above process but tick the “Uninstall”...
-
Page 38: Access To Node-Red
SmartSwarm 342 7.2 ACCESS TO NODE-RED For security purposes, access to the Node-RED editor and dashboards is disabled by default, and users must open the Node-RED firewall port 1880 via either LEWS or SWH before they can gain access to Node-RED. Once the firewall port has been opened, the Node-RED editor can be accessed from a connected browser using the URL <device IP address>:1880, and any dashboards created can be found at <device IP address>:1880/ui. -
Page 39: Changing The Firewall Settings Via Swh
SmartSwarm 342 7.2.2 CHANGING THE FIREWALL SETTINGS VIA SWH Navigate to the main management screen for the gateway in question, and click on the Node-RED link in the list of installed Apps. Select the ‘Firewall’ option from the menu in the top left of the resulting page. Click on the ‘Add Rule’... -
Page 40: Opening Other Firewall Ports
SmartSwarm 342 7.2.3 OPENING OTHER FIREWALL PORTS Depending upon the nature of the user Node-RED flows developed, it may be necessary for other firewall ports to be open in order to establish correct operation. Where the connection is outbound (which is normally the case) then the system will open the necessary ports automatically. -
Page 41: Aliasing Wzzard Id
SmartSwarm 342 7.3.4 ALIASING WZZARD ID Messages coming from Wzzard nodes include the MAC ID of the node within the topic space so that there is a unique identifier for the node. It is useful to alias this immediately upon receipt by the gateway into something more meaningful, for example ‘conference room’, or ‘shutdown valve 1’. -
Page 42: Calculating The Lngth Of Files (Number Of Lines)
SmartSwarm 342 7.3.6 CALCULATING THE LNGTH OF FILES (NUMBER OF LINES) Of course, you will need to be able to determine the number of lines in a file to decide when to start truncating the top. This can be achieved using an ‘exec’ node as follows: Note that the ‘-I’... -
Page 43: Adam And Wise
7.4.2 ADAM AND WISE There are two options for the recovery of data from Advantech ADAM & WISE units, the selection between them basically being governed by what protocols the particular ADAM/WISE unit supports. If the device supports REST, then the recommended method is to use the ‘http request’... -
Page 44: Via Modbus Tcp
SmartSwarm 342 7.4.2.2 VIA MODBUS TCP If the target device does not support REST, then it is possible to extract data using Modbus TCP. In order to do this, it is first necessary to download a Modbus TCP node and install it into the system palette. See the section on ‘Adding nodes to the default palette’... -
Page 45: Other Documentation
SmartSwarm 342 8. OTHER DOCUMENTATION Document Title Where? Wzzard MQTT Topics and http://advantech-bb.com/wp- JSON Data Format content/uploads/2015/12/MQTT_Topics_and_JSON_Data_Format_R3_User_Manual_0316.pdf Wzzard Sensing Platform http://advantech-bb.com/wp- Network Planning & content/uploads/2016/02/Wzzard_Network_Planning_and_Installation_Application_Note_R2_ Installation 2515.pdf Node-RED Community http://Node-RED.org Pages Node-RED Node and Flow http://flows.Node-RED.org/ Library Node-RED Programming http://Node-REDguide.com/... -
Page 46: Appendix 1 - Hardware Ratings
SmartSwarm 342 9. APPENDIX 1 - HARDWARE RATINGS 9.1 ENVIRONMENTAL IoT Gateway SmartSwarm 300 series Temperature Range Operating -40 to +75 °C Storage -40 to +85 °C Cold Start -35 deg. C Data transfers via mobile network are available immediately ... -
Page 47: Cellular Module
SmartSwarm 342 9.3 CELLULAR MODULE LTE Module for EMEA LTE Parameters Bit rate 100 Mbps (DL) / 50 Mbps (UL) 3GPP rel. 8 standard Supported bandwidths: 5 MHz, 10 MHz, 20 MHz Supported frequencies: 800 / 900 / 1800 / 2100 / 2600 MHz HSPA+ Parameters Bit rate 21,1 Mbps (DL) / 5,76 Mbps (UL) 3GPP rel. -
Page 48: Appendix 2 - General Settings
SmartSwarm 342 10. APPENDIX 2 – GENERAL SETTINGS For every SmartSwarm device, there are some general settings and options that are available to you. 10.1 NETWORK The Network settings enable you to configure operation of the ETH ports and the Cellular interface of your device. By default, ETH0 has a static IP address of 192.168.1.1. -
Page 49: Dhcp
SmartSwarm 342 By default, ETH0 runs a DHCP server, which serves a DHCP address to a connecting device. This means that you should configure your desktop/laptop to take an IP address automatically when you connect it to ETH0 of the SmartSwarm device. -
Page 50: Openvpn
SmartSwarm 342 At the time of writing, it is not possible to turn off the DHCP server that runs on ETH0. Please be careful not to connect ETH0 of the device into a LAN port that is also serving DHCP addresses. 10.3 OPENVPN You may configure up to two OpenVPN tunnels to run on your device. - Page 51 SmartSwarm 342 OpenVPN Enable Tunnel Enable or Disable this tunnel interface. Disabled by default. Protocol UDP or TCP (TCP is default) VPN Server (IP Port) The IP Address of the OpenVPN Server, and the port the Server is listening on. This must be entered as a single string, like in this example: 148.251.6.41 1194 NOTE the separator between the IP address and port number is a <space>...
- Page 52 SmartSwarm 342 When OpenVPN feature is enabled, the Client Key, the Client Certificate, and the CA Certificate will be sent to the Device. When the OpenVPN feature is disabled, all of these items will be removed from the Device. So how do you create your Key, how do you get your Client Certificate, and how do you know what the CA certificate is? You can generate your own private key (intended to be the Private Key of the Device).
-
Page 53: Ntp Client
SmartSwarm 342 10.4 NTP CLIENT You may specify up to 4 network time protocol servers for this Device. 10.5 FIREWALL By default, all incoming ports on the SmartSwarm 342 are blocked except for the following: Interface DHCP server ICMP (ping) HTTP Forward to Internet ETH0... - Page 54 SmartSwarm 342 To enable an inbound port, click on the ‘add rule’ link and enter the desired port number in the new line which appears in the table. Select other fields as required from the drop down options. When you have completed the configuration, click on ‘Apply changes’...
-
Page 55: Appendix 3 - Diagnostics And Troubleshooting
This interface is intended to be used for two purposes: a) Configure the device’s outbound (WAN) connectivity (using either the Cellular interface, or ETH1). b) Diagnosing and Troubleshooting problems, in collaboration with the Advantech B+B SmartWorx technical support team. 11.1 THE LOCAL WEB INTERFACE There is an embedded web-server which provides a local interface on ETH0. -
Page 56: Settings
In the case your device is not performing as you think it should. When you’re working with the Advantech B+B SmartWorx technical support engineer, he may ask you for some of the details that are available from this Tab. -
Page 57: Hub Client
SmartSwarm 342 11.1.4 HUB CLIENT Using this tab, you can change the default SmartWorx Hub Server instance that your device connects. By default, your device will connect to hub.bb-smartworx.com using https on port 443. If, for example, you have a hosted instance of SmartWorx Hub, you can change your devices’ settings to connect to your hosted instance instead. -
Page 58: Logs
SmartSwarm 342 11.1.6 LOGS The SmartSwarm device will keep debug message logs internally. During the troubleshooting session, it may be important to open the Logs tab, and to take a copy of the messages from one of the debug-logs available. To see live logs, you must turn on “Follow”... -
Page 59: Debug And Agents
SmartSwarm 342 11.1.7 DEBUG AND AGENTS It is best to use the Debug and Agents Tabs in conjunction with each other. In the Debug tab, you can see some static debug information and you can select which Agent(s) you wish to see run-time information from. -
Page 60: Node-Red License
SmartSwarm 342 12. NODE-RED LICENSE Copyright JS Foundation and other contributors, http://js.foundation Apache License Version 2.0, January 2004 http://www.apache.org/licenses/ TERMS AND CONDITIONS FOR USE, REPRODUCTION, AND DISTRIBUTION 1. Definitions. "License" shall mean the terms and conditions for use, reproduction, and distribution as defined by Sections 1 through 9 of this document. "Licensor"... - Page 61 SmartSwarm 342 "Derivative Works" shall mean any work, whether in Source or Object form, that is based on (or derived from) the Work and for which the editorial revisions, annotations, elaborations, or other modifications represent, as a whole, an original work of authorship. For the purposes of this License, Derivative Works shall not include works that remain separable from, or merely link (or bind by name) to the interfaces of,...
- Page 62 SmartSwarm 342 modifications, and in Source or Object form, provided that You meet the following conditions: (a) You must give any other recipients of the Work or Derivative Works a copy of this License; and (b) You must cause any modified files to carry prominent notices stating that You changed the files;...
- Page 63 SmartSwarm 342 7. Disclaimer of Warranty. Unless required by applicable law or agreed to in writing, Licensor provides the Work (and each Contributor provides its Contributions) on an "AS IS" BASIS, WITHOUT WARRANTIES OR CONDITIONS OF ANY KIND, either express or implied, including, without limitation, any warranties or conditions of TITLE, NON-INFRINGEMENT, MERCHANTABILITY, or FITNESS FOR A PARTICULAR PURPOSE.
-
Page 64: Advantech B+B Smartworx Technical Support
SmartSwarm 342 ADVANTECH B+B SMARTWORX TECHNICAL SUPPORT Phone: +353 91 792444 (Oranmore, Co. Galway, Ireland) (Monday - Friday, 8 a.m. to 5 p.m. UCT) 1 (800) 346-3119 (Ottawa, IL USA) (Monday - Friday, 7 a.m. to 5 p.m. CST) Email: support@advantech-bb.com...
Need help?
Do you have a question about the SMARTSWARM 300 Series and is the answer not in the manual?
Questions and answers