
Related Manuals for Hunter Douglas PowerView Motorization


Summary of Contents for Hunter Douglas PowerView Motorization
- Page 1 PowerView Motorization ® © 2017 Hunter Douglas. All rights reserved. All trademarks used herein are the REM OTE CONTROL GUIDE property of Hunter Douglas or their respective ow ners. 5110540123 5/17...
- Page 2 Table of Contents Key Com ponent s ..Gett ing St art ed..Program m ing ..Basic Operat ion ..Batt ery Replacem ent .
- Page 4 POW ERVIEW PEBBLE REM OTE POW ERVIEW SURFACE REM OTE ® ® ® Ergonomically designed, the Pow erView ® Pebble ® The sleek Pow erView ® Surface is w all-mounted so you know hand-held remote is available in ten on-trend colors your remote is alw ays right w here you left it.
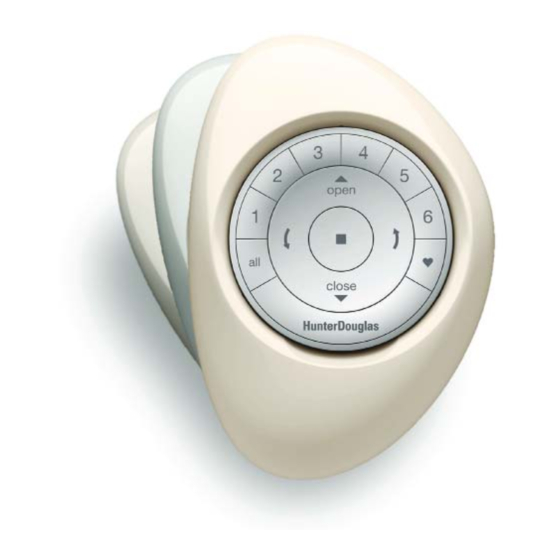
- Page 5 REM OTE M ODULE FRONT REM OTE M ODULE BACK GROU P 3 GROU P 4 GROU P 2 GROU P 5 OPEN GROU P 1 GROU P 6 STOP Press and hold for program mode. FAVORITE Shade position LEFT A RROW RIGHT A RROW Function varies Function varies...
- Page 6 REM OTE M ODULE (BACK COVER REM OVED) PROGRA M M IN G BATTERY BATTERY COM PA RTM EN T COM PA RTM EN T 3V CR 2032 3V CR 2032...
- Page 7 (hand-held): G e t t i n g s t a r t e d Center the Hunter Douglas logo on the remote module above the indentation on the bottom rim of the Pebble. First, activate the remote by pulling both plastic tabs from the Align the ribs on the remote module w ith the grooves on back battery compartment.
- Page 8 ® Surface: Choose a location to mount the Surface. Orient the Surface mounting plate so that the Hunter Douglas logo is horizontal and level. M ark screw holes. If you are mounting the Surface onto dryw all, use a " drill bit to drill pilot holes. Tap dryw all anchors into the pilot holes until the ange of the anchor is ush w ith the dryw all.
- Page 9 IM PORTANT: If you have multiple remotes, please follow P a i r i n g P o w e r V i e w ® R e p e a t e r s the steps below to pair all remotes to the same Pow erView ®...
- Page 10 P a i r i n g r e m o t e ( s ) t o a P o w e r V i e w ® H u b C r e a t i n g a D u p l i c a t e R e m o t e c r e a t e d P o w e r V i e w S h a d e N e t w o r k A duplicate remote w ill operate the same set of w indow coverings and GROUPS as the original remote.
- Page 11 D e a c t i v a t i n g t h e r e m o t e ’s a u t o - w a k e NOTE: It is recommended that only similar w indow coverings be included in a GROUP because of differences in product f e a t u r e features and operation.
- Page 12 R e m o v e a w i n d o w c o v e r i n g f r o m S e t a FA V O R IT E p o s i t i o n a G R O U P Each w indow covering has one FAVORITE position, w hich is set at 50% open by default.
- Page 13 R e s e t t i n g w i n d o w c o v e r i n g p r o g r a m m i n g This reset erases Network information stored in the w indow covering, including GROUP assignments, preventing any input device from operating the w indow covering.
- Page 14 Once the w indow coverings have been joined to a GROUP or For w indow covering(s) w ith vanes or a middle rail*, multiple GROUPS, the remote is ready to operate the w indow press the RIGHT ARROW to close the w indow covering(s).
- Page 16 R e p l a c i n g b a t t e r i e s i n t h e r e m o t e Rotate the back cover of the remote module clockw ise to unlock. Replacing the batteries in the remote module w ill not cause the Remove the back cover from the remote loss of any w indow covering programming, including GROUPS...
- Page 17 Using a nger or small Align and replace the back cover onto the screw driver, gently lift backside of the remote module. and remove the Rotate the back cover counter-clockw ise to old batteries. lock the back cover in place. NOTE: Once the back cover is in place, ensure the programming access point is aligned w ith the recessed P button.
- Page 19 W h a t i s a P o w e r V i e w ® S h a d e N e t w o r k ? M y w indow covering does not respond w hen I press OPEN or CLOSE.
- Page 20 Hunter Douglas Window F ashions O ne Duette Way, Broom eld, C O 80020, USA Hunter Douglas E urope B.V . P iekstraat 2, 3071 E L R otterdam, The Netherlands certify and declare under our sole responsibility that the P owerView ®...
Need help?
Do you have a question about the PowerView Motorization and is the answer not in the manual?
Questions and answers