Hunter Douglas PowerView User Manual
Motorization
Hide thumbs
Also See for PowerView:
- Installation operation care (36 pages) ,
- Reference manual (23 pages) ,
- Manual (5 pages)

Subscribe to Our Youtube Channel
Related Manuals for Hunter Douglas PowerView


Summary of Contents for Hunter Douglas PowerView
- Page 1 PowerView Motorization ™ REMOTE CONTROL GUIDE © 2015 Hunter Douglas. All rights reserved. All trademarks used herein are the property of Hunter Douglas. 5110540079 5/15...
-
Page 2: Table Of Contents
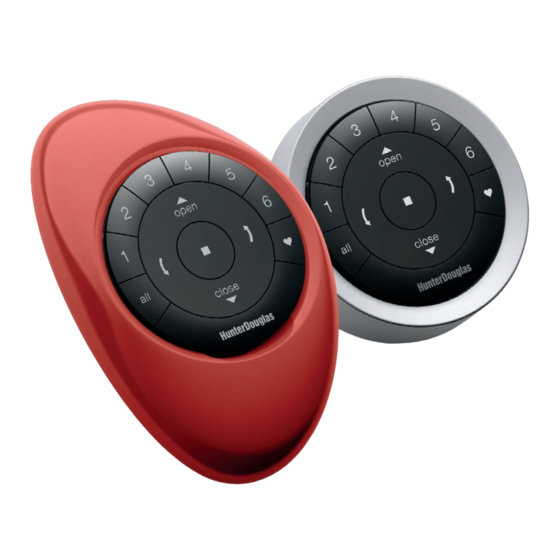
Your new PowerView ™ Pebble Remote and ™ Table of Contents Surface Remote combine fashion with function for Key Components precise control of your Getting Started Hunter Douglas window coverings. Artfully Programming designed, PowerView Basic Operation remotes allow you to... -
Page 3: Key Components
Key Components... - Page 4 POWERVIEW PEBBLE REMOTE POWERVIEW SURFACE REMOTE ™ ™ ™ Ergonomically designed, the PowerView Pebble The sleek PowerView Surface is wall-mounted so you know ™ ™ ™ hand-held remote is available in seven on-trend colors to your remote is always right where you left it.
- Page 5 REMOTE MODULE FRONT REMOTE MODULE (BACK COVER REMOVED) GROUP 3 GROUP 4 RESET GROUP 2 GROUP 5 BUTTON OPEN GROUP 1 GROUP 6 STOP Press and hold for program mode. FAVORITE Shade position LEFT ARROW RIGHT ARROW Function varies Function varies BATTERY BATTERY with shade type.
-
Page 6: Getting Started
Getting Started... - Page 7 " drill bit to drill pilot holes. Tap drywall anchors into back battery compartment. the pilot holes until the flange of the anchor is flush with the drywall. Inserting the remote module into the PowerView Pebble (hand-held): ™ If you are mounting the Surface onto wood, use a "...
-
Page 8: Programming
Programming... - Page 9 When a window covering is added to Press the desired GROUP number (1– 6) on the remote. a GROUP for the first time, it is also added to the PowerView ™ The backlit GROUP number will flash to show Shade Network that links window coverings and devices together.
- Page 10 I.D. from the original remote to additional remotes. All remotes in a home should be added to the same PowerView Shade Open or close the window covering to the desired Network. This allows for easy installation of additional control position.
- Page 11 Press and hold STOP for 4 seconds on the original remote to exit program mode. Same PowerView Shade Same PowerView Shade ™ Network I.D. as original remote. Network I.D. as original remote. Can be programmed differently An exact duplicate of from original remote.
-
Page 12: Basic Operation
Basic Operation... - Page 13 Once the window coverings have been joined to a GROUP or For window covering(s) with vanes or a middle rail*, multiple GROUPS, the remote is ready to operate the window press the RIGHT ARROW to close the window covering(s). Multiple window coverings can be operated at the covering and open the vanes, rotate the vanes to the same time.
-
Page 14: Battery Replacement
Battery Replacement... - Page 15 Replacing batteries in the remote Rotate the back cover of the remote module clockwise to unlock. Replacing the batteries in the remote module will not cause Remove the back cover from the remote module. the loss of any window covering programming, including GROUPS and FAVORITE.
- Page 16 Using a finger or small Align and replace the back cover onto the backside of the remote module. screwdriver, gently lift and remove the Rotate the back cover counter-clockwise to old batteries. lock the back cover in place. Align the ribs on the remote module with the grooves on the Pebble ™...
-
Page 17: Troubleshooting
Troubleshooting... - Page 18 OPEN inserted properly and are new. CLOSE, but not when I press either of the • All PowerView remotes within a home need to be included arrow buttons. in the same PowerView Shade Network. Refer to “Adding • The arrow buttons are for operating Top-Down/Bottom-Up additional remote(s) to the PowerView Shade Network”...
- Page 20 Hunter Douglas Europe B.V. Piekstraat 2, 3071 EL Rotterdam, The Netherlands certify and declare under our sole responsibility that the PowerView™ Remote Control conforms with the essential requirements of the EMC directive 2004/108/ EC and R&TTE directive 1999/5/EC. A copy of the original declaration of conformity may be found at www.hunterdouglas.com/RFcertifications.
Need help?
Do you have a question about the PowerView and is the answer not in the manual?
Questions and answers