Table of Contents
Advertisement
READ THIS MANUAL BEFORE USING THIS PRODUCT. FAILURE TO FOLLOW THE INSTRUCTIONS AND SAFETY PRECAUTIONS
IN THIS MANUAL CAN RESULT IN SERIOUS INJURY OR DEATH. KEEP THIS MANUAL FOR FUTURE REFERENCE.
QUICK START INSTRUCTIONS
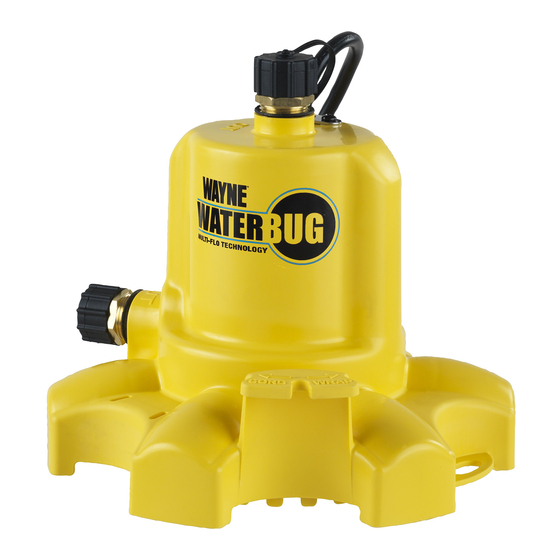
STEP 1 - GET TO KNOW YOUR PUMP
STEP 2 - CHOOSE THE DISCHARGE BEST FOR THE
APPLICATION
STEP 3 - REMOVE DISCHARGE CAP
© 2018, WAYNE/Scott Fetzer Company.
• 10 FT. POWER CORD
• TOP DISCHARGE
• SIDE DISCHARGE
• CORD WRAP
• CORD CLIP
• HANG LOOP
• TOP DISCHARGE
is perfect for water
removal in tight spaces: Laundry Tubs,
Window Wells, Buckets, etc.
-OR-
• SIDE DISCHARGE
is ideal for easy
water removal from at open surfaces:
Flat Roofs, Flooded Basements, standing
water in yard, crawl spaces, etc.
• WARNING DECAL
TWIST
For product & service information
visit www.waynepumps.com
STEP 4 - ATTACH GARDEN HOSE TO BRASS DISCHARGE
STEP 5 - PLACE IN WATER
STEP 6 - ALWAYS PLUG INTO GFCI OUTLET. UNPLUG PUMP
WHEN WATER IS NO LONGER BEING MOVED. DO NOT RUN
PUMP DRY FOR EXTENDED PERIOD OF TIME.
FOR FURTHER INSTRUCTIONS, DOWNLOAD OWNER's
MANUAL ONLINE
www.waynepumps.com/product/wwb
WWB
TIP: Unwind and remove all kinks
and bends in hose for more ef cient
pumping and priming.
Requires 3/16 in. of water
to start pumping.
Removes water down to
1/16 in. of surface,
VIRTUALLY DRY!
620009-001 B 08/18
Advertisement
Table of Contents

Related Manuals for Wayne WaterBug WWB


Summary of Contents for Wayne WaterBug WWB
- Page 1 Flat Roofs, Flooded Basements, standing water in yard, crawl spaces, etc. • WARNING DECAL STEP 3 - REMOVE DISCHARGE CAP FOR FURTHER INSTRUCTIONS, DOWNLOAD OWNER’s MANUAL ONLINE www.waynepumps.com/product/wwb TWIST © 2018, WAYNE/Scott Fetzer Company. For product & service information 620009-001 B 08/18 visit www.waynepumps.com...
- Page 3 PUMP DISCHARGE (2) 3/4 in. Brass Hose Fittings LIQUID TEMPERATURE RANGE 40° F- 120° F PERFORMANCE Model Discharge Head 0 ft. 5 ft. 10 ft. 15 ft. 20 ft. 25 ft. Gal/hr 1350 1190 1010 © 2018, WAYNE/Scott Fetzer Company. www.waynepumps.com...
-
Page 4: General Safety Information
Most electric product-related incidents are dangereuse imminente qui, si elle n’est pas évitée, ENTRAÎNE la mort ou caused by failure to observe basic safety rules or precautions. WAYNE des blessures graves. Water Systems is NOT responsible for any bodily injury or property damage that may result from operation outside of the normal operating conditions. - Page 5 Operating Instructions and Parts Manual GENERAL SAFETY INFORMATION (CONT’D) Electrical wiring must be performed by a qualified electrician. Improper wiring could result in fatal shock. Do NOT pump flammable or explosive fluids such as gasoline, fuel oil, kerosene, solvent, thinners, etc. DO NOT use Le câblage électrique doit être réalisé...
-
Page 6: Pump Operation
Operating Instructions and Parts Manual GENERAL SAFETY INFORMATION (CONT’D) PUMP OPERATION 1. This pump has been designed to attach to a standard Use safety equipment. Always wear eye garden hose. Thread the female end of the garden protection. Dust mask, non-skid safety shoes and hard hat must be hose to either discharge on the pump. -
Page 7: Service And Repair
When servicing this pump, only identical is grounded and is rated for at least 15 amps. The WAYNE replacement parts should be used. Failure to follow these steps pump will start operating as soon as the power cord is may create a risk of flooding, property damage, fatal electrical shock, or plugged into the power outlet. -
Page 8: Troubleshooting Chart
LIMITED WARRANTY For one year for WWB model from the date of purchase, from an authorized dealer, Wayne Water Systems will repair or replace, at its option for the original purchaser, any part or parts of its Multi-Use Pumps or Water Pumps (“Product”) found upon examination by Wayne Water Systems to be defective in materials or workmanship.
Need help?
Do you have a question about the WaterBug WWB and is the answer not in the manual?
Questions and answers
my waterbug will start to run then stop then try to start again and stop
The Wayne WaterBug WWB could be starting and stopping repeatedly due to the thermal protector opening. This can happen if the pump overheats, often caused by running the pump dry or with restricted flow. Ensure the pump is submerged in water and the garden hose is not kinked or blocked.
This answer is automatically generated