
Subscribe to Our Youtube Channel
Related Manuals for Huck 2480 SERIES


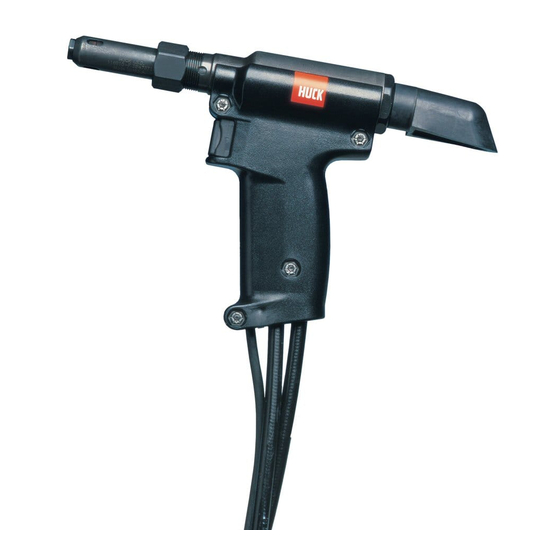
Summary of Contents for Huck 2480 SERIES
- Page 1 NSTRUCTION ANUAL 2480 2481 & ODELS ERIES YDRAULIC NSTALLATION OOLS 05-20-2014 HK970...
- Page 2 2480 & 2481 series Tooling Alcoa Fastening Systems (HK970)
-
Page 3: Table Of Contents
2480 & 2481 series Tooling Alcoa Fastening Systems (HK970) ONTENTS ONTENTS EU Declaration of Conformity ........2 Safety` . -
Page 4: Safety
2. Use only sizes and types of accessories and consumables that are recommend- 2. Huck equipment must be maintained in a safe working condition at all times. Tools ed. Do not use other types or sizes of accessories or consumables. -
Page 5: Description
The 2480, A2480, and 2481 series, with appropriate tioned by the piston. The end of the piston rod is nose assemblies, install a wide range of Huck blind threaded - - retaining nut and stop are included for fasteners and HUCKBOLT® fasteners. The 2480 attaching a nose assembly. -
Page 6: Specifications
2480 & 2481 series Tooling Alcoa Fastening Systems (HK970) PECIFICATIONS CONTINUED PECIFICATIONS CONTINUED... -
Page 7: Principle Of Operation
2480 & 2481 series Tooling Alcoa Fastening Systems (HK970) RINCIPLE PERATION FIGURE RINCIPLE PERATION FIGURE An electric trigger controls the PULL and ERIG® Hydraulic Unit. Release the trigger RETURN strokes. Press trigger to direct at end of PULL stroke when fastener is the hydraulic pressure to PULL side of the installed - - pressure is directed to piston - fastener installation begins. -
Page 8: Preparation For Use
SPECIFICATIONS of this manual. See both Note: hydraulic unit’s and T-124883’s Instruction Where a part number (P/N) is given, Huck manuals before/during checking procedure. sells that part. Visually inspect for leaks and to verify that End Cap is installed correctly. - Page 9 2480 & 2481 series Tooling Alcoa Fastening Systems (HK970) PERATING NSTRUCTIONS PERATING NSTRUCTIONS For safe operation. Please read completely General Blind Fastener Installation: WARNING: Do not pull on a pin with- out placing fastener in a workpiece - - Operators should receive training from qualified fastener will eject from front with personnel.
- Page 10 TIONAL VIEW W/TOOL P/N’s. Dirt/debris in hydraulic fluid causes unloading valve failure in Tool and in POWERIG® Hydraulic Note: Where a part number (P/N) is given, Huck sells Unit’s valves. that part. Always check tool assembly drawing for the proper...
- Page 11 2480 & 2481 series Tooling Alcoa Fastening Systems (HK970) AINTENANCE CONTINUED AINTENANCE CONTINUED PREVENTIVE MAINTENANCE POWERIG Hydraulic Unit Maintenance Maintenance and repair instructions are in System Inspection applicable POWERIG Hydraulic Unit Operating efficiency of the Tool is directly Instruction Manual. related to performance of complete sys- Tool/Nose Assembly Maintenance and tem, including tool/nose assembly,...
- Page 12 Improper Tool operation — see Trouble 6. swaged. b. Scored anvil. 9. Shear collar on Huck blind fastener not driven. a. Improper Tool operation. b. Worn or damaged driving anvil in nose assembly. 10. Tool ”hangs-up” on swaged collar of HUCKBOLT a.
-
Page 13: Sticker Locations
2480 H.I.T. ASSEMBLY DWG. 8-A2480 A2480 H.I.T. ASSEMBLY DWG. Specifications for Standard Parts 1. All part numbers shown in this manual are available from Huck. 2480B Pintail Bottle Assembly Also available is part no. 128017 Pintail Bottle Assembly to convert tool to 2480B... - Page 14 2480 & 2481 series Tooling Alcoa Fastening Systems (HK970) ISASSEMBLY ISASSEMBLY 5, 6, 6 EFER TO IGURES NOTE - For proper Assembly/Disassembly I. See WARNING on this page. Tools please refer to the NOTES Disconnect tool’s electrical connector Section on the proper Assembly from hydraulic unit.
- Page 15 2480 & 2481 series Tooling Alcoa Fastening Systems (HK970) ISASSEMBLY CONTINUED ISASSEMBLY CONTINUED 5. Unscrew hoses from tool. Drain hoses 7. Disassemble switch and cord assembly. into container. Piston can be pushed (refer to Switch and Cord Assembly to rear of cylinder to drain fluid. Section) Discard fluid.
-
Page 16: Assembly Of Tool
2480 & 2481 series Tooling Alcoa Fastening Systems (HK970) ISASSEMBLY CONTINUED ISASSEMBLY CONTINUED 4. See FIGURE 6b. Supporting tool as shown, press (or drive) piston, rear gland assembly, dump valve, and front gland assembly out of cylinder. 5. See FIGURE 6c. Remove piston assembly tool and spacer from piston. -
Page 17: Air Trigger & Hose Assembly
2480 & 2481 series Tooling Alcoa Fastening Systems (HK970) ISASSEMBLY CONTINUED ISASSEMBLY CONTINUED Refer to fig. 7) WITCH AND SSEMBLY 1. Loosen set screw in top of button - - use 5/64 hex key. Remove button. 2. Unscrew switch from housing. 3. - Page 18 Press evenly against (Slic-Tite is available in stick form as gland cap to slide front gland assem Huck P/N 503237.) bly over piston assembly tool and into piston. Slide wiper onto piston as Insure tool has been properly assem- shown.
- Page 19 2480 & 2481 series Tooling Alcoa Fastening Systems (HK970) SSEMBLY CONTINUED SSEMBLY CONTINUED 4. Lightly coat cylinder, piston O-rings, and front gland O-rings with lubricant. While supporting tool, as shown, press assembled piston and components into cylinder. Remove piston assembly tool - - FIGURE 8b.
- Page 20 2480 & 2481 series Tooling Alcoa Fastening Systems (HK970) SSEMBLY CONTINUED SSEMBLY CONTINUED Figure 9 LECTRICAL WITCH SSEMBLY (Refer to fig. 9) 1. Screw switch into housing. 2. Slide button onto switch. Tighten down set screw using 5/64 hex key. (Refer to fig.
- Page 21 2480 & 2481 series Tooling Alcoa Fastening Systems (HK970) SSEMBLY CONTINUED SSEMBLY CONTINUED Figure 11 (Refer to fig. 11) ANDLE SSEMBLY TO SSEMBLED 2. Position assembled cylinder and hoses in left handle half. Align right handle half with left (locators help align halves).
- Page 22 2480 & 2481 series Tooling Alcoa Fastening Systems (HK970) Figure 3 - 2480 Figure 3 - 2480...
- Page 23 2480 & 2481 series Tooling Alcoa Fastening Systems (HK970) Figure 3a - 2480L Figure 3a - 2480L...
- Page 24 2480 & 2481 series Tooling Alcoa Fastening Systems (HK970) Figure 3b - 2480L-1 Figure 3b - 2480L-1...
- Page 25 2480 & 2481 series Tooling Alcoa Fastening Systems (HK970) Figure 3c - 2480L-2 Figure 3c - 2480L-2...
- Page 26 2480 & 2481 series Tooling Alcoa Fastening Systems (HK970) Figure 3d - 2480XL Figure 3d - 2480XL...
- Page 27 2480 & 2481 series Tooling Alcoa Fastening Systems (HK970) Figure 3e - 2481 Figure 3e - 2481...
- Page 28 2480 & 2481 series Tooling Alcoa Fastening Systems (HK970) Figure 3f - 2480L-1 Figure 3f - 2480L-1...
- Page 29 2480 & 2481 series Tooling Alcoa Fastening Systems (HK970) Figure 3g Figure 3g A2480 A2480...
- Page 30 2480 & 2481 series Tooling Alcoa Fastening Systems (HK970) Figure 3h Figure 3h 2480LS 2480LS...
- Page 31 2480 & 2481 series Tooling Alcoa Fastening Systems (HK970) Figure 3j Figure 3j 2480LSL 2480LSL...
- Page 32 2480 & 2481 series Tooling Alcoa Fastening Systems (HK970) Figure 4 - A2480 Air Trigger & Hose Assembly Figure 4 - A2480 Air Trigger & Hose Assembly...
- Page 33 Huck shall not be liable for any loss or damage result- THERE ARE NO WARRANTIES WHICH EXTEND ing from delays or nonfulfillment of orders owing to...
- Page 34 Huck’s written quotations, acknowledge‐ International. Huck provides technical assistance ments, and/or purchase orders. It is recommend‐ regarding the use and application of Huck fasten‐ ed that the user secure specific, up‐to‐date data ers and tooling. and information regarding each application and/or use of such products.
Need help?
Do you have a question about the 2480 SERIES and is the answer not in the manual?
Questions and answers