Advertisement
Quick Links
Stoma care, urinary catheterization
TPN and PEG care
Introduction
Before you start
Training
Training
Training
Setting of the legs
IV injection and care (forearm)
Do not mark on the model with a pen or leave printed materials in
Caution
contact with the model's surface. Ink marks on the model are not removable.
Pressure sores care
Enema, Suppository insertion, Perineal care
For inquiries and service, please contact your distributor or KYOTO KAGAKU CO., LTD.
Setting of the legs
Stoma care
TPN and PEG care
IV injection
Manufacturer s note
①Catheter can be inserted at subclavicular and
①Pull the pad by the finger from the slit and remove
Note
code
Legs are separated to be packaged. Please connect the legs to the torso before training.
the pad.
subclavian access for TPN care.
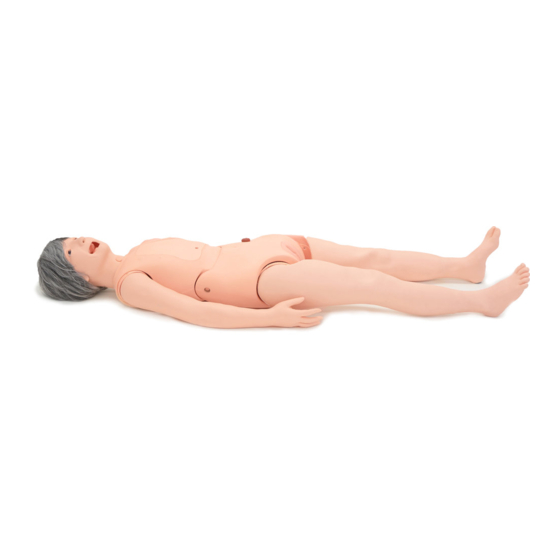
Cherry is a basic patient care manikin for introductory nursing. The manikin can sit
Consumable
11401-010
①Pull the black knob to unlock the stopper.
upright without support. Soft life-like materials provides realistic hands-on training.
parts
11401-020
A basic full body, nursing manikin o ers training for day-to-day patient care for health
11401-030
care professionals.
11401-040
Features
●
11388-200
・Able to sit upright without support
・Seamless limbs including ngers and toes
11401-050
・TPN and IV routes to simulate patients with catheter lines
11401-060
・True-to-life joint patient handling
・Pressure Ulcer varies in depth depending location
11401-070
Female catheterization, Enema, Suppository insertion, Perineal care
Caution
Liquid can not be injected from the holes for TPN care or PEG.
IV injection preparation
Training items
③Pull out the spring.
●
①Pull the edge of the genitalia unit using your fingers.
①Fill the bottle with water. Connect the tube of the
・Oral and denture care
injection pad to the bottle.
Pressure sores care
・Stomach pumping
・Nasogastric tube placement
6 insulin injetion pads
4 gluteal IM pads
①Pressure sore at scapula (Stage 1)
・Oxgen/nasal cannula placement
・Tracheotomy care and management
・TPN and PICC care
・Intramuscular injection
2 injection pads for median
2 pairs of 2 shoulder IM pads
antebrachial veins
⑤Set the spring and stopper to fix the leg.
DOs and DON'Ts
男性導尿
Male catheterization, Enema, Suppository insertion, Perineal care
DOs
③Pressure sore at sacral bone(Stage 4)
Handle the manikin and the components with care.
Storage in a dark, cool space will help prevent the
skin colours from fading.
URL http://www.kyotokagaku.com
e-mail rw-kyoto@kyotokagaku.co.jp
The manikin's skin may be cleaned with a wet cloth,
●
if neccessary, using mildly soapy water or diluted
detergent.
Main Office and Factory
15 Kitanekoya-cho Fushimi-ku Kyoto 612-8388, Japan
Telephone : 81-75-605-2510
Facsimile : 81-75-605-2519
Caution
Be careful not to lose the spring or stopper in the model.
The contents of the instruction manual are subject to change without prior notice.
No part of this instruction manual may be reproduced or transmitted in any form without permission from the manufacturer.
Please contact manufacturer for extra copies of this manual which may contain important updates and revisions.
Please contact manufacturer with any discrepancies in this manual or product feedback. Your cooperation is greatly appreciated.
2018.02
②PEG catheter can be set for PEG care.
Utirize for the training of stoma care.
※The spacer is in right arm. IV injection and care training is
name
available on both arms.
Recommended CV catheter size: 4Fr x 60cm
Recommended PEG catheter size: 20Fr x 34mm
Insulin injetion pad
②Keep pulling the knob and remove the
stopper from the metal rod.
Gluteal IM pads
Female genitalia unit
Male genitalia unit
Injection pad for median antebrachial vein
・Oxgen/nasal cannula
・Application of restraints
Shoulder IM pads (a pair)
・Dressing wrap capability
Thigh IM pads (a pair)
・Subcutaneous injection
・Wound dihiscense care
Wound care pad
④Insert the metal rod to the hole of the model.
②Remove the genitalia unit.
②Connect another tube of the injection pad to the
・Body positioning
syringe. Slowly pull the syringe to fill the pad with
・Stoma care
water.
・Patient handling
・Subcutaneous injection
・Passive exercise
・Urinal catheterization
1 female genitalia units
1 male genitalia units
②Pressure sore at great trochanter (Stage 2)
・Change of clothes
・Enema
・PEG care
・Suppository insertion
・Pressure sores care
・Perineal care
・IV insetion and care
・Wound care
2 pair of 2 thigh IM pads
1 wound care pads
⑥Completed. Then set the other leg.
DON'Ts
③Completed.
④Pressure sore at heel (Stage 3)
①Pull the edge of the genitalia unit and remove it.
Do not let ink from pens, newspapers, this manual
or other sources come in contact with the manikin,
as they cannot be cleaned o the manikin skin.
Never use organic solvent like paint thinner to clean
●
the skin, as this will damage the simulator.
Caution
■
Kyotokagaku America Inc. : USA,Canada,and South America
Recommended catheter size: Nelaton catheter 13Fr
3109 Lomita Boulevard, Torrance, CA 90505-5108 ,USA
Slowly pull the syringe or the vein in the injection
Balloon catheter 16Fr
Telephone : 1-310-325-8860
pad may be damaged. If the syringe can not be pulled
Facsimile : 1-310-325-8867
smoothly, check the connection of the tube and the
Liquid can not be injected to bladder,
Caution
syringe.
uterus and rectum.
3
1
5
7
9
Subcutaneous injection
Handling of the model
PICC care
Training
Before training
Training
Training
Training
Gluteal injection
Set includes
Oral and denture care
Stomach pumping
Subcutaneous and IM injection
Wound care
Oxygen inhalation
MW22
Patient Care Simulator
Set includes
Removal of stomach
PICC care
"Cherry"
Handling of the model
Subcutaneous injection
・True-to-life articulation
①Push the edge of the pad by finger and remove the pad.
Before your first use, ensure that you have all components lited below.
①Open the chest cover by pulling the cover at
for patient positioning,
the slit.
passive exercise, ect.
22
・Able to sit in an upright
position without support.
・Seamless arms and legs
enable the training of
bed bathing and foot
bathing to be more
realistic.
Caution
Liquid can not be injected to the subcutaneous injection pad.
Caution
Subcutaneous and IM injection
Choose a pajama set which does not cause color migration
to the manikin. (Manikin height is approx. 62 inch)
①Clip the injection pad onto the upper arm.
Gluteal injection
③Hold the stomach in the model and unscrew
the cap of the stomach.
18
19
3
Oxygen inhalation
Intranasal and intraoral catheter insertion
24
23
Note
Liquid can be injected to the subcutaneous and IM injection pad.
Nasal cannula can be placed for
oxgen inhalation.
27
26
After training
⑤Pull the esophagus tube from the stomach.
The stomach can be removed from the model.
Setting of tracheotomy catheter
①Push the attachment plate inward,
②Take off the skin carefully and
pull out the edge of the skin between
remove the sponge and transparent
Wound care
the attachment and the transparent
back plate.
①Pull up the plug.
back plate.
1. Head
1
10. Bronchi
・・・・・・・・・・・・・・・・・・・・・・・・
2. Eyes
1pair
11. Esophagus
・・・・・・・・・・・・・・・・・・・
3. Upper Denture
1
12. Stomach
・・・・・・・・・・・・・
4. Lower Denture
1
13. Stomach cap
・・・・・・・・・・・・・
5. Tracheostomy opening
1
14. Lumbar
・・・・
6. Chest
1
15. Spacer
・・・・・・・・・・・・・・・・・・・・・・・・
7. Arms
1
16. IV injection pad
・・・・・・・・・・・・・・・・・・・・・・・・
8. Chest cover
1
17. Stoma
・・・・・・・・・・・・・・・・・
9. PEG opening
1
18. Subcutaneous injection pad
・・・・・・・・・・・・・・・
Caution
Caution
Do not pull or twist the sponge. Excessive force may cause breakage.
Suction with liquid can not be performed however tracheotomy is connected to trachea of the model.
Intranasal and
intraoral catheter
Caution
Do not mark on the model with a pen or leave
printed materials in contact with the model's surface.
Ink marks on the model are not removable.
Tracheotomy care
Oral and denture care
・Removing
②Set the pad in correct direction.
①PICC catheter can be set on the right upper arm
②Remove the PEG cover.
Upper denture:
for PICC care training.
Pull the denture
20
15
14
9
6
5
downward.
8
Lower denture:
Pull the denture
Caution
upward.
Instruction
Liquid can not be injected to the PICC opening.
●
・Setting
Manual
The PICC opening is only 2cm depth.
●
Hold the denture and insert the pin of the denture
Cut the catheter to set it.
into the hole of the mouth.
Push the center and both side of denture to fix
the denture firmly.
Both upper and lower denture are fixed with the
pin of the denture at its center and left side.
②Clip the IM injection pad on to the thigh.
17
16
7
Contents
④Remove the chest cover.
21
①Push the edge of the pad by finger and remove the pad.
25
Introduction
●
Manufacturer's
note/DOs and DON Ts
・ ・ ・ ・ ・ ・ ・ ・ ・ ・ ・ ・ ・ ・ ・
①Catheter can be inserted to
Before you start
4
stomach through nasal and oral.
●
Set includes
・ ・ ・ ・ ・ ・ ・ ・ ・ ・ ・ ・ ・ ・ ・ ・ ・ ・ ・ ・ ・ ・ ・ ・ ・ ・ ・ ・ ・ ・ ・ ・ ・ ・ ・ ・ ・ ・ ・
12
11
10
※Set the pad in correct direction
Preparation
13
●
by following the guide of the
Recommended catheter size: 12Fr
Setting of the legs
・ ・ ・ ・ ・ ・ ・ ・ ・ ・ ・ ・・ ・ ・ ・ ・ ・ ・ ・ ・ ・ ・ ・ ・ ・ ・ ・ ・ ・ ・ ・ ・
pad and the body.
Caution
Training
●
Liquid can not be injected through
Liquid can not be injected to the gluteal
Caution
intranasal or intraoral catheter.
・Handling of the model
・・・・・・・・・・・・・・・・・・・・・・・・・・・
injection pad.
・Oral and denture care
・ ・ ・ ・ ・ ・ ・ ・ ・ ・ ・ ・ ・ ・ ・ ・ ・ ・ ・ ・ ・ ・ ・ ・ ・ ・ ・ ・
・Oxygen inhalation
・・・・・・・・・・・・・・・・・・・・・・・・・・・・・・・
⑥Completed.Stomach can be set by reversing
・Intranasal and intraoral catheter
the steps ①-⑤.
・ ・ ・ ・ ・ ・ ・ ・ ・ ・ ・ ・ ・ ・ ・ ・ ・ ・ ・
③Squeeze the sponge. After all parts
・Tracheotomy care
・ ・ ・ ・ ・ ・ ・ ・ ・ ・ ・ ・ ・ ・ ・ ・ ・ ・ ・ ・ ・ ・ ・ ・ ・ ・ ・ ・ ・ ・ ・ ・
get completely dry,reassemble them
・TPN and PEG care
・ ・ ・ ・ ・ ・ ・ ・ ・ ・ ・ ・ ・ ・ ・ ・ ・ ・ ・ ・ ・ ・ ・ ・ ・ ・ ・ ・ ・ ・ ・ ・
carefully.
②Set and fix a tracheotomy
・Pressure sores care
・ ・ ・ ・ ・ ・ ・ ・ ・ ・・ ・ ・ ・ ・ ・ ・ ・ ・ ・ ・ ・ ・ ・ ・ ・ ・ ・ ・ ・ ・
catheter. After the training,
①Set the would care pad on the stoma and
・Stomach pumping
plug the tracheotomy plug
1
・・・・・・・・・・・・・・・・・・・・・・・・・・・・・・・
19. Gluteral injection pad
・・・・・・・・・・・・・・・・・・・・・
・・・・・・
subcutaneous injection pad and adjust to fit
in to the tracheotomy.
・Stoma care
1
20. Female genitalia
・・・・・・・・・・・・・・・・・・・・・・・・・・・・・・・・・・・・・・
・・・・・・・・・・・・・・・・・
・・・・・・・・・・・
each other.
・Urinary catheterization, enema,
1
21. Male genitalia
・・・・・・・・・・・・・・・・・・・・
・・・・・・・・・・・・・・
suppository insertion, perineal care
1
22. Legs
・ ・ ・ ・ ・ ・ ・ ・ ・ ・ ・ ・ ・ ・ ・ ・
・・・・・・・・・・・・・・・
・・・・・・・・・・・・・・・・・・・・・・・・・
・Subcutaneous injection
1
23 . Femoral IM injection pad
・・・・・・・・・・・・・・・・・・・・・・・・・・
・・・・・・・・・・・・・・・・・・・・・
・Gluteal injection
1
24. Upper arm IM injection pad
・ ・ ・ ・ ・ ・ ・ ・ ・ ・ ・ ・・ ・ ・ ・ ・ ・ ・ ・ ・ ・ ・ ・ ・ ・ ・ ・ ・ ・ ・ ・ ・
・・・・・・・・・・・・・・・・・・・・・・
Recommended
1
25. Would care pad
・Wound care
tracheotomy catheter
・・・・・・・・・・・・・
・ ・ ・ ・ ・ ・ ・ ・ ・ ・ ・ ・ ・ ・ ・ ・ ・ ・ ・ ・ ・ ・ ・ ・ ・ ・ ・ ・ ・ ・ ・ ・ ・ ・ ・ ・ ・
・・・・・・・・・・・・
1
26. Bottle
・IV injection and care
size: ID8mm, OD11mm
・・・・・・・・・・・・・・・・・・・・・・
・・・・・・・・・・・・・・・・・・・・・・・・・・・・・
・・・・・・・・・・・・・・・・・・・・・・・
1
27. Syringe
・PICC care
・・・
・・・・・・・・・・・・・・・・・・・・・・
・・・・・・・・・・・・・・・・・・・・・・・・・・・・・・・・・・・・・・・
・Subcutaneous and IM injection
・ ・ ・ ・ ・ ・ ・ ・ ・ ・ ・ ・ ・ ・ ・ ・ ・ ・ ・
6
4
2
10
8
2
1
P.1
P.2
P.3
P . 4
P . 4
P . 4
P . 4
P . 4
P . 5
P . 5
P . 6
1
P . 7
1
1
P . 7
1
P . 8
1
・・・・
1
P . 8
・・
1
P . 8
1
P . 9
1
P . 9
P . 1 0
Advertisement

Related Manuals for Kyoto Kagaku Cherry


Summary of Contents for Kyoto Kagaku Cherry
- Page 1 the slit. Recommended CV catheter size: 4Fr x 60cm for PICC care training. Cherry is a basic patient care manikin for introductory nursing. The manikin can sit passive exercise, ect. Pull the denture Recommended PEG catheter size: 20Fr x 34mm ...
- Page 2 the slit. Recommended CV catheter size: 4Fr x 60cm for PICC care training. Cherry is a basic patient care manikin for introductory nursing. The manikin can sit passive exercise, ect. Pull the denture Recommended PEG catheter size: 20Fr x 34mm ...
- Page 3 the slit. Recommended CV catheter size: 4Fr x 60cm for PICC care training. Cherry is a basic patient care manikin for introductory nursing. The manikin can sit passive exercise, ect. Pull the denture Recommended PEG catheter size: 20Fr x 34mm ...
- Page 4 the slit. Recommended CV catheter size: 4Fr x 60cm for PICC care training. Cherry is a basic patient care manikin for introductory nursing. The manikin can sit passive exercise, ect. Pull the denture Recommended PEG catheter size: 20Fr x 34mm ...
- Page 5 the slit. Recommended CV catheter size: 4Fr x 60cm for PICC care training. Cherry is a basic patient care manikin for introductory nursing. The manikin can sit passive exercise, ect. Pull the denture Recommended PEG catheter size: 20Fr x 34mm ...
- Page 6 the slit. Recommended CV catheter size: 4Fr x 60cm for PICC care training. Cherry is a basic patient care manikin for introductory nursing. The manikin can sit passive exercise, ect. Pull the denture Recommended PEG catheter size: 20Fr x 34mm ...
Need help?
Do you have a question about the Cherry and is the answer not in the manual?
Questions and answers