VeriFone VX520 Manual
Hide thumbs
Also See for VX520:
- Reference manual (190 pages) ,
- Installation manual (64 pages) ,
- User manual (37 pages)
Table of Contents
Advertisement
Quick Links
Advertisement
Table of Contents

Related Manuals for VeriFone VX520


Summary of Contents for VeriFone VX520
- Page 1 MANUAL Payment terminal Verifone VX520...
- Page 2 MANUAL Payment terminal Verifone VX520...
-
Page 3: Table Of Contents
TABLE OF CONTENTS: 1. BEFORE USE 4.2 Online transactions ..............21 4.2.1 General information on online transactions ......21 1.1 Important ..................4 1.2 Terminal structure ................. 5 4.2.2 Online batch ...............22 1.3 Connecting the cables ..............6 4.3 Reports and bank connection ............22 1.3.1 Connecting the power cord .......... -
Page 4: Important
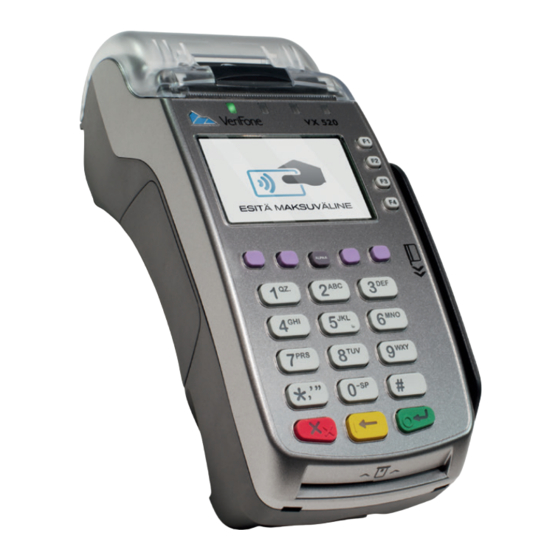
1. GETTING STARTED 1. GETTING STARTED 1.1 Important 1.2 Terminal structure NOTE! If these instructions are not followed and the terminal is damaged, the warranty will void! • Protect the power cord and modem. If they are damaged, they are not to be used anymore. -
Page 5: Connecting The Cables
1. GETTING STARTED 1. GETTING STARTED 1.3 Connecting the cables 1.3.2 Connecting the Ethernet cable In order to access the connection ports, remove the cover. Connect the Ethernet cable to the ETH port at the bottom of the terminal. Connect the 1.3.1 Connecting the power cord other end of the cable either to a broadband modem or a plug. -
Page 6: Battery
1. GETTING STARTED 1. GETTING STARTED 1.4 Battery 1.5 SIM card Terminals which use a GPRS connection have a SIM card. Before inserting the SIM card into the terminal, disable the PIN code query. The SIM card operator’s APN information is entered to the GPRS APN menu in the ter- minal. -
Page 7: Changing The Paper
1. GETTING STARTED 1. GETTING STARTED 1.6 Changing the paper 1.9 Terminal start-up and shutdown 1. Pull the printer cover’s eject button upwards, so that the cover opens. The terminal is switched on by pressing the Enter key for a while or by connecting it 2. -
Page 8: Settings
2. SETTINGS 2. SETTINGS 2.5 Time and date settings 2.1 Terminal settings 1. Press LILA4 and Enter. To go to the terminal’s Settings menu, press LILA4 and Enter. Select EDIT F4. 2. Choose EDIT F4. Some of the listed settings are explained in later sections. The sections are marked in brackets. 3. -
Page 9: Downloads
3. DOWNLOADS 4. DAILY USE 3.1 Downloading applications 4.1 Transactions 4.1.1 Chip card transactions NOTE! The terminal should be kept still and connected to the power cord during the entire download process. It is not advis- 1. ENTER AMOUNT: Type the precise amount, including cents, and press Enter. able to download e.g. -
Page 10: Swipe Card Transactions
4. DAILY USE 4. DAILY USE 4.1.2 Swipe card transactions 4.1.3 Contactless card transactions 1. ENTER AMOUNT: Type the precise amount, and press Enter. 1. ENTER AMOUNT: Type the precise amount, and press Enter. 2. INSERT/SWIPE OR PRESENT CARD: Swipe the card through the magnetic card 2. -
Page 11: Reversal
4. DAILY USE 4. DAILY USE 4.1.4 Reversal 4.1.6 Manual entry 1. ENTER AMOUNT: Enter the amount in euros, including cents, and press Enter. NOTE! Only a transaction that is still in the terminal’s memory can be 2. INSERT/SWIPE OR PRESENT CARD: Press F1. reversed. -
Page 12: Refund
4. DAILY USE 4. DAILY USE 4.1.8 Refund 4.1.9 Cash back You can make a refund at any time. If you need to cancel a transaction on the same In Cash back transactions customers can withdraw cash during a card transaction. day, use the REVERSAL function. -
Page 13: Online Batch
4. DAILY USE 4. DAILY USE 4.2.2 Online batch 4.3.2 Monthly report Online batch settings enable you to choose the maximum sum and number of trans- The monthly report can also be used as a shift report. The terminal collects informa- actions in the terminal memory. -
Page 14: Blacklist
4. DAILY USE 4. DAILY USE 4.3.4 Blacklist 4.3.5 Report explanations The terminal updates the blacklist automatically during the batch sending. You can al- The batch report lists all card transactions by card type. After this list, the report shows so download the blacklist manually if it is missing from the terminal. -
Page 15: Issue Report
4. DAILY USE 4. DAILY USE 4.3.6 Issue report • ALL REJECTED = The batch has been rejected by the receiver. The terminal forwards all transactions from its memory to Point reporting. From this service the batches are forwarded daily to a chosen bank or credit card company. If Actions = Contact the batch receiver and check why the batch has been rejected. -
Page 16: Authorization Notifications
4. DAILY USE 4. DAILY USE 4.4 Authorization notifications 200-299 Declined, card removal needed Declined When a transaction is declined at the authorization centre, a declining code is printed on the Card expired receipt. This code tells you the reason why the transaction has been declined. The transac- Suspected card counterfeit tion is declined based on a notification given by the bank or the credit card company. -
Page 17: Special Functions
5. SPECIAL FUNCTIONS 5. SPECIAL FUNCTIONS 5.1 Cash receipt 1. Press F1 and LILA 2 three times. 2. Select EXTRA AMOUNT F2. Cash receipt is used when a customer pays with cash and you want to print a receipt 3. RECEIPT NUMBER: The terminal suggests the number of the last transaction. from the terminal. -
Page 18: Invoice
5. SPECIAL FUNCTIONS 5. SPECIAL FUNCTIONS 5.6 Invoice The terminal prompts you to check the customer’s ID, if the transaction amount ex- ceeds €50.00 (depending on the card used). Press Enter, check the ID and write the last 4 digits of the social security number and the identity card type on the receipt. The invoice works in the same way as a cash receipt, except that the text INVOICE is printed on the receipt instead of CASH RECEIPT. -
Page 19: Forming Product Groups
5. SPECIAL FUNCTIONS 5. SPECIAL FUNCTIONS 5.8.2. Forming product groups 5.8.3. Product and VAT group lists Select LILA4, press Enter and choose Edit. To print product or VAT group lists, select LILA4, press Enter and choose Print. Navigate down with the LILA2 button and select Edit products. VAT groups: select Print VAT groups The display shows the following: Product groups: select Print products... -
Page 20: Product Reports
5. SPECIAL FUNCTIONS 6. TROUBLESHOOTING 7. TROUBLESHOOTING 5.8.6. Product reports 6.1 Notifications on the screen Report printing: NO SIM CARD The terminal does not have a SIM card inside or the SIM card is not properly in place. See instructions Select LILA1, press Enter and choose Product report. -
Page 21: Other Exceptions
6. TROUBLESHOOTING 6. TROUBLESHOOTING 6.2 Notifications on the receipt 6.4 Service CONNECTION ERROR = There is a problem in the connection. See section 6.3. PLEASE NOTE: Never try to repair the terminal by yourself – always send it to a repair shop. If you suspect or know that the BATCH SENDING ERROR = There is a problem in the connection. -
Page 22: Useful Contact Information
7. TECHNICAL DATA 8. USEFUL CONTACT INFORMATION Processor: CUSTOMER SERVICE: 400 MHz ARM11, 32-bit RISC processor Memory: 160 MB (128 MB Flash, 32 MB SDRAM) standard, Sonera Corporate Customer Service 0200 18818 (Mon–Fri, 8am–4:30pm) can extend up to 500 MB. Sonera Technical Customer Service Display: 128 x 64 pixel graphical (white backlit) LCD with back-... - Page 24 Sonera Corporate Customer Service 0200 18818 (mobile call charge / local network charge) Sonera’s Technical Customer Service 0206 90801...
Need help?
Do you have a question about the VX520 and is the answer not in the manual?
Questions and answers