VeriFone Vx-520 Series APACS 40 User Manual
Vx-520 series
Hide thumbs
Also See for Vx-520 Series APACS 40:
- Reference manual (190 pages) ,
- Installation manual (64 pages) ,
- User manual (37 pages)
Table of Contents
Advertisement
Quick Links
Advertisement
Table of Contents

Related Manuals for VeriFone Vx-520 Series APACS 40


Summary of Contents for VeriFone Vx-520 Series APACS 40
- Page 1 -520 Series APACS 40 User Guide...
-
Page 3: Table Of Contents
The information contained in this document is subject to change without notice. Although VeriFone has attempted to ensure the accuracy of the contents of this document, this document may include errors or omissions. VeriFone and the VeriFone logo are registered trademarks of VeriFone. Other brand names or trademarks associated with VeriFone’s products and services are trademarks of VeriFone... -
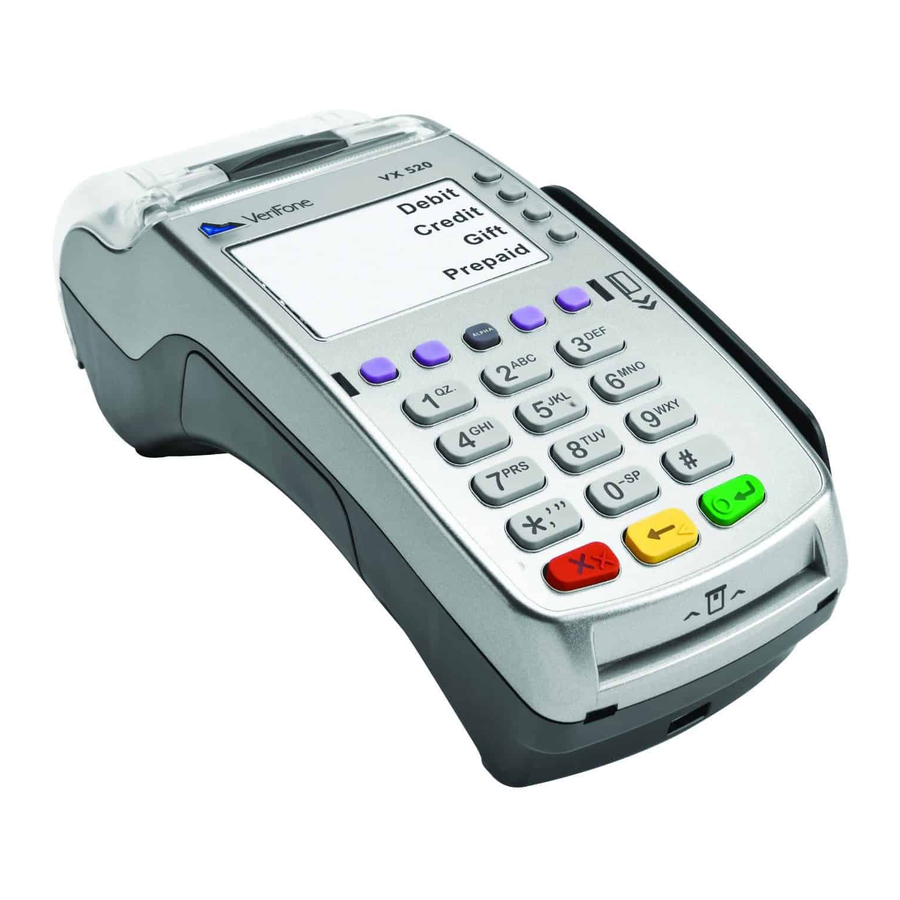
Page 4: Introduction
Introduction Terminal Features The illustration below highlights the features of the terminal. The descriptions are detailed below to help you navigate your way around and there will be references to various buttons on this terminal throughout the manual. Please note that the chip card insertion slot can be found the terminal keypad and the multi-directional magnetic card reader is located on the right hand side of the device. -
Page 5: Changing Paper Roll
Changing Paper Roll 1. Hook your finger under the latch and lift up to swing the paper roll cover open. 2. Remove any partial roll of paper in the printer tray by lifting it up. 3. Loosen the glued leading edge of the new paper roll or remove the protective strip. Unwind the paper roll past any glue residue. -
Page 6: Training Mode
Training Mode 20/04/12 1. From the main screen, as shown. Use the left 16:58:29 Sale most Purple function key to scroll down the Refund menu. Reports 2. Select Supervisor, by pressing the ↓ Reversal corresponding function key (F2) 3. The terminal will prompt for the Supervisor password;... -
Page 7: Financial Transactions
Financial Transactions 20/04/12 Sale 16:58:29 Sale Refund Chip and PIN Reports 1. While the terminal is at the main screen, ↓ Reversal insert the card into the smart card reader. 2. The terminal will prompt for the transaction SALE value to be entered. Once the desired £0.00 amount is entered press the green Enter... -
Page 8: Contactless
Contactless SALE £0.00 **Contactless payments are limited to a maximum transaction value; please consult with KEY IN AMOUNT the acquirer for the transaction ceiling limit. Enter confirms 1. From the main menu screen, start keying in the transaction value, then press the green Enter key to confirm the amount 2. -
Page 9: Customer Not Present (Cnp) / Manual (Keyed) Transaction
Customer Not Present (CNP) / Manual 20/04/12 (Keyed) Transaction 16:58:29 Sale 1. From the main screen select Sale (F1). Refund Reports 2. The terminal will prompt for the transaction ↓ Reversal value. Once the desired amount has been Enter keyed in press the green key. -
Page 10: Customer Not Present Continued
Customer Not Present Continued VISA 1. The terminal will request the CSC (last 3 digits behind the card) the door number at Enter CSC: 123 which the card is registered to, and finally the numerical digits within the postcode in the order they appear. -
Page 11: Sale With Gratuity
Sale with Gratuity 20/04/12 16:58:29 Sale *Note: This is not a standard feature on a Refund terminal. To have this feature enabled please call Reports the helpdesk. ↓ Reversal 1. From the main screen select Sale (F1). 2. The terminal will prompt for the transaction SALE value to be keyed in. - Page 12 6. If the customer selects Yes in the previous Please Select step, the terminal will provide the customer Gratuity 3 predefined TIP options or the option to Sale: key in a specific amount. The customer must £1.00 make their selection by using one of the Amount Function keys.
-
Page 13: Pre-Auth / Pre-Auth Top Up
Pre-Auth / Pre-Auth Top Up 20/04/12 16:58:29 Sale *Note: This is not a standard feature on a Refund terminal. To have this feature enabled please call Reports the helpdesk. ↓ Reversal **Note: The process on the terminal for Pre- Auth and Pre-Auth Top Up is the same, but Pre- Auth Top UP should be used if a Pre-Auth has already been taken on the same card otherwise Duplicate... - Page 14 Pre-Auth transaction process continued VISA Acct# 4562587852364567 5. If the card is inserted into the Chip reader Amount: £1.00 the terminal will prompt for a PIN number to To confirm amount process the transaction. Enter PIN Or press Cancel 6. The terminal will contact the acquiring host for an AUTH code;...
-
Page 15: Completion
Completion 20/04/12 16:58:29 Sale *Note: This is not a standard feature on a Refund terminal. To have this feature enabled please call Reports the helpdesk. ↓ Reversal 1. To complete a transaction that has been pre- authorised, press the first Purple function key to scroll down to the next menu screen. - Page 16 5. The terminal will prompt for the original COMPLETION Pre-Auth authorisation code to be entered. Enter last Auth Code: Key in the desired code and then press the green Enter key to confirm. If the Auth Clear code is incorrect use the yellow key to amend the number.
-
Page 17: Sale With Cashback
Sale with Cashback 20/04/12 16:58:29 Sale *Note: This is not a standard feature on a Refund terminal. To have this feature enabled please call Reports the helpdesk. ↓ Reversal ** Cash Back is only available on Debit Cards. 1. From the main select Sale (F1) SALE 2. - Page 18 5. The terminal will show a summary of the VISA transaction, if the totals are correct then Acct# 4562587852364567 Amount: £1.00 press the green Enter key to continue the Cash: £5.00 transaction or press the cancel key Total: £6.00 to abort. Enter to Con nue 6.
-
Page 19: Refund
Refund 20/04/12 16:58:29 Sale Chip and PIN Refund 1. From the main screen select Refund (F2). Reports ↓ Reversal 2. The terminals will prompt for a supervisor code to proceed with the refund. 3. The terminal will prompt for the transaction Refund value. -
Page 20: Contactless
Contactless SALE £0.00 1. From the main menu select Refund (F2) 2. The terminals will prompt for a supervisor KEY IN AMOUNT code to proceed with the refund. Enter confirms 3. The terminal will prompt for the transaction value. Once the desired amount has been Enter keyed in press the green key. -
Page 21: Reports
Reports 20/04/12 16:58:29 Sale Reconciliation Report Refund 1. From the main screen select Reports (F3) Reports ↓ Reversal 2. The terminal will prompt for the supervisor password. Key in the password and then press the green Enter key. 3. In the Reports Menu select Reconciliation (F2). 4. -
Page 22: And Z Reports
X and Z reports 20/04/12 16:58:29 Sale 1. From the main screen select Reports (F3) Refund 2. The terminal will prompt for the supervisor Reports password. Key in the password and then ↓ Reversal Enter press the green key. 3. In the Reports Menu select End of Shift (F3) for the X-balance or End of Day (F4) for the Z-balance. - Page 24 Helpdesk Number Enter Merchant ID for future reference ©2010 VeriFone. All rights reserved. VeriFone, the VeriFone logo, V are either trademarks or registered trademarks of VeriFone. No part of the contents of this document may be reproduced or transmitted in any forma without the written permission of VeriFone.
Need help?
Do you have a question about the Vx-520 Series APACS 40 and is the answer not in the manual?
Questions and answers