VeriFone VX 520 Installation Manual
Hide thumbs
Also See for VX 520:
- Reference manual (190 pages) ,
- User manual (37 pages) ,
- Implementation manual (34 pages)
Table of Contents
Advertisement
Advertisement
Table of Contents

Related Manuals for VeriFone VX 520


Summary of Contents for VeriFone VX 520
-
Page 1: Installation Guide
VX 520 Installation Guide VeriFone Part Number DOC252-003-EN-B, Revision B... - Page 2 VeriFone, Inc. The information contained in this document is subject to change without notice. Although VeriFone has attempted to ensure the accuracy of the contents of this document, this document may include errors or omissions. The examples and sample programs are for illustration only and may not be suited for your purpose.
-
Page 3: Table Of Contents
VX 520 Features and Benefits ........ - Page 4 VX 520 Sprocket Specifications ........
-
Page 5: Preface
Troubleshooting Guidelines. Provides troubleshooting guidelines, should you encounter a problem in terminal installation and configuration. Related To learn more about the VX 520 terminal, refer to the following set of documents: Documentation VPN DOC252-001-EN VX 520 Certifications and Regulations VPN DOC252-002-EN... -
Page 6: Conventions And Acronyms
Table 2 Acronym Definitions Acronym Definitions Alternating Current Automated Teller Machine Central Processing Unit Check Reader CTLS Contactless Direct Current Europay MasterCard and VISA Internal Thermal Printer Liquid Crystal Display VX 520 I NSTALLATION UIDE... - Page 7 Merchandise Return Authorization MSAM Micromodule-Size Security Access Module Payment Card Industry PIN-Entry Devices Personal Identification Number Random Access Memory RJ-11 Registered Jack 11 RJ-45 Registered Jack 45 RS-232 Recommended Standard 232 Security Access Module VeriFone Part Number VX 520 I NSTALLATION UIDE...
- Page 8 REFACE Conventions and Acronyms VX 520 I NSTALLATION UIDE...
-
Page 9: Hapter
HAPTER Terminal Overview Use this chapter to find out more about the features and benefits of VX 520 terminals. The VX 520 standard terminal comes with an internal thermal printer (ITP) while the VX 520 Sprocket terminal comes with a dot-matrix, sprocket-fed printer. -
Page 10: Vx 520 Terminal
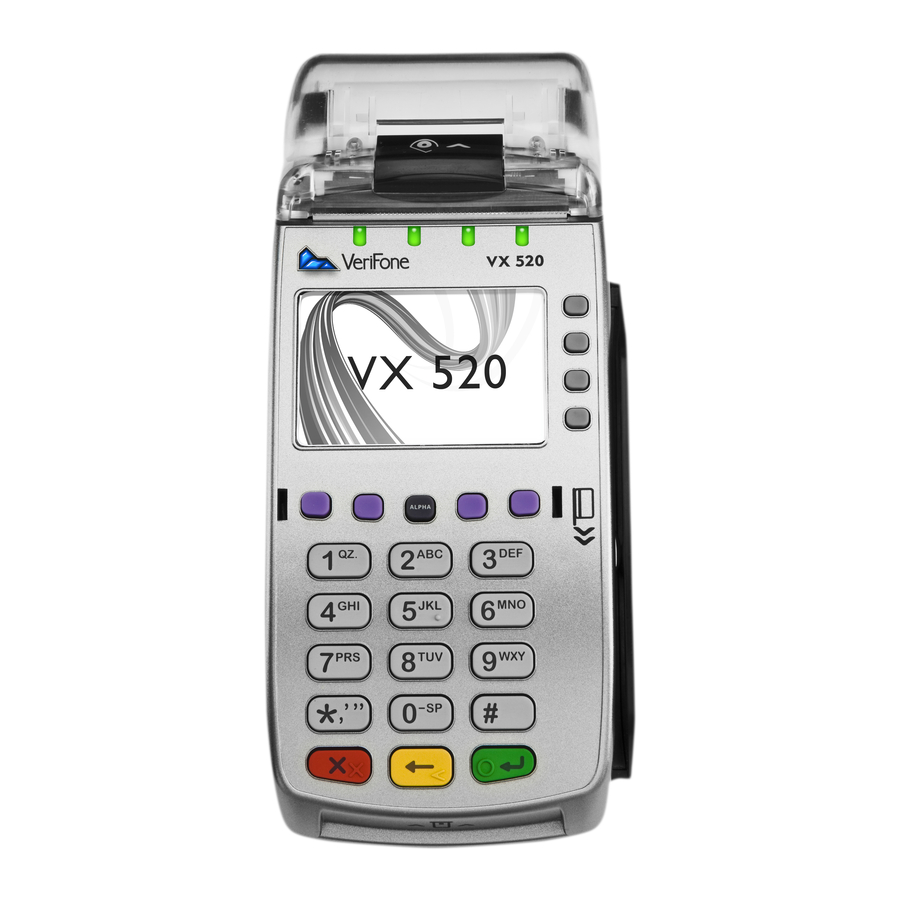
The VX 520 offers several communication options, enhanced display, increased processing power, expanded memory, and two USB peripheral ports. The VX 520 terminal uses a robust, sleek, and highly functional design. NOTE VeriFone ships variants of the VX 520 terminals for different markets. Your terminal may have a different configuration from the features described in this section. -
Page 11: Vx 520 Features And Benefits
Backlit keypad Security • Increased Security (PCI 2.0) • SDA DDA encryption ready • Leading ECC Performance Benchmark Form Factor • The VX 520 is ergonomically designed to fit both the traditional countertop and hand-over models. VX 520 I NSTALLATION UIDE... - Page 12 VeriFone, the worldwide leader in POS solutions. True Multi-Application Capability • The VX 520 terminal offers 32 MB of RAM, and 128 MB Flash memory, which supports multiple applications on a single terminal. • The primary smart card reader and the MSAMs safeguard sensitive financial data and support multiple smart card schemes.
-
Page 13: Vx 520 Sprocket Terminal
This section provides a brief description of the VX 520 Sprocket terminal: Terminal • An optional configuration of the VX 520 replaces the thermal printer with a sprocket printer, an additional telephone port (RJ-11) and power buttons. • The VX 520 Sprocket configuration enjoys the same communication and performance capabilities as the standard VX 520. - Page 14 VeriFone, the worldwide leader in POS solutions. True Multi-Application Capability • The VX 520 Sprocket terminal offers 32 MB of RAM, and 128 MB Flash memory, which supports multiple applications on a single terminal. • The primary smart card reader and the MSAMs safeguard sensitive financial data and support multiple smart card schemes.
-
Page 15: Hapter
HAPTER Terminal Setup Use this chapter to set up and use your VX 520 terminal. Package contents and setup procedures may vary for different VX 520 models: The standard VX 520 uses thermal paper rolls while the VX 520 Sprocket uses carbonized paper sheets. -
Page 16: Vx 520 Setup
ERMINAL ETUP VX 520 Setup VX 520 Setup This section describes the setup procedures for the VX 520 terminal. You will learn about: • Selecting Terminal Location • Unpacking the Shipping Carton • Examining Terminal Features • Establishing Telephone Line Connections •... -
Page 17: Unpacking The Shipping Carton
Remove all plastic wrapping from the terminal and other components. Remove the clear protective film from the LCD screen. Do not use a terminal that has been damaged or tampered with. The VX 520 CAUTION terminal comes equipped with tamper-evident labels. If a label or component appears damaged, please notify the shipping company and your VeriFone representative or service provider immediately. -
Page 18: Examining Terminal Features
ERMINAL ETUP VX 520 Setup Examining Terminal Before you continue the installation process, notice the features of the VX 520 Features terminal (see Figure INTERNAL THERMAL PRINTER PRINTER DOOR LATCH MAGNETIC SERRATED METAL CARD READER STRIP ATM-STYLE TERMINAL DISPLAY FUNCTION KEYS... - Page 19 NOTE VeriFone ships variants of the VX 520 terminal for different markets. Your terminal may have a different configuration. However, the basic processes described in this guide remain the same, regardless of terminal configuration.
- Page 20 ERMINAL ETUP VX 520 Setup Figure 5 Figure 6 show the connection ports for the VX 520 terminal. POWER PORT RS-232 SERIAL PORT RJ-11 TELEPHONE PORT Figure 5 VX 520 Power and Connection Ports HOST USB PORT ETHERNET PORT CLIENT USB PORT...
- Page 21 ERMINAL ETUP VX 520 Setup To use the The connection ports offer multiple connectivity for the VX 520 terminal. Please connection ports refer to the following list of peripheral devices for the connectivity options. Host USB Port • PINpad 1000 USB •...
-
Page 22: Establishing Telephone Line Connections
Roll in the Printer install paper in the printer. The VX 520 uses a roll of single-ply, thermal-sensitive paper for either the 38 mm- or the 49 mm-diameter version. A pink out-of-paper indicator line appears on the edge of the paper approximately 18 inches before the end of the roll. - Page 23 ERMINAL ETUP VX 520 Setup To install a paper roll Hook your finger under the latch and lift up to swing the paper roll cover open (see Figure Figure 8 Opening the Printer Cover Remove any partial roll of paper in the printer tray by lifting it up.
-
Page 24: Installing/Replacing Msam Cards
For paper ordering information, refer to Accessories and Documentation. Installing/Replacing When you first receive your VX 520 terminal, you may need to install one or more MSAM Cards MSAM cards or you may need to replace old cards. CAUTION Observe standard precautions when handling electrostatically sensitive devices. - Page 25 Press the unlocking button and then lift the rear cover to access the MSAM cardholder panel. Figure 11 Opening VX 520 Rear Cover Hold the MSAM cardholder panel, grasp firmly and pull upward to expose the MSAM slots. Figure 12...
-
Page 26: Connecting Optional Devices
Close the MSAM cardholder panel, and then replace the terminal rear cover. Connecting The VX 520 terminal supports some peripheral devices designed for use with Optional Devices electronic point-of-sale terminals. Before connecting any peripheral device, remove the power cord from the CAUTION terminal and ensure that the green indicator LED is not lit. - Page 27 ETUP VX 520 Setup Optional Device Connections The VX 520 terminal has a port that can operate either as a PIN pad port or an RS-232 port, depending on the power source available. Connecting the PIN Use the following procedures to connect a PIN pad or smart card reader.
- Page 28 ERMINAL ETUP VX 520 Setup Connecting ECRs to The VX 520 terminal also supports Electronic Cash Registers (ECR). Contact the VX 520 your VeriFone representative or visit the online store at www.store.verifone.com for information on these devices. Figure 15 provides an example of a peripheral connection to the USB port.
-
Page 29: Connecting The Terminal Power Pack
Connecting the When you have finished connecting optional peripheral(s), you are ready to Terminal Power connect the VX 520 terminal to the provided power source. Pack Using an incorrectly rated power supply may damage the terminal or cause it not CAUTION to work as specified. -
Page 30: Privacy Shield (Optional)
Privacy Shield The privacy shield protects the customers’ PIN entry from being seen by the (Optional) cashier or other customers. The illustration shows an example of a VX 520 with the optional privacy shield. Figure 17 VX 520 Optional Privacy Shield... -
Page 31: Using The Magnetic Card Reader
Leave the smart card in the card reader until the transaction is complete. Premature card removal will invalidate the transaction. Using the Magnetic The VX 520 terminal supports credit or debit card transactions. Card Reader To conduct a credit or... -
Page 32: Vx 520 Sprocket Setup
• Using the Smart Card Reader • Using the Magnetic Card Reader Selecting Terminal Use the following guidelines when selecting a location for your VX 520 Sprocket Location terminal. Ease of Use • Select a location convenient for both merchant and cardholder. -
Page 33: Unpacking The Shipping Carton
Remove all plastic wrapping from the terminal and other components. Remove the clear protective film from the LCD screen. Do not use a terminal that has been damaged or tampered with. The VX 520 CAUTION Sprocket terminal comes equipped with tamper-evident labels. If a label or component appears damaged, please notify the shipping company and your VeriFone representative or service provider immediately. -
Page 34: Examining Terminal Features
ERMINAL ETUP VX 520 Sprocket Setup Examining Terminal Before you continue the installation process, notice the features of the VX 520 Features Sprocket terminal (see Figure 20). SPROCKET PAPER TRAY PAPER LOADER PRINTER SERRATED METAL STRIP MAGNETIC CARD READER TERMINAL... - Page 35 • Three SAM (security access module) compartments, built into the side of the terminal. The VX 520 Sprocket terminal contains MSAM cardholders to support multiple stored-value card programs or other merchant card requirements. VX 520 I...
- Page 36 Turn the terminal upside down to view the connection ports. Notice that the ports are recessed. Different ports provide connections to a communications line, optional peripheral devices, and the power supply. Figure 21 Figure 22 show the connection ports for the VX 520 Sprocket terminal. POWER PORT RJ-11 (LINE) RJ-11 (PHONE)
- Page 37 ERMINAL ETUP VX 520 Sprocket Setup To use the The connection ports offer multiple connectivity for the VX 520 Sprocket terminal. connection ports Please refer to the following list of peripheral devices for the connectivity options. Host USB Port •...
-
Page 38: Establishing Telephone And Line Connections
Certified Telecommunication Line Cord. Installing Paper Tray The VX 520 Sprocket terminal uses 76 mm carbonized paper sheets. This type of paper requires an external-mounted paper tray. Use the following procedure to install the paper tray for the VX 520 Sprocket terminal: To install the paper Align the slots with the paper tray clasps. -
Page 39: Installing Paper In The Tray
ERMINAL ETUP VX 520 Sprocket Setup Hook the clasps into the slots to secure the tray and snap the lock on the lower end of the tray. Figure 24 Attaching Paper Tray VX 520 I NSTALLATION UIDE... -
Page 40: Connecting Optional Devices
Figure 25 Loading Paper Stack Installing/Replacing When you first receive your VX 520 Sprocket terminal, you may need to install one MSAM Cards or more MSAM cards or you may need to replace old cards. CAUTION Observe standard precautions when handling electrostatically sensitive devices. - Page 41 VeriFone distributor. Optional Device Connections The VX 520 Sprocket terminal has a port that can operate either as a PIN pad port or an RS-232 port, depending on the power source available. VX 520 I...
-
Page 42: Connecting The Terminal Power Pack
Figure 27 VX 520 Sprocket Sample PIN pad Connection Turn the terminal upside down to access the connection ports. Insert the USB connector of the PIN pad into the USB port of the VX 520 Sprocket. Connecting ECRs to The VX 520 Sprocket terminal also supports Electronic Cash Registers (ECR). - Page 43 Connecting the When you have finished connecting optional peripheral(s), you are ready to Terminal Power connect the VX 520 Sprocket terminal to the provided power source. Pack Using an incorrectly rated power supply may damage the terminal or cause it not CAUTION to work as specified.
-
Page 44: Privacy Shield (Optional)
Connect the power supply to the power cord. Connect the power cord to the wall outlet. If an application is loaded in the terminal, it starts after the initial VeriFone copyright screen and usually displays a unique copyright screen. If no application... -
Page 45: Using The Smart Card Reader
ERMINAL ETUP VX 520 Sprocket Setup Using the Smart The smart card transaction procedure may vary from one application to another. Card Reader Verify the procedure with your application provider before performing a smart card transaction. To conduct a smart... - Page 46 ETUP VX 520 Sprocket Setup Using the Magnetic The VX 520 Sprocket terminal supports credit or debit card transactions. Card Reader To conduct a credit or Position a magnetic card with the stripe in the card reader and facing inward, debit card transaction toward the keypad.
-
Page 47: Hapter
HAPTER Specifications This chapter discusses power requirements, dimensions, and other specifications of the VX 520 terminals: • VX 520 Specifications • VX 520 Sprocket Specifications VX 520 I NSTALLATION UIDE... -
Page 48: Specifications Vx 520 Specifications
PECIFICATIONS VX 520 Specifications VX 520 Specifications Power VX 520 terminal: 9.3V DC; 4.0 A DC Power Pack UL, ITE listed, LPS power supply: Input rated: 100 - 240V AC, 50/60 Hz Output rated: 9.3V DC 4.0 A Barrel connector polarity: –... -
Page 49: Vx 520 Sprocket Specifications
VX 520 Sprocket Specifications VX 520 Sprocket Specifications Power VX 520 Sprocket terminal: 24V DC; 1.7 A DC Power Pack UL, ITE listed, LPS power supply: Input rated: 100 - 240V AC, 50/60 Hz Output rated: 24V DC; 1.7 A Barrel connector polarity: –... - Page 50 PECIFICATIONS VX 520 Sprocket Specifications VX 520 I NSTALLATION UIDE...
-
Page 51: Hapter
Gently swab the contacts with alcohol or contact cleaner to remove the dirt. It is Contacts important that the exposed contacts of the VX 520 terminal stay clean and unbent. CAUTION Avoid touching the contacts of the terminal. Finger oils tarnish contacts, causing bad connections. - Page 52 AINTENANCE Smart Card Reader VX 520 I NSTALLATION UIDE...
-
Page 53: Hapter
• International – Contact your VeriFone representative Return a Before returning a VX 520 terminal to VeriFone, you must obtain an MRA number. Terminal for The following procedure describes how to return one or more VX 520 terminals for Service repair or replacement (U.S. -
Page 54: Power Pack
• Reference the model and part number in the Note box. NOTE One MRA number must be issued for each VX 520 terminal you return to VeriFone, even if you are returning several of the same model. Describe the problem(s). -
Page 55: Verifone Cleaning Kit
VX 520 Certifications and Regulations VPN DOC252-002-EN VX 520 Quick Installation Guide VPN DOC252-004-EN VX 520 Reference Manual VPN DOC252-006-EN VX 520 Sprocket Printer Certifications and Regulations VPN DOC252-007-EN VX 520 Sprocket Printer Quick Installation Guide VX 520 I NSTALLATION UIDE... - Page 56 ERVICE AND UPPORT Accessories and Documentation VX 520 I NSTALLATION UIDE...
-
Page 57: Hapter
HAPTER Troubleshooting Guidelines The troubleshooting guidelines provided in the following section are included to assist you to successfully install and configure your VX 520 terminal. If you have problems operating your VX 520 terminal, please read through these troubleshooting examples. -
Page 58: Guidelines Terminal Does Not Dial Out
Install printer paper. • If the problem persists, it may be due to poor paper quality. Install a new roll of higher-quality paper. WARNING Poor-quality paper may jam the printer. To order high-quality VeriFone paper, refer to Accessories and Documentation. Keypad Does... -
Page 59: Transactions Fail To Process
If they are not experiencing difficulties with their line, contact the telephone company and have your line checked. • If the telephone line works, contact your local VeriFone representative for assistance. VX 520 I NSTALLATION... -
Page 60: Printer Does Not Print
• Verify that the printer roller and paper roll dust cover are properly installed. • If the problem persists, contact your VeriFone distributor or service provider. Terminal Display • Connect the terminal in to a known-good power supply (if you have one) to Does not Show see if this clears the problem. -
Page 61: Index
MSAM cards terminal location accessories unpacking the shipping carton documentation installation VX 520 Sprocket ordering connecting a smart card reader to VX 520 power packs Sprocket printer paper connecting optional device(s) telephone line cord connecting the terminal power pack VeriFone cleaning kit... - Page 62 VX 520 DC power pack power button functions VX 520 external dimensions power buttons VX 520 power VX 520 Sprocket terminal VX 520 Sprocket DC power pack benefits VX 520 Sprocket external dimensions VX 520 Sprocket terminals VX 520 Sprocket power electrical considerations...
- Page 63 NDEX VX 520 I NSTALLATION UIDE...
-
Page 64: Gateway Place, Suite
VeriFone, Inc. 2099 Gateway Place, Suite 600 San Jose, CA, 95110 USA Tel: (800) VeriFone (837-4366) www.verifone.com VX 520 Installation Guide VeriFone Part Number DOC252-003-EN-B, Revision B...
Need help?
Do you have a question about the VX 520 and is the answer not in the manual?
Questions and answers
NO ZTCP VARIABLE how to solve this in verifone Vx520