Table of Contents
Advertisement
Quick Links
Advertisement
Table of Contents

Related Manuals for Coemar Reflection LEDko FullSpectrum 6


Summary of Contents for Coemar Reflection LEDko FullSpectrum 6
- Page 1 FullSpectrum 6 instruction manual Version 2.0...
- Page 2 FullSpectrum 6 Serial Number: ....................................... Purchase date: ....................................... Dealer: ....................................... Address: ....................................... Suburb: ....................................... Country: ....................................... Phone / Fax: ....................................... Please note in the space provided above the relative service information of the model and the retailer from whom you purchased your LEDko FullSpectrum 6: this information will assist us in providing spare parts, repairs or in answering any technical enquiries with the utmost speed and accuracy.
-
Page 3: Table Of Contents
Index 1. Packaging and transportation......................Pag. 5 1.1. Packaging................................Pag. 5 1.2. Transportation..............................Pag. 5 2. General information............................Pag. 5 2.1 Safety informations............................Pag. 5 2.2 Warranty conditions............................Pag. 6 2.3 EC Norms ................................Pag. 6 3. Product specifications ..........................Pag. 7 3.1 Technical characteristics..........................Pag. 7 3.2 Dimensions................................Pag. 7 3.3 Unit’s main components..........................Pag. - Page 4 11. Display panel functions........................Pag. 26 11.1 Quick guide to menu..........................Pag. 26 11.2 Rapid count..............................Pag. 26 11.3 Main functions menu..........................Pag. 27 11.4 Measure (MEAS)............................Pag. 29 11.5 Electronic alignment of the LEDs......................Pag. 31 11.6 Special functions of the fixture......................Pag. 32 11.7 Error messages............................
-
Page 5: Packaging And Transportation
Congratulations on having purchased a Coemar product. You have assured yourself of a fixture of the highest quality, both in componentry and in the technology used. We renew our invitation to you to complete the service information on the previous page, to expedite any request for service information or spares (in case of problems encountered either during, or subsequent to, installation). -
Page 6: Warranty Conditions
3. The level of technology of LEDko FullSpectrum 6 requires the use of spe- cialised personnel for all service applications; refer all work to your authorised Coemar service centre. 4. A good earth connection is essential for the proper functioning of the projec- tor. -
Page 7: Product Specifications
Product specifications Technical characteristics Power supply 90-230Vac, 50-60Hz Maximum current 1.06 A a 230 VaC - 2.71 A a 90 Vac Power factor Cosϕ = 0.9 Power consumption 220 watt RGBWLA, with pure colour mixing throughout the Color temperature field and all whites from 2.700 to 6.500 K Weight (without optic) 6kg - 13.2lbs Minimum ambient temperature... -
Page 8: Unit's Main Components
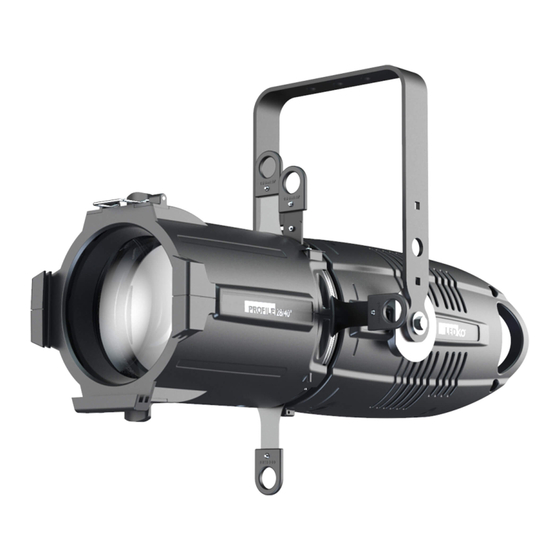
3.3. Unit’s main components Components description A Adjustable yoke B Iris (optional) C Gobo holder (optional) D Lens adjusting handles E Yoke locking handle F Gel frame locking spring G Profile blade H Interchangeable optic... -
Page 9: Back Panel Description
Back panel description Display Plus button Menu button Minus button DMX In Enter button DMX Out PowerCon In PowerCon Out... -
Page 10: Installation
. Installation Optical installation Remove the frontal cap by loosening the upper and lower screws enough to free the cap itself, set the optic’s flange tilted about 60°. Insert the optic’s flange into the body’s receptacle and turn the optic 60° until it is firmly assembled to the projector body, free to rotate but not free to detach itself from the body. -
Page 11: Mechanical Installation
The safety chain must pass through the handles of the unit and then attached to the structure. If using steel cables and chains not Coemar’s production, make sure they are suitable to support the weight of the unit according to normative UL/ETL (required: the weight of 6 complete devices for at least one hour). -
Page 12: Powering Up
(cable 3 X 1,5 ø external 10 mm, rated 300/500V, tested to 2 KV, operating temperature -40°C + 180°C, Coemar cod. CV5311). Connection to mains power LEDko FullSpectrum 6 is equipped with two power connectors, one as input and one as output, which can be used to feed up to 8 (at 230 VAC) or 4 (90 VAC) fixtures. -
Page 13: Control Signal Connections
. Control signal connections Control signal connection by XLR5 plugs The digital control signal is transmitted to the projector via a two pole cable screened in ac- cording to the International standards for DMX 512 data transmission. The connection must be serial, using connectors XLR5 male and female located on the back of LEDko FullSpectrum 6 labelled DMX512 IN e OUT. -
Page 14: Turning On The Projector
. Turning on the projector After having followed the preceding steps described, proceed with the power supply and turn on the projector connecting it to the mains power. The software version installed on the internal microprocessors will be shown on the display, suddenly it will show the current DMX addressing. -
Page 15: Dmx Chart (Software Vrs. 1.09 - 1.23)
. DMX chart (software vrs. 1.09 - 1.23) DMX Chart 14, 9, 6, 1 channels type of channel function effect decimal percentage control master 1 1 - 1 proportional adjust luminous output intensity from 0 to 100% 0 - 255 0% - 100% dimmer 2 2 1 - proportional proportional control of the color percentage from 0 to 100% 0 - 255 0% - 100%... - Page 16 no effect 0 - 9 0% - 4% R4460 CALCOLOR 60 GREEN 10 - 70 4% - 27% 11 - - green tone step R2004 DEEP GREEN 71 - 132 28% - 52% E730 LIGHT GREEN 133 - 194 52% - 76% E088 LIME GREEN 195 - 255 76% - 100% no effect...
-
Page 17: Dmx Chart 5 Channels
DMX Chart 5 channels type of channel function effect decimal percentage control master proportional adjust luminous output intensity from 0 to 100% 0 - 255 0% - 100% dimmer no effect 0 - 9 0% - 4% step 2700 K 10 - 30 4% - 12% proportional... -
Page 18: Dmx Chart (Software Vrs. 1.31 - 2.03)
. DMX chart (software vrs. 1.31 - 2.03) DMX Chart 16, 10, 6, 1 channels type of channel function effect decimal percentage control master 1 1 - 1 proportional adjust luminous output intensity from 0 to 100% 0 - 255 0% - 100% dimmer 2 2 1 - proportional proportional control of the color percentage from 0 to 100% 0 - 255 0% - 100%... - Page 19 park, no effect 0 - 71 0% - 28% 600 Hz 72 - 84 28% - 33% step fan at low-noise speed 85 - 96 33% - 38% fan at auto-silent speed 97 - 108 38% - 42% proportional fan speed control from minimum to maximum 109 - 120 43% - 47% no effect 121 - 133 47% - 52%...
-
Page 20: Dmx Chart 5 Channels
DMX Chart 5 channels type of channel function effect decimal percentage control master proportional adjust luminous output intensity from 0 to 100% 0 - 255 0% - 100% dimmer 3200 K 0 - 5 0% - 2% 2700 K 6 - 11 2% - 4% 2800 K 12 - 17... - Page 21 step no effect 0 - 9 0% - 4% exalts the green color in the mixing and diminishes the proportional 10 - 123 4% - 48% presence of magenta green step no effect 124 - 132 49% - 52% saturation diminishes the presence of green in the mixing and exalts the proportional 133 - 246 52% - 96%...
-
Page 22: Dmx Chart (Software Vrs. 2.04 Or Following)
. DMX chart (software vrs. 2.04 or following) 10.1 DMX Chart 16, 7, 1 channels type of channel function effect decimal percentage control master proportional adjust luminous output intensity from 0 to 100% 0 - 255 0% - 100% dimmer proportional proportional control of the color percentage from 0 to 100% 0 - 255 0% - 100% green proportional proportional control of the color percentage from 0 to 100% 0 - 255 0% - 100%... - Page 23 no effect 0 - 9 0% - 4% R4460 CALCOLOR 60 GREEN 10 - 70 4% - 27% 12 - - green tone step R2004 DEEP GREEN 71 - 132 28% - 52% E730 LIGHT GREEN 133 - 194 52% - 76% E088 LIME GREEN 195 - 255 76% - 100% no effect...
-
Page 24: Dmx Chart 5 Channels
10.2 DMX Chart 5 channels type of channel function effect decimal percentage control master proportional adjust luminous output intensity from 0 to 100% 0 - 255 0% - 100% dimmer 3200 K 0 - 5 0% - 2% 2700 K 6 - 11 2% - 4% 2800 K... - Page 25 step no effect 0 - 9 0% - 4% exalts the green color in the mixing and diminishes the proportional 10 - 123 4% - 48% presence of magenta green step no effect 124 - 132 49% - 52% saturation diminishes the presence of green in the mixing and exalts the proportional 133 - 246 52% - 96%...
-
Page 26: Display Panel Functions
Changing the preset settings made by Coemar can vary the functions of the projector so that it will respond differently to the controller; therefore carefully read about the functions described here before carrying out any possible selection. -
Page 27: Main Functions Menu
11.3 Main functions menu CCT: This channel offers a preset library of va- 2700 rious white CCT from a range 2700 K up to 6500 K by 100 K steps, manually selec- table without the need of a DMX conso- 6500 Dimmer: diMM... - Page 28 Fan Speed: • Auto: under this setting the fan speed varies based on the overall tempera- ture of the fixture to guarantee the AUtO maximum output possible; [Auto] • Low noise: this setting will keep the [Fan Speed] speed of the fan at the minimum level while the light output will decrease in [Low noise]...
-
Page 29: Measure (Meas)
11.4 Measure (MEAS) Temperature: tEMP t.LEd Shows the current temperature values: • LED: shows the LED module temper- [LED Temperature] [Temperature] ature; • Board: shows the electronic board temperature; t.brd [Board Temperature] Volt: Shows the power supply voltage; vOLt DMX Input: Shows the value of the DMX channels [Supply Voltage] received by the fixture on every channel... - Page 30 LED: Shows the percentage value of the LED status; Fre: Shows the PWM frequency of the LED [LED Status] (611 Hz as default); Fan speed: Shows the percentage fan usage; Usage hours: Shows the hour counter of the fixture: • Unit: shows the overall hours of life of the fixture;...
-
Page 31: Electronic Alignment Of The Leds
The display panel of LEDko FullSpectrum 6 allows the electronic alignment of the LEDs, this procedure is performed by Coemar at the time of testing, this procedure may be useful for special effects or in case of replacement of internal components (PCBs, LEDs, etc...). -
Page 32: Special Functions Of The Fixture
If a malfunction occurs, LEDko FullSpectrum 6 has a self-diagnostic system that will show the error message on the display. The following table will explain in detail the most common errors. If, despite of suggested intervention, the problem persists, call the Coemar Service Center. Error code... -
Page 33: Accessories And Spare Parts
. Accessories and spare parts LEDko FullSpectrum 6 is a very versatile fixture, optional accessories for its customization are available under request: Accessory name Code Front barrel for lens tube with burnished blades BC10011A200 Profile 5°, lens tube BC10011A041 Profile 10°, lens tube BC10011A042 Profile 14°, lens tube BC10011A023... - Page 34 BC10011A044 max. load 20 Kg. All the components of LEDko FullSpectrum 6 are available as spare parts from your Coemar dealer or Service. Accurate description of the fixture, model number and type will assist us in providing for your requirements in an efficient and effective manner.
-
Page 35: Maintenance
. Maintenance 13.1 Firmware update The firmware of LEDko FullSpectrum 6 can be updates through the RDM protocol (ANSI E1.20). Contact Coemar assistance to receive the software and the device updater. 13.2 Periodic cleaning Lenses Even a thin layer of dust can reduce the luminous output and alter the consistency of the beam. -
Page 36: And Answers
. F.A.Q. and answers The following list shows common issues that may be simply solved. If issues persist, the unit must be repaired by a qualified personnel or just contact your Coemar service near you. Question Possible solution Projector not powered on: • Make sure the power cord is plugged in or test the input... - Page 37 User notes ......................................................................................................................................................................................................................................................................................................................................................................................................................................................................................................................................................
- Page 38 Information on disposal of the equipment The equipment at the end of its useful life must be disposed of at an appropriate recycling center for waste electrical and electronic equipment. The treatment and disposal of environmentally friendly, helps prevent potential negative environmental and health and promote the reuse and / or recycling of materials making up the equipment.
- Page 39 Coemar Lighting s.r.l. Via Carpenedolo 90 46043 Castiglione delle Stiviere, Mantova, Italy phone. +39 0376/1514412 - fax +39 0376/1514380 info@coemar.com Coemar reserves the right to effect modifications without notification...
Need help?
Do you have a question about the Reflection LEDko FullSpectrum 6 and is the answer not in the manual?
Questions and answers