Table of Contents
Advertisement
Quick Links
MODEL T1240
MINI BENCHTOP
ROUTER TABLE
OWNER'S MANUAL
(For models manufactured since 12/17)
COPYRIGHT © MARCH, 2018 BY GRIZZLY INDUSTRIAL, INC.
WARNING: NO PORTION OF THIS MANUAL MAY BE REPRODUCED IN ANY SHAPE
OR FORM WITHOUT THE WRITTEN APPROVAL OF GRIZZLY INDUSTRIAL, INC.
#ES19242 PRINTED IN CHINA
V1.03.18
Advertisement
Table of Contents

Related Manuals for Grizzly T1240


Summary of Contents for Grizzly T1240
- Page 1 (For models manufactured since 12/17) COPYRIGHT © MARCH, 2018 BY GRIZZLY INDUSTRIAL, INC. WARNING: NO PORTION OF THIS MANUAL MAY BE REPRODUCED IN ANY SHAPE OR FORM WITHOUT THE WRITTEN APPROVAL OF GRIZZLY INDUSTRIAL, INC. #ES19242 PRINTED IN CHINA V1.03.18...
- Page 2 This manual provides critical safety instructions on the proper setup, operation, maintenance, and service of this machine/tool. Save this document, refer to it often, and use it to instruct other operators. Failure to read, understand and follow the instructions in this manual may result in fire or serious personal injury—including amputation, electrocution, or death.
-
Page 3: Table Of Contents
IMPORTANT NOTICE! Modification Required for Attaching Your Router The mounting plate included with the Model T1240 DOES NOT feature pre-drilled mounting holes due to the varying brands of routers using different mounting hole configurations. To properly use this router table, holes must be drilled into the mounting plate that match the base mount- ing hole configuration of your router. -
Page 4: Introduction
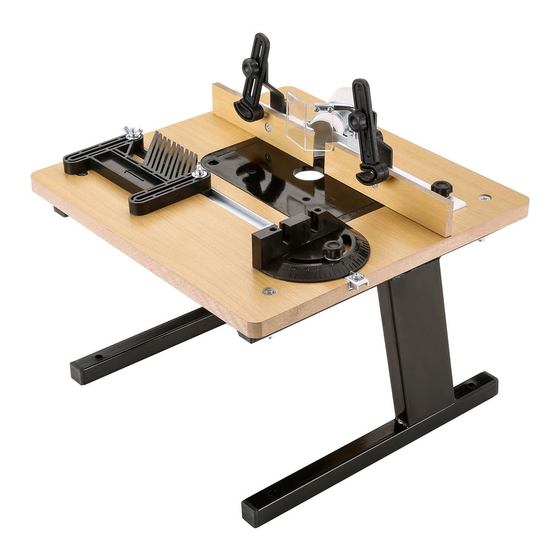
INTRODUCTION Description Manual Accuracy The Model T1240 Mini Benchtop Router Table We are proud to offer this document with your new comes equipped with many features of a full-sized machine/tool! We've made every effort to be exact router table, but in a compact size. It's the perfect with the instructions, specifications, drawings, and router table for a small-project hobbyist. -
Page 5: Identification
Always keep router bit guard in place and in proper operating condition. c) Feed workpiece AGAINST rotation of router bit. d) Keep fingers away from revolving bit–use fixtures when necessary. e) Do not use awkward hand positions. Model T1240 (Mfd. Since 12/17) -
Page 6: Controls & Components
C. Mounting Plate. Plate used to attach router to table. D. Router Bit Guard. Clear guard provides workpiece visibility and safety during router operations. E. Hold-Down (1 of 2). Provides additional workpiece support and kickback protection during router operations. Model T1240 (Mfd. Since 12/17) -
Page 7: Machine Data Sheet
Approximate Assembly & Setup Time ........................30 Minutes Features: Clear Polycarbonate Router Bit Guard Hand-Adjustable Fence Base and Fence Boards Shop Vacuum Compatible Dust Port Accessories: Miter Gauge Featherboard Model T1240 Page 1 of 1 Model T1240 (Mfd. Since 12/17) -
Page 8: Section 1: Safety
Never operate under the influence of drugs or injury or blindness from flying particles. Everyday alcohol, when tired, or when distracted. eyeglasses are NOT approved safety glasses. Model T1240 (Mfd. Since 12/17) - Page 9 EXPERIENCING DIFFICULTIES. If at any time debris. Make sure they are properly installed, you experience difficulties performing the intend- undamaged, and working correctly BEFORE ed operation, stop using the machine! Contact our operating machine. Technical Support at (570) 546-9663. Model T1240 (Mfd. Since 12/17)
-
Page 10: Additional Safety For Router Tables
Use this machine/tool with respect and caution to lessen the possibility of operator injury. If normal safety precautions are overlooked or ignored, serious personal injury may occur. Model T1240 (Mfd. Since 12/17) -
Page 11: Section 2: Setup
IMPORTANT: Save all packaging materials until you are completely satisfied with the tool and have resolved any issues between Grizzly or the shipping agent. You MUST have the original pack- aging to file a freight claim. It is also extremely helpful if you need to return your tool later. -
Page 12: Inventory
Use this and other machinery with caution and respect. Failure to do so could result in serious per- sonal injury, damage to equipment, or poor work results. -10- Model T1240 (Mfd. Since 12/17) -
Page 13: Securing To Workbench
Router Table Leg router table. Workbench Note: Fence assembly is attached to table in Flat Washer reverse position for shipping purposes. Lock Washer Hex Nut Figure 5. "Through Mount" setup. -11- Model T1240 (Mfd. Since 12/17) - Page 14 Attach (2) hold-downs to hold-down brackets with (2) M5-.8 x 12 knob bolts and (2) 5mm flat washers (see Figure 10). Knob Bolts Fence Base Figure 8. Fence assembly attached. Hold- Downs Figure 10. Hold-downs attached. -12- Model T1240 (Mfd. Since 12/17)
-
Page 15: Attaching Router
M6-1 x 15 knob bolt (see Figure 11). The mounting plate included with the Model Router Bit T1240 is universal and designed to attach to the Guard bottom of your router in the same manner as the base plate of the router. We recommend using the base plate as a template for the hole pattern to be drilled through the mounting plate. - Page 16 Figure 15. mounting plate with threaded holes in router base. Mounting Plate Router Base Plate Figure 15. Marking holes on mounting plate. -14- Model T1240 (Mfd. Since 12/17)
-
Page 17: Dust Collection
12. Use fasteners removed in Step 5 to secure router to mounting plate, as shown in Figure 17. The Model T1240 has a dust port that will accept Note: The original fasteners may not be long ⁄ " shop vacuum hose adapter. -
Page 18: Section 3: Operations
Regardless of the content in this sec- tion, Grizzly Industrial will not be held liable Stops the router. for accidents caused by lack of training. -16-... -
Page 19: Stock Inspection & Requirements
Note: If the grain changes direction along the edge of the board, decrease the cutting depth and make additional passes. The fence on the Model T1240 has two fence boards (infeed and outfeed). Each fence board can be moved sideways up to 1" to increase or... -
Page 20: Router Bit Guard
Miter Gauge & Featherboard A clear router bit guard is included with the Model T1240 to provide additional safety during router A miter gauge and featherboard are included with operations. It is held to the fence base with a knob the Model T1240. -
Page 21: Squaring Fence & Table
(see Figure 26 on Page 20). IMPORTANT: To reduce risk of kickback, Figure 25. Adjusting fence parallel with table DO NOT take more than ⁄ " off during any slot. pass. -19- Model T1240 (Mfd. Since 12/17) -
Page 22: Profile Routing
Lock fence in place, and then adjust hold- downs so they barely touch the workpiece. Tighten all knobs, connect router to power, then perform cut. -20- Model T1240 (Mfd. Since 12/17) -
Page 23: Routing Small Stock
Figure 29. Example of a zero-clearance fence board. DO NOT attempt free-hand routing with the Model T1240, doing so may result in serious personal injury or machine damage. The compact size and lack of starting pin, makes the Model T1240 unsuitable for free-hand routing. -
Page 24: Section 4: Accessories
T20451—“Kirova” Clear Safety Glasses To reduce this risk, only install accessories T20452—“Kirova” Anti-Reflective S. Glasses recommended for this machine by Grizzly. T20456—DAKURA Safety Glasses, Black/Clear T20502 NOTICE Refer to our website or latest catalog for additional recommended accessories. -
Page 25: Section 5: Maintenance
130 CFM. Always disconnect power to the router before per- forming maintenance. Failure to do this may result in serious person- al injury. Figure 34. Shop-Vac 10-Gallon 4HP Wet/Dry ® Shop Vacuum. -23- Model T1240 (Mfd. Since 12/17) -
Page 26: Section 6: Service
1. Inconsistent feeding speed. 1. Use consistent feed rate. Divots in edge of cut. 2. Inconsistent pressure against fence boards. 2. Apply constant pressure. 3. Fence not adjusted correctly. 3. Adjust fence correctly (Page 17). -24- Model T1240 (Mfd. Since 12/17) -
Page 27: Section 7: Parts
SECTION 7: PARTS We do our best to stock replacement parts when possible, but we cannot guarantee that all parts shown are available for purchase. Call (800) 523-4777 or visit www.grizzly.com/parts to check for availability. Main T1240 grizzly.com WARNING! WARNING! - Page 28 MUST maintain the original location and readability of the labels on the machine/ tool. If any label is removed or becomes unreadable, REPLACE that label before using the machine /tool again. Contact Grizzly at (800) 523-4777 or www.grizzly.com to order new labels. BUY PARTS ONLINE AT GRIZZLY.COM! -26- Model T1240 (Mfd.
- Page 29 Would you recommend Grizzly Industrial to a friend? _____ Yes _____No Would you allow us to use your name as a reference for Grizzly customers in your area? Note: We never use names more than 3 times. _____ Yes _____No 10.
- Page 30 FOLD ALONG DOTTED LINE Place Stamp Here GRIZZLY INDUSTRIAL, INC. P.O. BOX 2069 BELLINGHAM, WA 98227-2069 FOLD ALONG DOTTED LINE Send a Grizzly Catalog to a friend: Name_______________________________ Street_______________________________ City______________State______Zip______ TAPE ALONG EDGES--PLEASE DO NOT STAPLE...
-
Page 31: Warranty And Returns
WARRANTY AND RETURNS Grizzly Industrial, Inc. warrants every product it sells for a period of 1 year to the original purchaser from the date of purchase. This warranty does not apply to defects due directly or indirectly to misuse, abuse, negligence, accidents, repairs or alterations or lack of maintenance.
Need help?
Do you have a question about the T1240 and is the answer not in the manual?
Questions and answers