Table of Contents
Advertisement
Quick Links
Advertisement
Table of Contents

Related Manuals for Pro-Ject Audio Systems Signature 12


Summary of Contents for Pro-Ject Audio Systems Signature 12
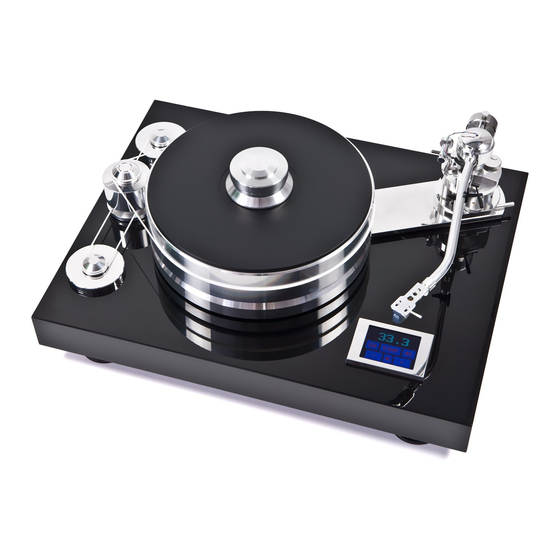
- Page 1 INSTRUCTIONS FOR USE Pro-Ject Signature 12...
-
Page 2: Controls, Features And Connections
Damaged devices not operate. Compare the data for electrical connection on the plate with the data network. These data must match in order to avoid damage of the turntable. © Pro-Ject Audio Systems · Pro-Ject Signature 12 · Revision 2014.11.04... -
Page 3: Turntable Accessories
11. Spirit level Pro-Ject Level IT 12. Tool for correct cartridge assembly 13. Record puck 14. Cartridge alignment tool Pro-Ject Align IT 15. Electronic stylus balance Pro-Ject Measure IT 16. Instructions for use © Pro-Ject Audio Systems · Pro-Ject Signature 12 · Revision 2014.11.04... - Page 4 1. Installation of adjustable feet (9) The feet are disassembled for transport and stored in the package of platter. Screw the feet into the thread inserts of the turntable plinth. © Pro-Ject Audio Systems · Pro-Ject Signature 12 · Revision 2014.11.04...
- Page 5 WARNING: Don’t stretch belts too much to avoid damage. 4. Headshell Headshell is stored in a separated packaging. When assembling, follow instructions: a) Mounting the cartridge into the headshell: © Pro-Ject Audio Systems · Pro-Ject Signature 12 · Revision 2014.11.04...
-
Page 6: Fitting And Connecting The Cartridge
L- Headshell assembly Plug headshell into the front of the tube. Connector pin must be oriented into the groove. Fixing nut tighten on the tonearm tube properly. © Pro-Ject Audio Systems · Pro-Ject Signature 12 · Revision 2014.11.04... - Page 7 3. Counterweight with additional counterweight with dimensions Ø15mm, length 45mm. This setting balance cartridge with weight 15 – 23 gr. Please note that the maximum visible part of this additional counterweight is 21mm. © Pro-Ject Audio Systems · Pro-Ject Signature 12 · Revision 2014.11.04...
- Page 8 After insertion the connector into socket, lock the connector with fixing nut. Tonearm output connection Attached signal cabel plug to tonearm 5-PIN connector, which is located on the bottom side of the turntable. Keep the right positioning. m) Anti-skating assembly © Pro-Ject Audio Systems · Pro-Ject Signature 12 · Revision 2014.11.04...
- Page 9 WARNING: When the thread isn’t tensioned at the beginning, at the end already falling on the other side. Be careful, there is a danger to rip off thread by tensile force. © Pro-Ject Audio Systems · Pro-Ject Signature 12 · Revision 2014.11.04...
-
Page 10: Operation And Calibration
Step 2: Then move the cartridge to the correct position. Correct position is, if the top of the needle is in the same plane like as comparative plane of tool. This is illustrated in the following picture. © Pro-Ject Audio Systems · Pro-Ject Signature 12 · Revision 2014.11.04... - Page 11 Carefully retighten VTA adjustment screws without applying excessive force which would deform the arm pillar. © Pro-Ject Audio Systems · Pro-Ject Signature 12 · Revision 2014.11.04...
- Page 12 Correct position can be checked from the front view, preferably with needle placed on a mirror which is placed on platter. Examples of incorrect azimuth setup: Too much left angle: Too much right angle: The correct position is 100% perpendicular to the record. © Pro-Ject Audio Systems · Pro-Ject Signature 12 · Revision 2014.11.04...
- Page 13 5. Adjusting the turntable plane Put the spirit level on the top of the turntable. With feet that are screw-type balance the turntable. Control the plane in several directions. © Pro-Ject Audio Systems · Pro-Ject Signature 12 · Revision 2014.11.04...
- Page 14 Turn on the switch located in the bottom of plinth Turntable control is performed by the touch screen. After turning the switch on, the display shows logo Pro-Ject. Touching the screen you can control the turntable functions. © Pro-Ject Audio Systems · Pro-Ject Signature 12 · Revision 2014.11.04...
- Page 15 Note: Use normal mains-operated lamps. Daylight, fluorescent lamps (energy saving lamps) as well as flashlights LEDs, which are operated with direct current are not suitable. Time and date setting © Pro-Ject Audio Systems · Pro-Ject Signature 12 · Revision 2014.11.04...
- Page 16 By touching the screen on the „T“ go to time and date setting window. Touch the mark with altered number and correct value by + or -. The set values can be saved by touching the „S“. To return to control touch the „C“. © Pro-Ject Audio Systems · Pro-Ject Signature 12 · Revision 2014.11.04...
-
Page 17: Warranty
This guide was produced by: Pro-Ject Audio Systems without prior notice as deemed necessary to Copyright © 2014. All rights reserved. uphold the ongoing process of technical development. © Pro-Ject Audio Systems · Pro-Ject Signature 12 · Revision 2014.11.04... -
Page 18: Maintenance And Cleaning
If the player is not used over a long period of time the drive belt can be removed to prevent unequal stretching. Always disconnect the record player from the mains power supply as a precaution before maintenance! © Pro-Ject Audio Systems · Pro-Ject Signature 12 · Revision 2014.11.04... - Page 19 © Pro-Ject Audio Systems · Pro-Ject Signature 12 · Revision 2014.11.04...
Need help?
Do you have a question about the Signature 12 and is the answer not in the manual?
Questions and answers