Bosch B426 Installation And Operation Manual
Conettix ethernet communication module
Hide thumbs
Also See for B426:
- Installation manual ,
- Installation and operation manual (34 pages) ,
- Setup & troubleshooting (23 pages)
Table of Contents
Advertisement
Advertisement
Table of Contents

Related Manuals for Bosch B426


Summary of Contents for Bosch B426
- Page 1 Conettix Ethernet Communication Module B426 Installation and Operation Guide...
-
Page 3: Table Of Contents
Conettix Ethernet Communication Module Table of contents | en Table of contents Safety Introduction About documentation Bosch Security Systems, Inc. product manufacturing dates Installation workflow System overview Overview Bus address settings Installation Mount the module in the enclosure Mount and wire the tamper switch (optional) -
Page 4: Safety
Safety ESD Precaution Please note that the B426 board comes without any case/box and all components are exposed for finger touches - therefore extra attention must be paid to ESD (electrostatic discharge) precaution. Make sure there is no static interference when using the board. Appropriate ESD protections must be taken and wearing electrostatic equipment is recommended, such as anti- static wrist strap. -
Page 5: Introduction
Bosch Security Systems, Inc. product manufacturing dates Use the serial number located on the product label and refer to the Bosch Security Systems, Inc. website at http://www.boschsecurity.com/datecodes/. The following image shows an example of a product label and highlights where to find the manufacturing date within the serial number. -
Page 6: Installation Workflow
13, or Plug and Play configuration for SDI or option bus control panels, page 13, or Web-based configuration, page 13. Verify operation using the LEDs. Refer to Maintenance and troubleshooting LEDs, page 30. 2016.08 | 08 | F.01U.266.226 Installation and Operation Guide Bosch Security Systems, Inc. -
Page 7: System Overview
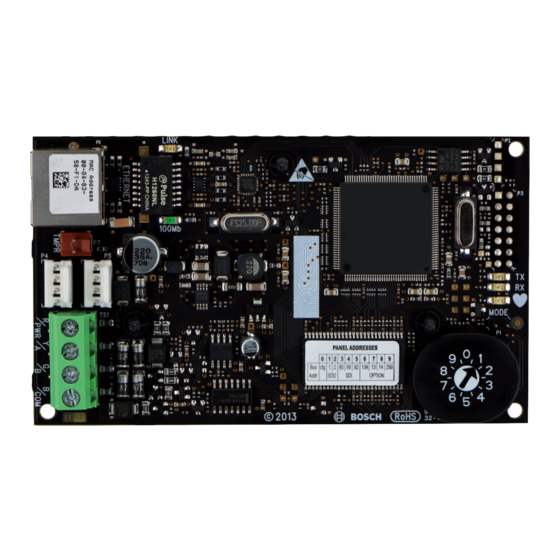
Conettix Ethernet Communication Module System overview | en System overview Use the B426 for bi-directional communication over an Ethernet network. Figure 3.1: B426 system connections overview Callout ᅳ Description Callout ᅳ Description 1 ᅳ Compatible Bosch control panel 7 ᅳ Conettix D6100i Communications Receiver/Gateway and/or... -
Page 8: Overview
AMAX 2000/2100/3000/4000 . A-Link configuration. The B426 Conettix Ethernet Communication Module is compatible with IPv6. For ULC-S559, the B426 can be used for either active or passive communication. For passive communication, maximum check in is 24 hours. For active communication, maximum check in (heartbeat) is 89 seconds. -
Page 9: Bus Address Settings
The B426 address switch provides the value for the module's address. The figure below shows the address switch setting for address 1. Refer to the following table for panel-specific settings. -
Page 10: Installation
B426 module overview, page 8. Wire to the control panel When you wire a B426 to an SDI or SDI2 control panel, you can use either the module's terminal strip labeled R, Y, G, B (PWR, A, B, COM) or the module's interconnect wiring connectors (wire included). - Page 11 5 ᅳ Interconnect cable (P/N: F01U079745) (included) Figure 4.3: Wiring to an option bus terminal strip Callout ᅳ Description 1 ᅳ Compatible control panel (FPD-7024 control panel shown) 2 ᅳ Module Bosch Security Systems, Inc. Installation and Operation Guide 2016.08 | 08 | F.01U.266.226...
- Page 12 | Installation Conettix Ethernet Communication Module 3 ᅳ To Ethernet network 4 ᅳ Terminal strip wiring For complete wiring instructions, refer to the control panel documentation. 2016.08 | 08 | F.01U.266.226 Installation and Operation Guide Bosch Security Systems, Inc.
-
Page 13: Configuration
Conettix Ethernet Communication Module Configuration | en Configuration You can configure the B426 using one of the methods described in this section for your control panel type: – Plug and Play configuration for SDI2 or option bus control panels, page 13 –... -
Page 14: Web-Based Configuration Log In And Use
Open an internet browser (Microsoft Internet Explorer 6 or higher, or Mozilla Firefox 3 or higher), type in the B426’s IP address or hostname, and press [Enter]. (If Web and Automation Security is enabled on the B426, you must type https:// instead of http://). -
Page 15: Device Information (Home) Page
Saving the settings might cause the module to terminate the current web browsing session. 5.3.4 Basic Network Settings page The Basic Network Settings page provides the applicable options, depending on whether IPv6 mode is enabled or disabled. Bosch Security Systems, Inc. Installation and Operation Guide 2016.08 | 08 | F.01U.266.226... - Page 16 The corresponding fields on the page are disabled, but previously entered values show and cannot be changed. If you disable DHCP/AutoIP, you must set the IPv4 address, subnet mask, and gateway. IPv4 Address Default: 0.0.0.0 2016.08 | 08 | F.01U.266.226 Installation and Operation Guide Bosch Security Systems, Inc.
- Page 17 The address has a dot decimal notation, which consists of the four octets of the address expressed separately in decimal and separated by periods. Each octet has a value 0-255. Bosch Security Systems, Inc. Installation and Operation Guide 2016.08 | 08 | F.01U.266.226...
- Page 18 Alternate IPv6 DNS server is used, if specified. The module can use the Alternate IPv6 DNS server address only when the Primary address is not the default address. 2016.08 | 08 | F.01U.266.226 Installation and Operation Guide Bosch Security Systems, Inc.
- Page 19 Select how many seconds the unit waits during a silent connection before attempting to see if the currently connected network device is still on the network. If there is no response, it drops the connection. Bosch Security Systems, Inc. Installation and Operation Guide 2016.08 | 08 | F.01U.266.226...
-
Page 20: Advanced Network Settings Page
Yes: The network configuration port is enabled. No: The network configuration port is disabled. The Conettix D6200 Programming/Administration Software uses this port to find devices on its local network. 2016.08 | 08 | F.01U.266.226 Installation and Operation Guide Bosch Security Systems, Inc. -
Page 21: Panel Address Settings Page
The Panel Address Setting page only allows configuration when the address switch on the module is set to 0. If the address switch is set to a position other than 0, the set address is displayed. Bosch Security Systems, Inc. Installation and Operation Guide 2016.08 | 08 | F.01U.266.226... - Page 22 Conettix Ethernet Communication Module Figure 5.5: Panel Address Settings page Use this option to select the bus address for the control panel type to which the module is connected. 2016.08 | 08 | F.01U.266.226 Installation and Operation Guide Bosch Security Systems, Inc.
-
Page 23: Encryption And Security Settings Page
Use this option to select the AES key size. The AES key size must match the key size used in RPS and the receiver. AES Key String Default: The default varies by key size. Bosch Security Systems, Inc. Installation and Operation Guide 2016.08 | 08 | F.01U.266.226... -
Page 24: Maintenance Page
Selections: Disable, Enable This parameter enables enhanced security for Automation and B426 Web Access. When enabled, HTTPS is applied to B426 Web Access changing the default value of the HTTP port number parameter. This setting also enables TLS Security for Automation. - Page 25 Firmware Upgrade Enable Default: No Selections: Yes, No Yes: Allows firmware upgrades to the B426. No: Prevents firmware upgrades. Enable or disable the ability to upgrade the module's firmware from the Firmware Upgrade configuration page. Module Hostname...
-
Page 26: Factory Default Page
To avoid the control panel settings overwriting Configuration Page settings, set Panel Programming Enable to No after restoring the module to factory default, but before pressing Save and Execute. 2016.08 | 08 | F.01U.266.226 Installation and Operation Guide Bosch Security Systems, Inc. -
Page 27: Firmware Update Page
Figure 5.9: Firmware Update page To proceed with the upgrade, click OK. A new web page opens that allows you to locate the firmware file and upload it to the module. Bosch Security Systems, Inc. Installation and Operation Guide 2016.08 | 08 | F.01U.266.226... -
Page 28: Exiting The Web-Based Configuration
When you are finished configuring the module, select the Save and Execute option. The Save and Execute web page opens. To save the configuration changes that you made, click OK. A confirmation message appears. 2016.08 | 08 | F.01U.266.226 Installation and Operation Guide Bosch Security Systems, Inc. - Page 29 Conettix Ethernet Communication Module Configuration | en Figure 5.11: Save and Execute confirmation To exit the configuration web page, click Logout, and then close the internet browser window. Bosch Security Systems, Inc. Installation and Operation Guide 2016.08 | 08 | F.01U.266.226...
-
Page 30: Maintenance And Troubleshooting Leds
Heartbeat (system status). – RX (receive). – TX (transmit). Refer to B426 module overview, page 8 for Ethernet link LED locations. Flash pattern Function Normal state. Indicates normal operation state. Flashes once every 1 sec Communication error state. Indicates a bus communication error. -
Page 31: Show The Firmware Version
1 sec pause after each digit. The following is an example: The version 1.4.3 would show as LED flashes: [3 second pause] *__****__*** [3 second pause, then normal operation]. Bosch Security Systems, Inc. Installation and Operation Guide 2016.08 | 08 | F.01U.266.226... - Page 32 | Maintenance and troubleshooting LEDs Conettix Ethernet Communication Module Figure 6.1: Firmware LED flash patterns example 2016.08 | 08 | F.01U.266.226 Installation and Operation Guide Bosch Security Systems, Inc.
-
Page 33: Specifications
Compatible control panels AMAX 2000/2100/3000/4000 B9512G/B9512G-E B8512G/B8512G-E B6512 B5512/B5512E B4512/B4512E B3512/B3512E D9412GV4/D7412GV4/D7212GV4 D9412GV3/D7412GV3/D7212GV3 D9412GV2/D7412GV2/D7212GV2 Version 7.06 or higher DS7220 Version 2.10 or higher DS7240 Version 2.10 or higher Bosch Security Systems, Inc. Installation and Operation Guide 2016.08 | 08 | F.01U.266.226... - Page 34 | Specifications Conettix Ethernet Communication Module DS7400XiV4 Version 4.10 or higher Easy Series V3+ FPD-7024 Solution 2000/3000 2016.08 | 08 | F.01U.266.226 Installation and Operation Guide Bosch Security Systems, Inc.
-
Page 35: Appendix
Use an SDI/SDI2 keypad to discover the IP address of a module, page 35. (B9512G/ B8512G, B6512/B5512/B4512/B3512, and GV4 only.) – Use Auto IP with a directly connected module, page 36. Within 60 seconds, the B426 temporarily assumes address 169.254.1.1 for configuration. Notice! Outside access requires obtaining the public IP address and port mapping from the gateway. -
Page 36: Use Auto Ip With A Directly Connected Module
Remove power from the module. Disconnect the module from the network. Connect the B426 directly to the Ethernet port on a computer, power up, and wait 60 sec. If AutoIP service is enabled on your computer, a 169.254.XXX.XXX address should now be assigned to your computer. - Page 38 Bosch Security Systems, Inc. Bosch Sicherheitssysteme GmbH 130 Perinton Parkway Robert-Bosch-Ring 5 Fairport, NY 14450 85630 Grasbrunn Germany www.boschsecurity.com © Bosch Security Systems, Inc., 2016...
Need help?
Do you have a question about the B426 and is the answer not in the manual?
Questions and answers