Advertisement
Quick Links
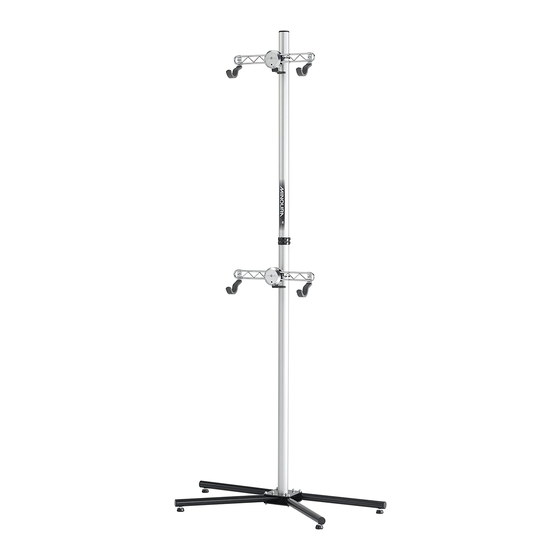
(Image: P-500AL-6S in K-style leg)
● Do NOT hook the bike with the down-tube and seat-tube. Hook the top-tube.
● Set up close to a wall to prevent the stand from falling down when setting the stand up in the K-leg configuration.
● Do NOT try to remove the clamp from the bike cradle when installing on the pillar.
● The clamp is made of light alloy material. Do NOT over-tighten or the bolt may come out of the housing, ruining the
clamping mechanism.
● Tighten the bolts equally. Do NOT tighten just one bolt firmly. Failure to do so may lead to improperly tightened screws.
Contact
MINOURA JAPAN
(for ALL customers, including Canada)
1197-1 Godo, Anpachi, Gifu 503-2305 Japan
Fax +81-584-27-7505
minoura@minoura.jp / www.minoura.jp
P-500AL-6S "PairStand"
If you have question or problem on this product, please contact the shop where you originally purchase this product
or the distributor in your country first. The distributor information can be found on our web site. Only when you
cannot obtain enough service from them, you can contact Minoura directly.
Made in Japan
FEATURES
● Save vast amounts of space by storing
two bicycles in a single space.
● Alloy pillar is lightweight, rust proof and
durable. Max load is 100 kgs (in X-style
leg mode).
● Legs are switchable between K-style
and X-style depending on the number of
bikes or setup location.
● Alloy clamp securely holds the bike
cradle and allows for easy position
changes.
● The bike hook is designed to be low
profile to get the bike on and off easily.
Soft plastic pads prevent frame from
being scratched. It fits up to 70mm
diameter frame.
● Bike Cradle is same design as Bike-
Tower20. Cradle angle and hook span
are fully adjustable.
!
● For normal 2-wheel bicycle only. Tandem,
recumbent and long tail bikes may not be
used on this stand. Place heaviest bike in the
lower cradle to maintain stands balance.
● Set stand on an even, horizontal floor. Adjust
each foot precisely to insure each of the
foot's four points touch the floor evenly.
● Leaving a bike in the top cradle only may
cause an imbalance and the stand could fall
down. Be careful to keep weights balanced
at all times.
MINOURA NORTH AMERICAN TECH CENTER
(for U.S. residents ONLY)
Mon - Fri, 9 am - 5 pm (PCT)
Phone 1-510-538-8599 / Fax 1-510-538-5899
support@minourausa.com
instructions manual
CAUTIONS
(ver.6.1 2017/2)
Advertisement

Related Manuals for MINOURA P-500AL-6S


Summary of Contents for MINOURA P-500AL-6S
- Page 1 If you have question or problem on this product, please contact the shop where you originally purchase this product Contact or the distributor in your country first. The distributor information can be found on our web site. Only when you cannot obtain enough service from them, you can contact Minoura directly. MINOURA JAPAN MINOURA NORTH AMERICAN TECH CENTER (for ALL customers, including Canada) (for U.S.
-
Page 2: Required Tools
Part Name Assemble P-500 in K-style Leg Setting up your P-500 in the K-Style leg configuration saves valuable room { Clamp because the stand can be placed next to a wall. ONLY place the bikes on the front side of the stand so as to maintain balance and keep the stand from toppling over. - Page 3 Install the legs. Assemble P-500 in X-style Leg All 4 legs are exactly the same size. Each leg has an inner Reinforcement Bracket on its Setting up the P-500 in the X-style allows the stand to be placed end to prevent deformation when tightening the bolt. anywhere due to the larger footprint and maximum stability of Make sure this bracket is set in the deepest position in the X.
- Page 4 The direction of the cut out under the Pillar Joint Clamp is NOT fixed when using the X-style leg pattern Tighten the bolts alternately and equally. Do not tighten only one bolt with too Upper Base Plate much force. Lower Pillar 4 N.m M6x30 Bolt...
- Page 5 Join The Pillars Upper Pillar The pillars on P-500AL-6S are separated, not a single piece. Both pillars have same diameter, and the Pillar Joint fastens the pillars. Pillar Joint has already been installed on the Upper Pillar. You insert it into the Lower Pillar, then tighten the clamps to fix.
- Page 6 (To explain about the clamp, the cradle is not shown here) How To Slide Cradle Arm Wind the clamp arms around the Pillar. (The following description is set as the single side arm is on YOUR right, and the double side arm is on YOUR left.) Insert the 5mm hex wrench into the center hole of the Cradle Cap and...
- Page 7 Mounting Your Bike To mount your bike on the P-500, place the hooks under the crossing sections of the frame tubing. You should set the hook distance as wide as possible for greatest stability. On a normal diamond type frame, you will hook the top-tube with both hooks, but in the case of sloping frame or other specially designed frame, you can change to another point such as behind the seat-tube...
-
Page 8: Warranty Period
Warranty Period <Complete condition in K-style leg> Minoura offers 1-year limited warranty from the date of your purchase. Any problem cause by manufacturer defect or workmanship will be covered under this warranty. But any trouble caused by user's misuse, wrong assembling, unapproved modification, natural calamity or shipping damage will not be covered under this warranty.
Need help?
Do you have a question about the P-500AL-6S and is the answer not in the manual?
Questions and answers