Advertisement
Thank you for choosing Minoura BikeTower10.
BikeTower10 is a very convenient and easy-to-setup bike
storage stand that can be installed in the room which
ceiling height is between 1.7 and 3.1 meters.
BikeTower10 comes with two bike cradles, and it can
be expanded up to 4 bikes and other items by installing
optional bike cradles and attachments.
Read this instructions manual carefully before use for
your safety, and keep in hand for future reference.
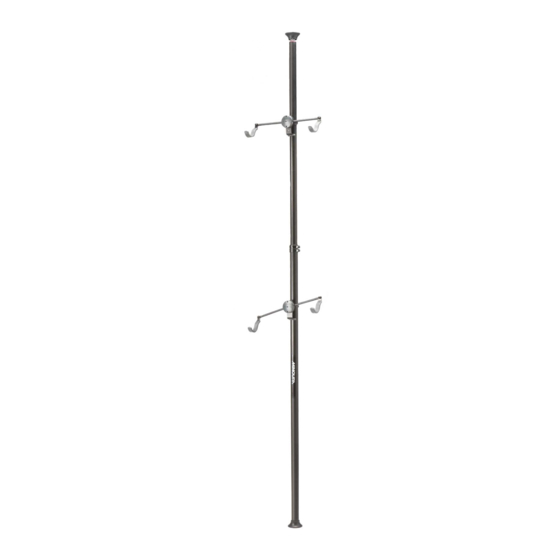
Part Name
}
Important Notes
• Keep the recommended tightening torque
(5 – 8 N.m) on every bolt.
• It's your duty to hold the top pillar to the ceiling
or wall by using the supplied plastic tie in order
to avoid falling down accident.
Minoura will not be responsible to any accident
caused by not using this plastic tie.
bicycle storage stand
Upper Rubber Cup
(with spring inside)
Top Pillar
(40mm diameter)
Clamp on Upper Pillar
(with Plastic Shim)
Bike Cradle
Pillar Joint
Recommened Tightening
Torque: 5 – 8 N.m
Clamp on Lower Pillar
(without Plastic Shim)
Arm
Cradle Hook
(universal on both sides)
Bottom Pillar
(45mm diameter)
Lower Rubber Cup
(without spring inside)
BikeTower10
• For standard 2 wheel bike only. Not for use with
tandems or long wheel base bicycles.
• Each bke cradle is rated to hold 25 kgs.
If mounting heavy bikes, check the bolts often to
make sure they are not loose.
• The pillar is supported by the internal spring
applying pressure to the ceiling.
Make sure that the pillar comes in contact with
a stud or other reinforced area of the ceiling
otherwise the pressure may cause the break
through dry wall or other non supportive
material.
• Adjust the pillar length correctly. If the red plastic
appears in the upper rubber cup, the pillar is
not adjusted properly (too short). Remove the
BikeTower and and extend the pillar slightly
more.
• Do not use BikeTower upside down. The larger
diameter pillar must be on the bottom.
NEVER use BikeTower horizontally. It is for
vertical use ONLY.
• The ceiling and floor must be parallel and level.
If not, it cannot hold BikeTower safely.
• The pillar must not be set at any angled.
If the pillar has been slanted, BikeTower may
become loose and fall.
• The rubber cup material may leave a mark on
some ceilings and/or floor. We recommend
placing a small piece of fabric or paper between
the rubber cup and the ceiling. Do not use slippy
Vinyl sheet.
• The hook material may stain on your bike frame,
especially in light color such as white, depending
on the top finish condition.
We recommend placing a piece of bar-tape
between the hook and the frame or wrapping
the hook with bandage in order to avoid direct
touching each other.
• The clamps for installing the bike cradles are
pre-installed on the pillar and you don't need
to remove it basically. However, if you need
to disassemble and install the clamp onto the
pillar again, carefully follow the instructions
described in page 4. Wrong clamp direction will
cause serious problem that the clamp cannot
hold the pillar properly and the bike will slide off
suddenly. It's really dangerous.
Warranty Period
Minoura offers 1-year limited warranty to this product
from the date of your purchase.
Any natural wear and the problems caused by miuse
or unapproved modification will not be covered by this
program.
For more details, read the enclosed Minorua Limited
Warranty Policy card in the kit.
Also please regularly check our Minoura web site for the
latest information.
instructions manual
(ver.1.4 2015/4)
Advertisement
Table of Contents

Related Manuals for MINOURA BikeTower10


Summary of Contents for MINOURA BikeTower10
- Page 1 If mounting heavy bikes, check the bolts often to make sure they are not loose. BikeTower10 comes with two bike cradles, and it can • The pillar is supported by the internal spring be expanded up to 4 bikes and other items by installing applying pressure to the ceiling.
- Page 2 How To Set Up Pillar 1) Extend pillar, 2) Adjust pillar length, then 3) Install in room. Touch Push Please be aware both bolts on Pillar Joint are intentionaly loosened in the package condition. Your first job is loosening the lower bolt, push Look down Pillar Joint until the bracket reaches the Bottom Pillar end, then tighten the bolt firmly.
- Page 3 make the job easier. Confirm you tighten both How To Install Bike Cradle bolts firmly after installation. Bike Cradle is pre-installed Arms are independently angle adjustable in the on each pillar and the range of +/- 35 degrees in order to fit to various clamp band is temporally types of bike frame as tightened.
- Page 4 YOUR left. (larger don't sell any parts and product to consumer directly. diameter) Get any necessary items through the authorized dealer. MINOURA North America When installing the (for U.S. residents only) clamp band to the Top Pillar Hayward, Califormia, U.S.A.
Need help?
Do you have a question about the BikeTower10 and is the answer not in the manual?
Questions and answers