Advertisement
Quick Links
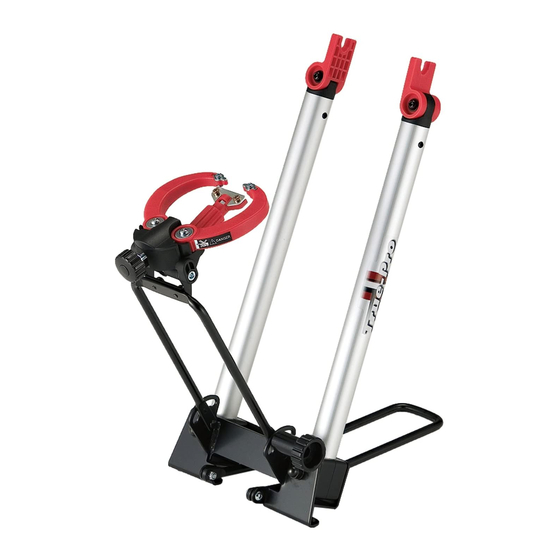
Axle Holder
Pillar
Gauge
Stay
Lock Knob
Thank you for choosing the MINOURA TRUE-
PRO .
This portable wheel truing stand features our
convenient AUTO CENTERING system. ACS
allows you to perform almost every procedure
needed in building a wheel without the need for an
additional dishing tool.
Also, newly designed gauges that check vertical and
horizontal movement of the wheel are intuitive and
easy to use.
TRUE-PRO folds down completely for easy trans-
port and storage.
Please read this instructions manual carefully before
use and keep handy at all times for future references.
!
Important Notes
• Do NOT use True-Pro for any purpose other
than instructed such as display stand or
indoor trainer.
• This Auto-Centering system is not 100%
perfect so we recommend you to use a
wheel dishing tool together for much more
precise adjustment.
• Setting wheel in the correct position is
crucial. Push down the wheel to set it in
the deepest position on the Axle Holder
when you tighten the quick release skewer.
Wheel Truing Stand
Leg
Body
- 1 -
TRUE-PRO
instructions manual
Components
Vertical Gauge
• PILLARS
Both right and left side Pillars are connected in the
Body so they will move together at the same time.
You should hold both Pillars with both hands when
opening or closing them.
• AXLE HOLDER
Axle Holder can adjust its angle to keep parallel at
any width to fit hubs properly. (see Fig. A)
It is crucial to set the wheel into the deepest position
of the Axle Holder by pushing down the wheel when
setting up the wheel on True-Pro to get better result.
If one side has been lifted up due to bad installation,
the wheel won't be symmetrical.
Side Gauge
Vertical Gauge
Adjust Knob
Arm
Arm Lock
Side Gauge
Adjust Knob
(Fig. A)
Advertisement

Related Manuals for MINOURA TRUE-PRO


Summary of Contents for MINOURA TRUE-PRO
- Page 1 Axle Holder by pushing down the wheel when TRUE-PRO folds down completely for easy trans- setting up the wheel on True-Pro to get better result. port and storage. If one side has been lifted up due to bad installation, the wheel won't be symmetrical.
- Page 2 Foldable Vertical How to Operate Gauge (Fig. B) (Fig. D) Checking Position The metal tip on the Vertical Gauge can be removed by loosening two screws if you don't wish to scratch the soft carbon rim surface. However, we recommend you keep the metal tip in contact at all times.
- Page 3 T-Gauge2 adjusting. Normal Position (metal tip is projected) (Fig. H) The T-Gauge2 checks the position of your True-Pro Carbon Position (Fig. F) to make sure it is centered exactly so your wheel (metal tip is retracted) should be able to be trued as symmetrically as How To Fold Down possible.
- Page 4 Check the clearance between T-Gauge2 and each About Offset Wheel Setting Side Gauge. If each clearance is equal, your gauge position is At first, you should understand that you should perfect. (see Fig. J) fix the vertical movement prior to the horizontal movement, especially on the rear wheel because of its unique wheel system named "Offset"...
- Page 5 You set the wheel on the True-Pro and see the Side Make three (3) groups of spokes between your vinyl Gauges. markers as below;...
-
Page 6: Limited Warranty Policy
Warranty Service. except for the center spoke. 5. All warranties will be void if the True-Pro is damaged Group-C : The center one between the vinyl tapes. due to user's abuse, disassembly, unauthorized alteration or midification, or used in any way not intended as described in the instructions manual. - Page 7 True-Pro Resolution Diagram TB-4 TG-6 TB-3 TG-7 TG-5 TB-1 TG-3 TF-2 TB-6 TG-4 TG-9 TG-8 TG-2 TG-1 TB-6 TB-2 TF-1: Main Body TB-5 TF-2: Axle Holder TF-3: TF-4: Lock Knob TF-1 TG-1: Gauge Body TG-2: Vertical Gauge TG-3: Vertical Gauge Plate...
Need help?
Do you have a question about the TRUE-PRO and is the answer not in the manual?
Questions and answers