Table of Contents
Advertisement
Quick Links
Download this manual
See also:
Installation Manual
Advertisement
Table of Contents

Related Manuals for Atlona AT-GAIN-60


Summary of Contents for Atlona AT-GAIN-60
- Page 1 Stereo / Mono Audio Power Amplifier 60 Watts Atlona Manuals AT-GAIN-60 Audio...
-
Page 2: Version Information
Version Information Version Release Date Notes 04/18 Initial release AT-GAIN-60... -
Page 3: Operating Notes
Welcome to Atlona! Thank you for purchasing this Atlona product. We hope you enjoy it and will take an extra few moments to register your new purchase. Registration only takes a few minutes and protects this product against theft or loss. In addition, you will receive notifications of product updates and firmware. - Page 4 Atlona requires that products returned are properly packed, preferably in the original carton, for shipping. Cartons not bearing a return authorization or case number will be refused. Atlona, at its sole discretion, reserves the right to reject any products received without advanced authorization. Authorizations can be requested by calling 1-877-536-3976 (US toll free) or 1-408- 962-0515 (US/international) or via Atlona’s website at www.atlona.com.
- Page 5 Damage, deterioration or malfunction resulting from the installation or removal of this product from any installation, any unauthorized tampering with this product, any repairs attempted by anyone unauthorized by Atlona to make such repairs, or any other cause which does not relate directly to a defect in materials and/or workmanship of this product.
-
Page 6: Important Safety Information
Where shielded interface cables have been provided with the product or specified additional components or accessories elsewhere defined to be used with the installation of the product, they must be used in order to ensure compliance with FCC regulations. AT-GAIN-60... -
Page 7: Table Of Contents
Auto Power Down mode Factory Reset The Web GUI Introduction to the Web GUI Menu Bar Status page Firmware page Network page Control page Users page Audio page Appendix Updating the Firmware Rack Mount Installation Default Settings Specifications Index AT-GAIN-60... -
Page 8: Introduction
Introduction The Atlona Gain™ 60 (AT-GAIN-60) is a compact power amplifier designed for low or high-impedance applications. A mode selector switch allows the Gain 60 to deliver two channels of 30 watts each into 4 or 8 ohms, or a single channel of 60 watts at 24, 70, or 100 volts. -
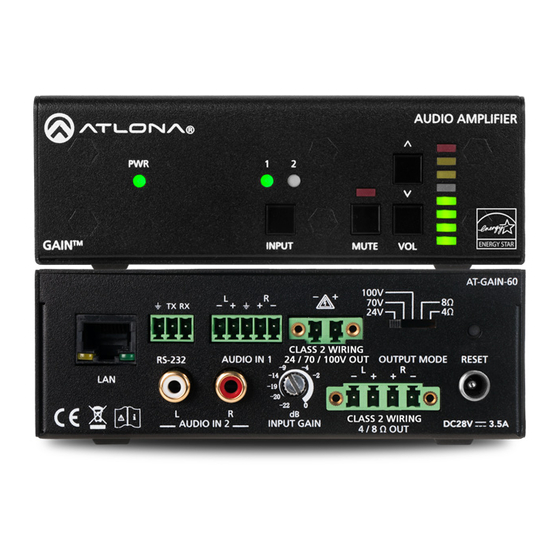
Page 9: Panel Description
Connect the included 3-pin captive screw connector 17 DC 28V from this port to an RS-232 controller or automation Connect the included 28V DC power supply to this system. Refer to RS-232 (page 11) for wiring power receptacle. information. AT-GAIN-60... -
Page 10: Installation
Audio Connectors The AT-GAIN-60 provides two audio ports: one input and one output. The AUDIO IN 1 port can be used to connect an audio digital signal processor (DSP) or other audio source device. Balanced or unbalanced wiring is supported. -
Page 11: Rs-232
Installation RS-232 The AT-GAIN-60 provides RS-232 control between an automation system and an RS-232 device. This step is optional. 1. Use wire strippers to remove a portion of the cable jacket. 2. Remove at least 3/16” (5 mm) from the insulation of the RX, TX, and GND wires. -
Page 12: Connection Instructions
NOTE: The AT-GAIN-60 only supports one type of speaker connection at a time: high-impedance or low-impedance. 3. Connect the speakers to the proper port on the AT-GAIN-60, based on the selection made in the previous step. 4. Connect the LAN port to a network switch for set up and control of the unit. -
Page 13: Connection Diagrams
S- 21 -H DV INPU LI NK B- C INPU LINK -SC- AT-H AT-HDVS-210U-TX-WP Display IMPORTANT: When connecting speakers, either use a distributed speaker system or program/ stereo speakers. The AT-GAIN-60 does not support simultaneous distributed and program speaker connections. AT-GAIN-60... -
Page 14: Ip Configuration
IP address to the unit. Execute the arp -a command at the Windows command line or use an IP scanner to locate the AT-GAIN-60 on the network. If the AT-GAIN-60 is unable to detect a DHCP server, within 15 seconds, then the unit will be assigned the following IP configuration: •... -
Page 15: Using Commands
2. At the command line, execute the IPDHCP command using the on argument, as shown. All characters are case-sensitive. IPDHCP on 3. The AT-GAIN-60 will automatically reboot. The unit is now set to DHCP mode and will be assigned an IP address by the DHCP server (if present). AT-GAIN-60... -
Page 16: Using The Web Gui
Using the Web GUI Network page (page 25) in the web GUI allows the option for the AT-GAIN-60 to use either DHCP or static IP mode. In order to access the web GUI, the IP address of the AT-GAIN-60 must be known. - Page 17 Installation 5. The following message box will be displayed: 6. Click OK to accept the changes or click Cancel to abort changes and return to the Network page. AT-GAIN-60...
-
Page 18: Basic Operation
Basic Operation LED Indicators The LED indicators on the front panel, provide information on the current state of the AT-GAIN-60. Refer to the table below for more information. LED Indicator State Description TX RX Solid green Unit is powered. CLASS 2 WIRING... -
Page 19: Power Modes
Enabling this mode will automatically power-down the AT-GAIN-60 if no audio input signal is present on either the AUDIO IN 1 port or the AUDIO IN 2 port, after the specified time interval. When the AT-GAIN-60 enters Auto Power Down mode, the Power option will be set to OFF and the front-panel LED indicators will turn off. In Auto Power Down mode, power consumption is limited to 1.2 W. -
Page 20: Factory Reset
If necessary, the AT-GAIN-60 can be reset to factory-default settings. Press and hold the RESET button on the back panel, using the end of a paper clip or other pointed object, for 10 seconds to reset the AT-GAIN-60 to factory-default settings. -
Page 21: The Web Gui
The AT-GAIN-60 is shipped with DHCP enabled. Once connected to a network, the DHCP server will automatically assign an IP address to the unit. Use an IP scanner to determine the IP address of the AT-GAIN-60. If a static IP address is desired, refer to IP Configuration (page 14). -
Page 22: Menu Bar
The Web GUI 7. The Status page will be displayed. 8. To logout of the web GUI at any time, click Logout on the side menu bar. Once logged out, the AT-GAIN-60 will display the login screen. Menu Bar The window on the left side of the screen is the menu bar. The menu system is divided into three sections: Home, Settings, and Configuration. -
Page 23: Status Page
The SKU of this product. Firmware The current firmware version installed. MAC Address The MAC address of the AT-GAIN-60. Serial Number The serial number of the AT-GAIN-60. Operating Time The time in which the unit has been in the “on” state since it was last rebooted. -
Page 24: Firmware Page
Click this button to select the firmware file. Click the Load button to begin the update procedure. Refer to Updating the Firmware (page 30) for more information. Load Click this button to upload the selected firmware file to the AT-GAIN-60. While the system settings file is being loaded, the Status progress bar will display the current progress. AT-GAIN-60... -
Page 25: Network Page
Address, Subnet, and Gateway fields can be modified. IP Address Enter the IP address of the AT-GAIN-60 in this field. This field can only be changed when DHCP is set to OFF. Subnet Enter the subnet mask in this field. This field can only be changed when DHCP is set to OFF. - Page 26 GUI login credentials. Click the OFF button to create an open Telnet session that does not require login credentials. The default setting is OFF. Save / Cancel Click the Save button after any changes have been made. Click the Cancel button to abort changes. AT-GAIN-60...
-
Page 27: Control Page
The Web GUI Control page Power Click the ON button to power-on the AT-GAIN-60. Click the OFF button to power-off the unit. Auto Power Down Enables or disables auto power down mode. Refer to Auto Power Down mode (page 19) for more information. -
Page 28: Users Page
Enter the password for the administrator in this field. Special characters (e.g. #, %, @, &, etc.) are not permitted. Change Admin Password • Old password Enter the current password in this field. The default password is Atlona. • New Password Enter the new password in this field. -
Page 29: Audio Page
0 to 100. Note that the output volume is not measured in decibels. The default value is 30. Auto Reset Click this button to reset the Bass, Treble, and Volume to the default settings. Refer to Default Settings (page 35) for more information. Mute Click this button to mute the audio output. AT-GAIN-60... -
Page 30: Appendix
• Username and password to access the web GUI 1. Verify that an Ethernet cable is connected between the AT-GAIN-60 and the network. The computer used to access the web GUI must be on the same network as the AT-GAIN-60. - Page 31 8. Click the Browse button to select the firmware file. 9. Click the Load button to begin the upgrade process. Once the update has been completed, the login screen will be displayed. WARNING: Power must not be disconnected or interrupted during the firmware update process. AT-GAIN-60...
-
Page 32: Rack Mount Installation
The AT-GAIN-60 can be mounted in different ways, based on the number of units that are being installed. In order to rack-mount the AT-GAIN-60, the AT-RACK-1RU will need to be purchased from atlona.com. The AT-RACK-1RU can be used to either mount three AT-GAIN-60 unit at once or it can be used to mount two AT- GAIN units. - Page 33 Appendix 3. Mount each of the AT-GAIN-60 units in the rack. Match the mounting holes on the bottom of each AT-GAIN-60 with the holes in the rack tray, marked in the illustration below. Front of rack tray 4. Install the rack tray in the rack shelf and secure the rack tray with two screws on either side.
- Page 34 Rack Mount Installation (page 32) for the location of the mounting holes. 3. Mount each of the AT-GAIN-60 units in the rack. Match the mounting holes on the bottom of each AT-GAIN-60 with the holes marked in the illustration below. Front of rack tray 4.
-
Page 35: Default Settings
Appendix Default Settings The following table lists the factory-default settings for the AT-GAIN-60. Feature Settings Network DHCP Static IP address 192.168.1.254 Subnet 255.255.0.0 Gateway 192.168.1.1 Telnet Port HTTP Port IP Timeout Hostname AT-GAIN-60-[last five digits of serial number] Telnet Login Mode... -
Page 36: Specifications
4 / 8 Ω = 30 W per channel Audio Processing Audio Formats 24-bit uncompressed, selectable at 44.1, 48, 88.2, and 96 kHz sampling rate Signal Processing Volume, Auto on/off signal sensing, 80 Hz HPF 2-band EQ Bass / Treble, adjustable: -10 to +10 dB AT-GAIN-60... - Page 37 100 - 240 V AC, 50/60 Hz, 60 W Dimensions Inches Millimeters H x W x D 1.69 x 5.00 x 7.95 43 x 127 x 202 Weight Pounds Kilograms Device 3.15 1.43 Certification Device CE, RoHS, WEEE, FCC, ENERGY STAR ® AT-GAIN-60...
-
Page 38: Index
Default setttings Warranty Description Web GUI front / rear panel FCC statement Features Firmware displaying 23, 24 Installation IP configuration using commands using rear panel using the web GUI LED indicators Operating notes Panel descriptions Password changing default Power modes AT-GAIN-60... - Page 39 • 408.962.0515 • 877.536.3976 © 2018 Atlona Inc. All rights reserved. “Atlona” and the Atlona logo are registered trademarks of Atlona Inc. All other brand names and trademarks or registered trademarks are the property of their respective owners. Pricing, specifications and availability...
Need help?
Do you have a question about the AT-GAIN-60 and is the answer not in the manual?
Questions and answers