
Related Manuals for Atlona AT-UHD-CAT-8


Summary of Contents for Atlona AT-UHD-CAT-8
- Page 1 4K / UHD HDMI to HDBaseT Distribution Amplifier Atlona Manuals AT-UHD-CAT-8 Distribution Amplifiers...
- Page 2 Version Information Version Release Date Notes 03/19 New format AT-UHD-CAT-8...
- Page 3 Welcome to Atlona! Thank you for purchasing this Atlona product. We hope you enjoy it and will take an extra few moments to register your new purchase. Registration only takes a few minutes and protects this product against theft or loss. In addition, you will receive notifications of product updates and firmware.
- Page 4 Atlona requires that products returned are properly packed, preferably in the original carton, for shipping. Cartons not bearing a return authorization or case number will be refused. Atlona, at its sole discretion, reserves the right to reject any products received without advanced authorization. Authorizations can be requested by calling 1-877-536-3976 (US toll free) or 1-408- 962-0515 (US/international) or via Atlona’s website at www.atlona.com.
- Page 5 Damage, deterioration or malfunction resulting from the installation or removal of this product from any installation, any unauthorized tampering with this product, any repairs attempted by anyone unauthorized by Atlona to make such repairs, or any other cause which does not relate directly to a defect in materials and/or workmanship of this product.
- Page 6 Where shielded interface cables have been provided with the product or specified additional components or accessories elsewhere defined to be used with the installation of the product, they must be used in order to ensure compliance with FCC regulations. AT-UHD-CAT-8...
-
Page 7: Table Of Contents
Control mode IR Control Controlling Display Devices Controlling Source Devices Power Button Modes Normal Operation Powering Sink Devices Powering Sinks and the AT-UHD-CAT-8 The Web GUI Introduction to the Web GUI Menu Bar Info page RS-232 page EDID page Config page... -
Page 8: Introduction
Sony displays. However, it is not guaranteed that CEC will work with all displays. Many manufacturers do not support the CEC “off” command, and older displays use proprietary commands. Atlona only supports displays that use the CEC command structure defined in HDMI 1.2a. It is recommended that dealers request an evaluation product from Atlona, before designing a system using the CEC protocol. -
Page 9: Panel Description
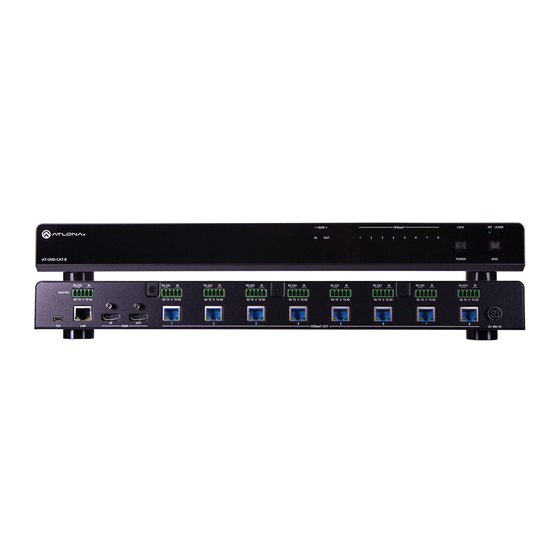
Panel Description HDMI HDBaseT LOCK LEARN AT-UHD-CAT-8 POWER EDID HDMI HDBaseT LOCK LEARN MASTER RS-232 RS-232 RS-232 RS-232 RS-232 RS-232 RS-232 RS-232 RS-232 AT-UHD-CAT-8 POWER EDID TX RX TX RX TX RX TX RX TX RX TX RX TX RX... -
Page 10: Installation
IR Control (page 25) for more information. • MASTER RS-232/IR Connecting to this port will provide direct control of the AT-UHD-CAT-8 using a control system. Control can be performed using either RS-232 or electrical IR. • RS-232/IR 1 through RS-232/IR 8 Each of these ports is associated to the respective HDBaseT OUT port. -
Page 11: Connection Diagram
Installation Connection Diagram Display -C AT -U HD AT-UHD-CAT-8 Laptop -R X X -7 D -E -U H LI N AT-UHD-EX-70C-RX Display AT-UHD-CAT-8... -
Page 12: Ip Configuration
The default static IP address of the AT-UHD-CAT-8 is 192.168.1.254. If the AT-UHD-CAT-8 is unable to detect a DHCP server within 15 seconds, then the unit will set all IP settings to zero. IMPORTANT: If the AT-UHD-CAT-8 is receiving a DHCP IP address, and the IP mode is changed to static, then Telnet and web GUI communication will be lost. -
Page 13: Setting The Ip Address Using The Web Gui
System page (page 37), in the web GUI, allows the AT-UHD-CAT-8 to use either DHCP or static IP mode. In order to access the web GUI, the IP address of the AT-UHD-CAT-8 must be known. Refer to Introduction to the Web GUI (page 31). -
Page 14: Basic Operation
Basic Operation LED Indicators The LED indicators on both the front of the unit provide basic information on the current status of the AT-UHD-CAT-8. Description POWER Blue Unit is powered and in normal operating mode. Unit is in standby mode. -
Page 15: Locking The Front Panel
4. To unlock the front-panel buttons, press and hold the POWER button for five seconds, then release. The LOCK LED indicator will no longer be illuminated. LOCK LED indicator HDMI HDBaseT LOCK LEARN AT-UHD-CAT-8 POWER EDID MASTER RS-232 RS-232 RS-232... -
Page 16: Edid Management
Basic Operation EDID Management The AT-UHD-CAT-8 provides two EDID modes: INT and LEARN. The default EDID mode is INT mode. In this mode, the AT-UHD-CAT-8 will automatically create an EDID based on the capabilities of all connected displays. INT mode is recommended for the best results when the capabilities of all connected displays are unknown. -
Page 17: Learning The Edid Using The Web Gui
4. Click the EDID mode drop-down list and select LEARN. 5. Click the COPY button to copy the downstream EDID to memory. The AT-UHD-CAT-8 will now use the EDID of the downstream sink. To switch back to the INT mode, click the EDID mode drop-down list and select INT. -
Page 18: Selecting Edid Presets
Basic Operation Selecting EDID Presets The AT-UHD-CAT-8 comes with a default EDID plus 16 pre-programmed EDID selections. When selecting the default or one of the pre-programmed EDID selections, the EDID mode must be set to INT (internal) mode. Available EDID selections are presented in the table below. -
Page 19: Managing Users
The AT-UHD-CAT-8 allows the admin user to create, edit, and remove additional TCP/IP users. All users have the same level of access to control the AT-UHD-CAT-8. However, only the admin user is allowed to manage other users. Up to three additional users can be created. -
Page 20: Editing / Deleting Users
The username and password of a user can be changed using this method. 1. Open the desired web browser and enter the IP address of the AT-UHD-CAT-8. 2. Log in as the admin user with the required credentials. The factory-default username and password for the... -
Page 21: Advanced Operation
Advanced Operation RS-232 Control The AT-UHD-CAT-8 provides two methods of RS-232 control: Pass-through mode and control mode. The master RS-232 / IR port, allows the unit to be directly controlled using a control system. In addition eight pass-through RS- 232 / IR ports allow sink devices, at the viewing location, to be controlled using a control system. -
Page 22: Cable Assembly
However, the AT-UHD-CAT-8 will use only TxD, RxD, and GND signals when communicating with a control system or computer. -
Page 23: Pass-Through Mode
HDBaseT OUT 4 RS-232 / IR 8 HDBaseT OUT 8 1. Connect the RS-232 cable from the control system to the desired RS-232 / IR port on the AT-UHD-CAT-8. Refer to Cable Assembly (page 22) for instructions on preparing the cable. -
Page 24: Control Mode
Advanced Operation Control mode In control mode, the MASTER RS-232 / IR port is used to directly control the AT-UHD-CAT-8 using a control system. 1. Launch a web browser and login to the web GUI. Refer to Introduction to the Web GUI (page 31) for more information. -
Page 25: Ir Control
TX RX 6. Connect the IR emitter to the receiver and place the emitter next to HDMI HDBaseT OUT DC 48V IN the display (sink) device. ITAL X OUT Control System Display -C AT -U HD AT-UHD-CAT-8 IR Signal AT-UHD-EX-70C-RX AT-UHD-CAT-8... -
Page 26: Controlling Source Devices
TX RX HDMI HDBaseT OUT DC 48V IN Blu-ray Player LE AR IN T se T W ER A T- D -C A T- AT-UHD-CAT-8 70 C- -E X- -U HD W ER AT-UHD-EX-70C-RX IR Signal Blu-ray Player IR Remote AT-UHD-CAT-8... -
Page 27: Power Button Modes
Normal Operation By default, pressing the POWER button will toggle the power state of the AT-UHD-CAT-8. When the unit is in normal operating mode, the POWER button will be blue. Pressing the POWER button again, will place the unit into standby mode, and the POWER button will be red. -
Page 28: Powering Sink Devices
Sony displays. However, it is not guaranteed that CEC will work with all displays. Many manufacturers do not support the CEC “off” command, and older displays use proprietary commands. Atlona only supports displays that use the CEC command structure defined in HDMI 1.2a. It is recommended that dealers request an evaluation product from Atlona, before designing a system using the CEC protocol. - Page 29 6. Test the CEC power-on and power-off commands by pressing the ON and OFF buttons, near the bottom of the page. 7. Press the POWER button on the front panel to power-on or power-off the display. Note that the power state of the AT-UHD-CAT-8 will be unaffected. AT-UHD-CAT-8...
-
Page 30: Powering Sinks And The At-Uhd-Cat-8
Sony displays. However, it is not guaranteed that CEC will work with all displays. Many manufacturers do not support the CEC “off” command, and older displays use proprietary commands. Atlona only supports displays that use the CEC command structure defined in HDMI 1.2a. It is recommended that dealers request an evaluation product from Atlona, before designing a system using the CEC protocol. -
Page 31: The Web Gui
The AT-UHD-CAT-8 is shipped with DHCP enabled. Once connected to a network, the DHCP server will automatically assign an IP address to the unit. Use an IP scanner to determine the IP address of the AT-UHD-CAT-8. If a static IP address is desired, refer to IP Configuration (page 12). -
Page 32: Menu Bar
Once the desired menu element is highlighted, click the left mouse button to access the settings within the menu. In this example, moving the mouse over the RS-232 menu item will highlight it. Click the RS-232 menu item to display the RS-232 page. Menu bar AT-UHD-CAT-8... -
Page 33: Info Page
The model SKU of this product. Software Version The version of firmware that the AT-UHD-CAT-8 is running. Always make sure to check the AT-UHD-CAT-8 product page, on the Atlona web site, for the latest version of firmware. Output 1 VALENS Version - Output 8 VALENS Version The version of firmware on the HDBaseT chip for each HDBaseT OUT port. -
Page 34: Rs-232 Page
The following options are available: None, Odd, or Even. Stop bit Sets the stop bit. Stop bits are sent at the end of each character, allowing the client to detect the end of a character stream. The following options are available: 1 or 2. AT-UHD-CAT-8... -
Page 35: Edid Page
ATL 1080P 3D Multi CH ATL 3840x2160@30 Multi CH ATL 1080P 3D DD ATL 3840x2160@60 2CH ATL 720P 2CH ATL 3840x2160@60 Multi CH ATL 720P DD EDID copy Click this button to copy the selected EDID to the HDMI IN port. AT-UHD-CAT-8... -
Page 36: Config Page
Config page Old Username This field cannot be changed. “root” is the administrator user. Old Password Enter the current password for the “root” username in this field. The default password is “Atlona”. New Username This field cannot be changed. Save Click this button to save all changes. -
Page 37: System Page
Telnet Login Mode Click this toggle to set the login mode to either ON or OFF. If this feature is set to ON, then the AT-UHD-CAT-8 will prompt for both the username and password at the start of a Telnet session. Use the same credentials as the web GUI. - Page 38 Sony displays. However, it is not guaranteed that CEC will work with all displays. Many manufacturers do not support the CEC “off” command, and older displays use proprietary commands. Atlona only supports displays that use the CEC command structure defined in HDMI 1.2a. It is recommended that dealers request an evaluation product from Atlona, before designing a system using the CEC protocol.
-
Page 39: Appendix
Updating the firmware can be completed using either the USB interface or the web GUI. Atlona recommends using the web GUI for updating the firmware. However, if a network connection is not available, the AT-UHD-CAT-8 firmware can be updated using a USB-A to USB mini-B cable. -
Page 40: Using Usb
1. Disconnect power from the AT-UHD-CAT-8. 2. Press and hold the INPUT button while connecting power to the AT-UHD-CAT-8. 3. Release the INPUT button. The POWER button will glow solid red, indicating that the AT-UHD-CAT-8 is in update mode. 4. Connect the USB-A to USB mini-B cable between the PC and the firmware port on the AT-UHD-CAT-8. -
Page 41: Cable Termination
Appendix Cable Termination Atlona recommends EIA/TIA-568-B termination. Connector type and size is very important to ensure extenders work correctly. Always use the matching cable type with the correct RJ45 connector. • CAT5e cables should use only CAT5e RJ45 connectors •... -
Page 42: Default Settings
Appendix Default Settings The following tables list the factory-default settings for the AT-UHD-CAT-8. Feature Settings RS-232 Baud rate 115200 Data bit Parity None Stop bit EDID EDID lock UNLOCK EDID mode INT EDID settings Config Username (default) root Password (default) -
Page 43: Specifications
RS-232 / IR 9 - Euroblock, 5-pin DC 48V 1 - 3-pin DIN Indicators and Controls Control Buttons: 2 - momentary, tact-type POWER, EDID LED Indicators: 9 - LED, blue HDMI IN/OUT, HDBaseT (1 - 8), LOCK, INT, LEARN AT-UHD-CAT-8... - Page 44 Dimensions (H x W x D) 1.73 x 17.24 x 10 (inch) 44 x 438 x 254 (mm) Weight 3.70 lbs / 1.66 kg Safety CE, RoHS, FCC (1) 4096x2160 @ 50/60 Hz and 3840x2160 @ 50/60 Hz only supports 4:2:0 8-bit chroma subsampling. AT-UHD-CAT-8...
-
Page 45: Index
Updating firmware 39, 40 updating Users using the web GUI adding using USB deleting editing Installation IP configuration 12, 37 Warranty Web GUI controlling displays controlling sources LEARN button LED indicators Locking the EDID the front panel Operating notes AT-UHD-CAT-8... - Page 46 • © 2019 Atlona Inc. All rights reserved. “Atlona” and the Atlona logo are registered trademarks of Atlona Inc. All other brand names and trademarks or registered trademarks are the property of their respective owners. Pricing, specifications and availability subject to change without notice. Actual products, product images, and online product images may vary from images shown here.
Need help?
Do you have a question about the AT-UHD-CAT-8 and is the answer not in the manual?
Questions and answers