Table of Contents
Advertisement
Quick Links
Download this manual
See also:
Manual
Stereo / Mono Audio Power Amplifier - 60 Watts
AT-GAIN-60
The Atlona Gain™ 60 (AT-GAIN-60) is a compact power amplifier designed for low or high
impedance applications. A mode selector switch allows the Gain 60 to deliver two channels
of 30 watts each into 4 or 8 ohms, or a single channel of 60 watts at 24, 70,or 100 volts.
This Class-D amplifier is energy efficient and convection-cooled without the need for fans.
Additionally, the Gain 60 is UL 2043 plenum-rated, allowing convenient yet discreet installation
in a plenum airspace above a drop ceiling. Selectable balanced captive screw and unbalanced
RCA inputs are provided for system design versatility. The Gain 60 is controllable via TCP/
IP or RS-232, and can be integrated with Atlona AV switchers, HDBaseT™ receivers, and
OmniStream™ AV decoders and audio devices for a wide variety of sound reinforcement
applications.
Package Contents
1 x AT-GAIN-60
1 x Captive screw connector, 2-pin
1 x Captive screw connector, 3-pin
1 x Captive screw connector, 4-pin
1 x Captive screw connector, 5-pin
1 x 28 V / 3.4 A DC power supply
1 x Installation Guide
IMPORTANT: Visit http://www.atlona.com/product/AT-GAIN-60 for the latest firmware
updates and User Manual.
1
Installation Guide
AT-GAIN-60
Advertisement
Table of Contents

Related Manuals for Atlona AT-GAIN-60


Summary of Contents for Atlona AT-GAIN-60
-
Page 1: Installation Guide
Stereo / Mono Audio Power Amplifier - 60 Watts AT-GAIN-60 The Atlona Gain™ 60 (AT-GAIN-60) is a compact power amplifier designed for low or high impedance applications. A mode selector switch allows the Gain 60 to deliver two channels of 30 watts each into 4 or 8 ohms, or a single channel of 60 watts at 24, 70,or 100 volts. -
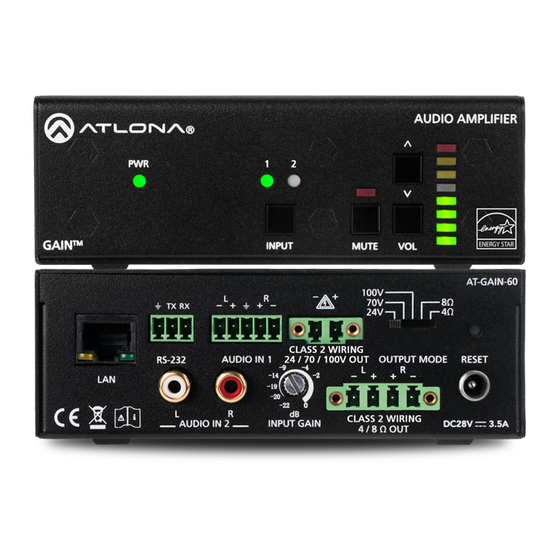
Page 2: Panel Description
Installation Guide AT-GAIN-60 Panel Description Front Rear TX RX CLASS 2 WIRING 24 / 70 / 100V OUT CLASS 2 WIRING AUDIO IN 2 INPUT GAIN DC28V 3.4A TX RX CLASS 2 WIRING 24 / 70 / 100V OUT AUDIO IN 2 (unbalanced) - Page 3 Insert the TX, RX, and GND wires into correct terminal on the included captive screw block. Analog Audio Input Connector The AUDIO IN 1 connector on the AT-GAIN-60 provides the ability to connect either balanced or unbalanced audio inputs, using the included 5-pin captive screw block.
-
Page 4: Installation
NOTE: The AT-GAIN-60 only supports one type of speaker connection at a time: high-impedance or low-impedance. Connect the speakers to the proper port on the AT-GAIN-60, based on the selection made in the previous step. Connect the LAN port to a network switch for set up and control of the unit. -
Page 5: Resetting To Factory Default Settings
Installation Guide AT-GAIN-60 IP Configuration By default, the AT-GAIN-60 is set to DHCP mode, allowing a DHCP server (if present) to assign the unit an IP address. Switching the IP mode Press and hold the INPUT button for approximately 10 seconds. Release the button once both input LED indicators 1 and 2 begin to flash. - Page 6 IP Configuration (page 5) for more information. Connect an Ethernet cable from the LAN port on the AT-GAIN-60 to the Local Area Network (LAN). Use an IP scanner to determine the IP address of the AT-GAIN-60. Launch a web browser and enter the IP address of the unit.
-
Page 7: Connection Diagrams
Installation Guide AT-GAIN-60 Connection Diagrams Program / Stereo Speakers Application Program Speakers G en R SYS Laptop Tablet G en R SYS (BYOD) PL AY AT-VGW-250 I OUT P OUT -250 AT-V AT-GAIN-60 -5 10 -S W -U HD AT-UHD-SW-510W... -
Page 8: Mounting Instructions
AT-GAIN-60 Mounting Instructions Mounting three AT-GAIN-60 units The following provides instructions for mounting up to three AT-GAIN-60 unit in the AT-RACK-1U (not included). Turn the AT-GAIN-60 so that the bottom of the unit is facing upward. Locate the two sets of holes on either side of the unit, as shown below:... - Page 9 Installation Guide AT-GAIN-60 Mount each of the AT-GAIN-60 units in the rack. Match the mounting holes on the bottom of each AT-GAIN-60 with the holes in the rack tray, marked in the illustration below. Front of rack tray Install the rack tray in the rack shelf and secure the rack tray with two screws on either side.
- Page 10 Locate the two sets of holes on either side of the unit. Refer to page 7 for the location of the mounting holes. Mount each of the AT-GAIN-60 units in the rack. Match the mounting holes on the bottom of each AT-GAIN-60 with the holes marked in the illustration below.
- Page 11 Installation Guide AT-GAIN-60 Notes...
- Page 12 • © 2018 Atlona Inc. All rights reserved. “Atlona” and the Atlona logo are registered trademarks of Atlona Inc. All other brand names and trademarks or registered trademarks are the property of their respective owners. Pricing, specifications and availability subject to change without notice. Actual products, product images, and...
Need help?
Do you have a question about the AT-GAIN-60 and is the answer not in the manual?
Questions and answers