Table of Contents
Advertisement
Quick Links
WARRANTY
Flyzone
®
guarantees this kit to be free from defects in both material and workmanship at the date of purchase. This warranty does not cover
any component parts damaged by use or modification. In no case shall Flyzone's liability exceed the original cost of the purchased kit.
Further, Flyzone reserves the right to change or modify this warranty without notice.
In that Flyzone has no control over the final assembly or material used for final assembly, no liability shall be assumed nor accepted for any
damage resulting from the use by the user of the final user-assembled product. By the act of using the user-assembled product, the user
accepts all resulting liability.
If the buyer is not prepared to accept the liability associated with the use of this product, the buyer is advised to return this kit immediately
in new and unused condition to the place of purchase.
READ THROUGH THIS MANUAL BEFORE STARTING ASSEMBLY.
IT CONTAINS IMPORTANT INSTRUCTIONS AND WARNINGS
CONCERNING THE ASSEMBLY AND USE OF THIS MODEL.
Flyzone, a Hobbico company.
© 2013 Hobbico, Inc. All rights reserved.
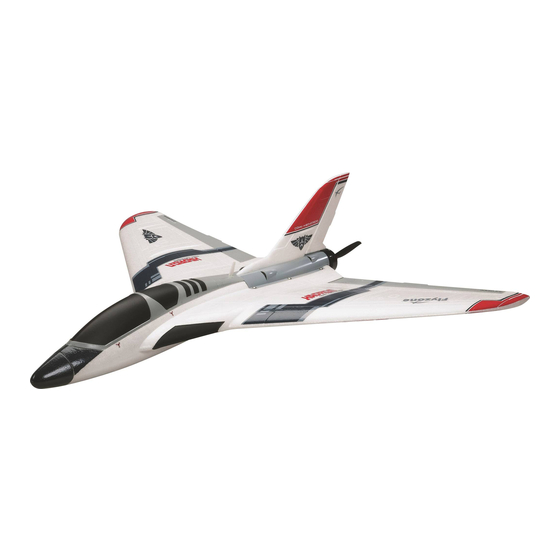
Vectored Thrust Flying Wing
Wing Loading: 10.4 – 11.0 oz/sq ft [32 – 34 g/dm
Radio: 6-channel computer radio with elevon mixing
Motor: 35-36-2200kV Outrunner, 40A ESC
For warranty claims Contact Flyzone Product Support:
Flyzone Product Support:
3002 N Apollo Drive Suite 1
Champaign, IL 61822 USA
Telephone: (217) 398-8970 ext. 6
Fax: (217) 398-7721
E-mail: airsupport@hobbico.com
flyzoneplanes.com
™
Wingspan: 33.5 in [850mm]
Wing Area: 408 sq in [26.3 dm
Weight: 29.6 – 31.3 oz [840 – 885 g]
Length: 33.5 in [850mm]
FLZA3612/14Mnl
2
]
2
]
™
Advertisement
Table of Contents

Related Manuals for Flyzone HADRON


Summary of Contents for Flyzone HADRON
- Page 1 Further, Flyzone reserves the right to change or modify this warranty without notice. In that Flyzone has no control over the final assembly or material used for final assembly, no liability shall be assumed nor accepted for any damage resulting from the use by the user of the final user-assembled product. By the act of using the user-assembled product, the user accepts all resulting liability.
-
Page 2: Items Required
- handy for calculating optimum fl ight time). Spare Propellers Prop breakage on the Hadron is a rare occurrence, but if you ever do break or damage a prop keep a few spares on-hand so you’ll never have to be grounded:... - Page 3 ASSEMBLY Program Your Transmitter 1. Remove the turtledeck and set aside. Rudder servo arm rotates counter- clockwise Motor Motor turns clockwise rotates right Left elevon down Right elevon up Both elevons up 2. Connect the servos and ESC to your receiver and power up the system with a battery so you can operate the servos and motor (if not done so already, this may also require linking the receiver to your transmitter).
- Page 4 90° 3. Still with the radio system powered up, check that the pushrod hole in the vectoring servo wheel is 90° to the servo (this may require removing and rotating the servo wheel to fi nd another hole for the pushrod). If necessary, also adjust the V-bend in the vectoring pushrod so the motor will be centered.
-
Page 5: Mount The Battery
You could measure and check the throws (provided on page 12), or simply program your low-rates to 60% and the throws will be close enough for you to fi ne tune from there. While you’re at it, your Hadron will also benefi t from -30% exponential on high- rate and -20% exponential on low-rate (negative values apply to Futaba and Tactic radios—control response should be softer/... - Page 6 With the ElectriFly 3S or 4S 2200mAh 30C batteries (or other batteries similar in weight) mounted where shown, the Hadron will balance within the recommended C.G. range. If using a heavier or lighter battery, fi rst determine where the battery must be positioned to get the Hadron to balance within the range specifi...
- Page 7 Optional: Install the Canopy Hook Bold pilots who have the courage to fl at-spin the Hadron suddenly and violently are advised to install the optional canopy hook for additional canopy security. Pilots who fl y the Hadron “normally” (performing traditional aerobatics and speed fl ying) need not install the hook.
-
Page 8: Mount The Propeller
Mount the Propeller It’s not essential to balance the propeller, but to extract the highest degree of performance possible out of your motor, use a precision propeller balancer to balance your propeller. If you feel or hear excess vibration, stop the motor immediately and examine the propeller. -
Page 9: Set A Flight Timer
Launching the Hadron is a cinch. It’s so easy that you can do it yourself; however, if it makes you feel better, you can always have someone else launch it on its fi rst fl ight. It’s best to launch the Hadron on low rates and at full throttle. Simply hold it by the fi nger grips on the bottom of the fuselage, advance the throttle to full and throw it upward into the wind at a 10-15°... -
Page 10: Flight Basics
7.) Once the Hadron starts spinning you can release the right stick, but continue to hold the left stick until you want the spin to stop. The easiest way to exit the fl at spin is to center the rudder/vectoring stick, but leave the throttle at full. Usually, the Hadron will stop spinning within a revolution or two and fl... - Page 11 SUPPLEMENTARY SETUP INSTRUCTIONS Tactic TTX650 Programming These instructions mix the vectoring and rudder servos and allow either to be turned off in-fl ight via switch E. I. Servo Connections to Receiver II. Radio Programming Ch. 1: Right Elevon Servo A. MODEL SETUP (Press and hold “ENTER”) Ch.
-
Page 12: Center Of Gravity
Hadron balances in-between. Balanced nearer the front of the C.G. range you’ll notice that the Hadron is more stable and fl ies smoother, but can fl y and land slower when balanced nearer the aft end of the range. If most of your fl ying consists of high-speed passes and full-throttle fl ying you’ll want to balance your Hadron nearer the front of the range. - Page 13 II. Programming Instructions: The ESC is factory-set for the Hadron—other than possibly having to calibrate the throttle, there is nothing that needs to be done with the ESC. However, should you desire to re-program the ESC to suit different requirements, following are full programming...
- Page 14 2. After the sequence of beeps representing the desired function, lower the throttle stick to enter the programming mode for that function. The ESC will beep as indicated below waiting for your command to change the setting: Advance the throttle after number of beeps (one Function One Beep Two Beeps...
-
Page 15: Motor Removal
REPAIRS AeroCell foam is easily reparable. Pliable glue such as canopy glue is the very best, but requires tape to hold the parts together while the glue dries overnight. CA is usually the go-to adhesive for repairing AeroCell and with a little CA accelerator the repair will be complete in minutes. -
Page 16: Motor Safety Precautions
2. You must assemble the Hadron according to the instructions. Do not alter or modify the model, as doing so may result in an unsafe or unfl yable model. In a few cases the instructions may differ slightly from the photos. In those instances the written instructions should be considered as correct.
Need help?
Do you have a question about the HADRON and is the answer not in the manual?
Questions and answers