Advertisement
Nano Switch
View the expanded manual:
http://aeotec.com/support
IMPORTANT!
This product has been fully tested and certified to
work with Z-Wave by the Z-Wave Alliance. It is
crafted using Z-Wave Plus, the latest device version
of Z-Wave. As such, if the product does not work
with your gateway, please be sure to check with your
gateway manufacturer that they have integrated this
device with their gateway for full operation.
Advertisement
Table of Contents

Related Manuals for Aeotec ZW139


Summary of Contents for Aeotec ZW139
- Page 1 Nano Switch View the expanded manual: http://aeotec.com/support IMPORTANT! This product has been fully tested and certified to work with Z-Wave by the Z-Wave Alliance. It is crafted using Z-Wave Plus, the latest device version of Z-Wave. As such, if the product does not work...
- Page 3 Warning Do not dispose of electrical appliances as unsorted municipal waste, use separate collection facilities. Aeotec Nano Switch is a low-cost Z-Wave Switch Contact your local government for information specifically used to enable Z-Wave command and regarding the collection systems available.
- Page 4 Familiarize yourself with your Nano to try to correct the interference by one or more of the following measures: Switch. Reorient or relocate the receiving antenna. Increase the separation between the equipment and receiver. RF antenna Connect the equipment into an outlet on a circuit different from that to which the receiver Touch panel connection port is connected.
- Page 5 This device complies with Part 15 of the FCC Rules. Operation is subject to the following two conditions: This device may not cause harmful interference, This device must accept any interference received, including interference that may cause undesired operation. This equipment has been tested and found to comply with the limits for a Class B digital device, pursuant to part 15 of the FCC Rules.
- Page 6 Install the Nano Switch. DELIVERY, OR THE DATE FIXED FOR DELIVERY IN THE EVENT OF NONDELIVERY. THE INDEMNITY Important: A licensed electrician with knowledge AND WARRANTY IN ABOVE ARE EXCLUSIVE and understanding electrician systems and electrical AND IN LIEU OF ALL OTHER INDEMNITIES safety should complete the electrical installation.
- Page 7 OR USE INCURRED BYCUSTOMER, COMPANY Preparing connection wires OR ANY THIRD PARTY, WHETHER IN AN ACTION 14 AWG power wires for Input/ Output. IN CONTRACT, OR TORT, OR OTHERWISE 18 AWG copper wires for external manual switch. EVENIF ADVISED OF THE POSSIBILITY OF Use the wire stripper cut the metallic part of the SUCH DAMAGES.
- Page 8 Wiring diagram of AC120V/230V power input. interest, costs and expenses (including fees and disbursements of counsel) of every kind (i) based upon personal injury or death or injury to property to the extent any of the foregoing is proximately caused either by a defective product (including strict liability in tort) or by the negligent or willful acts or omissions of Customer or its officers, employees, subcontractors or agents, and/or (ii) arising from...
- Page 9 to assume or create for it any other obligation or liability in connection with the Products except as set forth herein. Aeon Labs will pass on to Company all manufacturers’ Material warranties to the extent that they are transferable, but will not independently warrant any Material.
- Page 10 Wiring diagram of DC24V power input. warranty is, at Aeon Labs' option, to repair, replace Since the Nano Switch also supports the DC24V or correct any such defect that was present at the power input, so you can use it to control the loads time of delivery, or to remove the Products and to that powered by DC24V.
- Page 11 This guarantee made by the company who you purchased the product from includes the transfer of Aeon Labs’ full warranty to that Company. They’ve guaranteed that they’ll be able to assist you, the Customer, with all technical support and repair needs on our behalf.
-
Page 12: Warranty
If you are in need of any technical support during or subsequent to your products’ warranty, please get in touch with our support team via http://aeotec.com/ support. The Company you bought this product from has also guaranteed to assist you with any of your support needs, and you can also contact them for accordingly. -
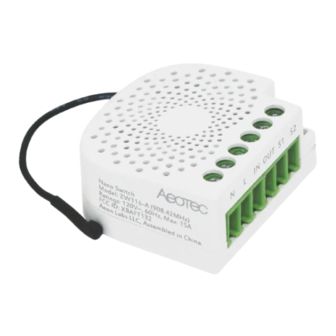
Page 13: Technical Specifications
IN OUT Touch panel gradient status as a confirmation. 3-Way 6 Technical specifications. Switch (SPDT) Model number: ZW116/ZW139 Max standby power: 0.8W. Operating temperature: 0℃ to 40℃ /32 ℉ to Live 104 ℉ . AC120V~230V Neutral Relative humidity: 8% to 80%. - Page 14 Neutral wire connection: Connect the Neutral LED will be on for 2 seconds and then return to a wire to the “N” terminal on the Nano Switch. colourful gradient. Load wire connection: Connect the Load wire Including Nano Switch as a secure device: to the “OUT”...
- Page 15 Position all wires to provide room for the the Nano Switch. device. Place the Nano Switch inside the gang Note: The model ZW139 Nano Switch does not box towards the back of the box. have the ability to monitor energy consumption. The...
- Page 16 Restore Power. Restore power at the circuit breaker or fuse. Monitoring Energy Consumption. The Aeotec Nano Switch can report wattage energy usage or kWh energy usage to a Z-Wave control point when requested. If this function is supported by the control points, the energy consumption will be displayed in the user interface of the control points.
-
Page 17: Quick Start
Quick start. switch wired into Nano Switch, toggle the button on the manual switch once and wait 2 seconds for the Adding your Nano Switch to a Z-Wave Nano Switch to detect the type of manual switch. network. After your Nano Switch is installed and powered You can also set the external switch mode through on, you are now able to manually control the Nano Configuration Command Class. -
Page 18: Advanced Functions
If the Nano Switch has been successfully added instruction manual. to your Z-Wave network, its RGB LED will be Set your Z-Wave controller into removal mode. solid. If the pairing was unsuccessful, the red Press the Action Button on the Nano Switch or LED will be on for 2 seconds and then remain a toggle the external manual switch 3 times in fast colourful gradient, repeat the instructions above...
Need help?
Do you have a question about the ZW139 and is the answer not in the manual?
Questions and answers