Table of Contents
Advertisement
Quick Links
FOR AGES:
WEIGHT LIMIT:
3-7
WARNING/ADVERTENCIA
• Please read all the instructions before using
this product.
• Consult a physician before beginning any
exercise program or strenuous activity.
• The contents of this package are not suitable
for children under 3 years of age. Contains
small parts which may cause choking.
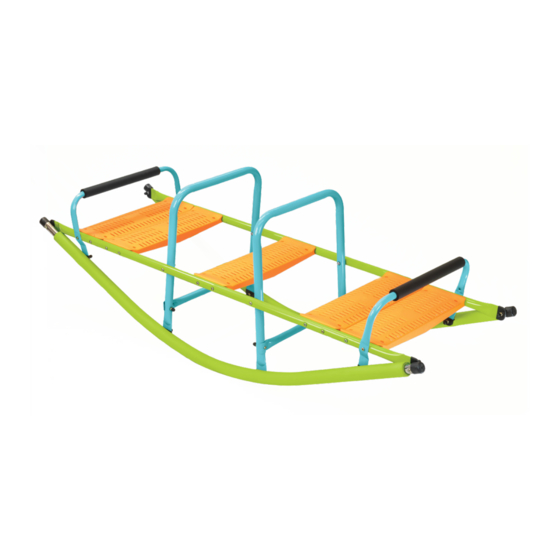
KIDS ROCKER SEESAW
MODEL# 9306RS
PRODUCT MANUAL - VERSION 05.18.07
TO BUILD:
150
Lbs
68 Kgs
• Do not allow more than one person on this
product at any time.
• Adult supervision is required.
• ADULT ASSEMBLY REQUIRED.
• 75 LBS per seat maximum weight rating.
TOOLS NEEDED:
1
X
CUSTOMER SERVICE
GQBrands.com
CustomerService@GQBrands.com
1-866-498-5269
4401 Samuell Blvd, Ste 150
Mesquite, TX 75149
Advertisement
Table of Contents

Related Manuals for Pure Fun 9306RS


Summary of Contents for Pure Fun 9306RS
- Page 1 KIDS ROCKER SEESAW MODEL# 9306RS PRODUCT MANUAL - VERSION 05.18.07 FOR AGES: WEIGHT LIMIT: TO BUILD: TOOLS NEEDED: 68 Kgs WARNING/ADVERTENCIA CUSTOMER SERVICE • Please read all the instructions before using • Do not allow more than one person on this GQBrands.com...
-
Page 2: Customer Service Information
CUSTOMER SERVICE INFORMATION Thank you for purchasing: KIDS ROCKER SEESAW MODEL# 9306RS At Global Quality Brands®, we want all of our customers to be To order these parts, or if you have any other questions or concerns completely satisfied with their purchase. Please take time to review... -
Page 3: Limited Warranty
TO USE. ALL MERCHANDISE IS SOLD ON THIS CONDITION, WHICH NO products are not covered by the product warranty. No other warranty REPRESENTATIVE OF GQ BRANDS® CAN WAIVE OR CHANGE. beyond that specifically set forth above is authorized by GQBrands®. MODEL# 9306RS... -
Page 4: Important Message
WARNINGS IMPORTANT MESSAGE WARNING - PLEASE READ ADULT ASSEMBLY REQUIRED CHOKING HAZARD - Small Parts NOT for children under 3 years of age. WARNING: While every attempt is made to ensure the highest degree of protection in all equipment, we cannot guarantee freedom from injury. The user assumes all risks of injury due to use. - Page 5 Please refer to the table reference. Make sure you have all parts listed. If you are missing any for part descriptions and numbers. parts • Use gloves to protect against pinch points during assembly. MODEL# 9306RS...
-
Page 6: Parts List
PARTS LIST Base Rails Foam Rocker Bar Handle Tube Backrest GQBrands.com CustomerService@GQBrands.com 1-866-498-5269... - Page 7 M6 45mm Bolt M6 40mm Bolt M6 50mm Bolt 13 - 12 - 10 - 11 - Safety Caps Washer Square Nuts Hex Nut 14 - 15 - 16 - Flat Cap (Large) Flat Cap (Small) Round Cap MODEL# 9306RS...
- Page 8 ASSEMBLY INSTRUCTIONS STEP 1: Parts: Part 1 (x2) - Base Rails Part 6 (x1) - Seat Place both Base Rails (Part 1) in a flat surface free of obstructions. Place 1x Seat (Part 6) with the flat surface facing the floor and align the side openings to the middle openings of the Base Rails.
- Page 9 Base Rail and Seat openings. NOTE: When Installing the Seats to the Base Rails, do not install to the 4 locations circled as shown. These are reserved to install the Handle Bars in Step 12. Do not Install MODEL# 9306RS...
- Page 10 ASSEMBLY INSTRUCTIONS STEP 4: Parts: Part 2 (x2) - Foam Rocker Bar Part 7 (x4) - M6 45mm Bolt Part 11 (x4) - Hex nut Part 12 (x4) - Washer NOTE: Round Cap (Part 16) is already installed on the Foam Rocker Bar (Part 12). If not, slide to both ends and make sure the tub ends are covered Place the Foam Rocker Bars (Part 2) on the...
- Page 11 Tube (Part 3), and align to the openings at the tips of the Footrest Tube (Part 5). Tighten with a M6 40mm Bolt (Part 8), Hex Nut (Part 11), and Washer (Part 12). Repeat until you have 2x completed Handle Tubes with the Footrest Tubes installed. MODEL# 9306RS...
- Page 12 ASSEMBLY INSTRUCTIONS STEP 7: Insert the Assembled Handles on the inside of the Seesaw. Align the upper openings of the Handle Tubes to the Base Rails, and bottom openings to the Foam Rocker Bars STEP 8: Parts: Part 9 (x4) - M6 50mm Bolt Part 11 (x4) - Hex nut Part 12 (x4) - Washer Locate the aligned middle openings in the...
- Page 13 Nut (Part 11), and Washer (Part 12). Hide the head of the Bolt under the foam of the Foam Rock Bars. NOTE: Make sure the head of the Bolts are facing the outside of the Seesaw to avoid scratches or scrapes when in use. MODEL# 9306RS...
- Page 14 STEP 10: Parts: Part 4 (x2) - Backrest Insert the Backrest (Part 4) from the outside of the Base Rails and slide the tips on the inside of the Rocker Seesaw. Align the openings of the tips to the Foam Rocker Bars to the Backrest to install the hardware in Step 11.
- Page 15 Parts: Part 13 (x20) - Safety Caps Use the Safety Caps (Part 13) to hide any excess from the Bolts. NOTE: Failure to use the Safety may cause scratches, scrapes, or injury while when product is in use. MODEL# 9306RS...
-
Page 16: Frequently Asked Questions
FREQUENTLY ASKED QUESTIONS • Question: “How should I clean my • Question: “A seat seems loose, what seesaw?” should I do?” Answer: you should clean the Seesaw Answer: Make sure the Bolts/Nuts under with a solution of warm water and Non- the plastic seat are secure.
Need help?
Do you have a question about the 9306RS and is the answer not in the manual?
Questions and answers