
Related Manuals for Blizzard Lighting Wink


Summary of Contents for Blizzard Lighting Wink
- Page 1 Blizzard Lighting, LLC www.blizzardlighting.com Waukesha, WI USA Copyright (c) 2017...
-
Page 2: Table Of Contents
Calibration Settings Fixture Test Motor/Factory Reset Runtime Info Software DMX Values In-Depth 5. Appendix A Quick DMX Lesson Keeping Your Wink™ As Good As New Returns (Gasp!) Shipping Issues Tech Specs Troubleshooting Dimensional Drawings Photometric Data Page 2 Wink™ User Manual - Rev. A... -
Page 3: Wink™ Led Moving Head
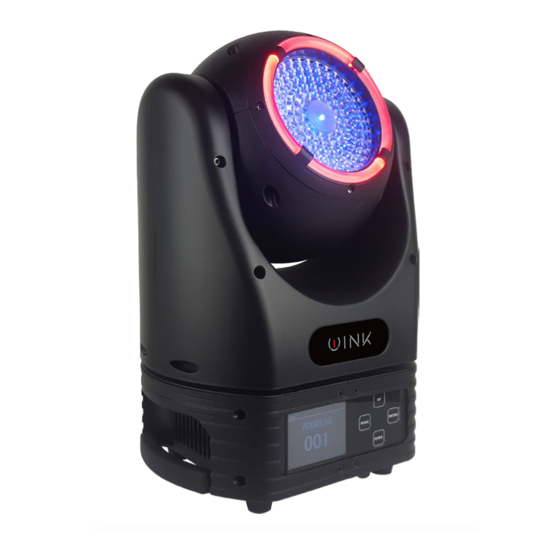
• This Lovely User Manual Getting It Out Of The Box Congratulations on your purchase of Wink™, your new eye of the storm LED moving head fixture! Now that you’ve got your Wink™ (or hopefully Winks), you should carefully unpack the box and check the contents to ensure that all parts are present and in good condition. -
Page 4: Safety Instructions (Don't Stick Your Hand In The Toaster!)
Caution! There are no user serviceable parts inside the unit. Do not open the housing or attempt any repairs yourself. In the unlikely event your unit may require service, please open a support ticket at www. blizzardlighting.com/support. Page 4 Wink™ User Manual - Rev. A (c) 2017 Blizzard Lighting, LLC... -
Page 5: Meet Wink
Ring LED 3 - Blue Ring LED 4 - Red Ring LED 4 - Green Ring LED 4 - Blue Ring Strobe Ring Dimmer Ring Macros Ring Macro Speed Page 5 Wink™ User Manual - Rev. A (c) 2017 Blizzard Lighting, LLC... -
Page 6: The Wink™ Pin-Up Picture
TFT Color the top position Display if mounted upside down. Figure 2: The Rear Connections 3-Pin Power Power 3-Pin DMX In Input Output DMX Out Page 6 Wink™ User Manual - Rev. A (c) 2017 Blizzard Lighting, LLC... -
Page 7: Setup
ALWAYS replace with the same type and rating of fuse. Fuse Replacement Wink™ utilizes a high-output switch-mode power supply with an in- ternal fuse. Under normal operating conditions, it should not require replacement. Should the fuse require replacement, please contact Blizzard Lighting for instructions, or to return your unit for service. -
Page 8: Cable Connectors
Step 3: Connect other fixtures in the chain from output to input as above. Place a DMX terminator on the output of the final fixture to ensure best communication. Page 8 Wink™ User Manual - Rev. A (c) 2017 Blizzard Lighting, LLC... -
Page 9: Installation
It must be securely fixed to the support structure, and then connected to the fixing point on the bottom of the base. Page 9 Wink™ User Manual - Rev. A (c) 2017 Blizzard Lighting, LLC... -
Page 10: Operating Adjustments
4. OPERATING ADJUSTMENTS The Control Panel All the goodies and different modes possible with the Wink™ are ac- cessed by using the control panel on the front of the fixture. There are 4 control buttons to the right of the LCD display which allow you to navigate through the various control panel menus. -
Page 11: Control Panel Menu Structure
Fixture Test Pan & Tilt Ring LED Motor Reset YES/NO Factory Reset YES/NO Time Info Power on xxx (hours) Last Run Hours xxx (hours) Software Ver Version Vx.x Page 11 Wink™ User Manual - Rev. A (c) 2017 Blizzard Lighting, LLC... -
Page 12: Set The Starting Dmx Address
1.) Navigate the main menu until you reach Run Mode, press <ENTER>. 2.) Use the <UP/DOWN> buttons to select Static Setup. 3.) Manual adjustments ranging from 0-255 can be made to any available static mode submenu option. Page 12 Wink™ User Manual - Rev. A (c) 2017 Blizzard Lighting, LLC... -
Page 13: Display Timeout
2.) From here you can view current Power On time, and Last Run hours. Software 1.) Navigate to Utilities <ENTER>, then Software <ENTER>. 2.) From here you can view the installed software version information. Page 13 Wink™ User Manual - Rev. A (c) 2017 Blizzard Lighting, LLC... -
Page 14: Dmx Values In-Depth
080 <-> 084 Pale Lavender 085 <-> 089 Pink 090 <-> 094 095 <-> 099 Green 100 <-> 104 Blue 105 <-> 109 White 110 <-> 255 Reserved Page 14 Wink™ User Manual - Rev. A (c) 2017 Blizzard Lighting, LLC... - Page 15 208 <-> 219 Macro 17 220 <-> 231 Macro 18 232 <-> 243 Macro 19 244 <-> 255 Macro 20 000 <-> 255 Ring Macro Speed (slow <--> fast) Page 15 Wink™ User Manual - Rev. A (c) 2017 Blizzard Lighting, LLC...
-
Page 16: Appendix
It is flexible, robust, and scalable, and its ability to control everything from dimmer packs to moving lights to foggers to lasers makes it an indispensable tool for any lighting designer or lighting performer. Page 16 Wink™ User Manual - Rev. A (c) 2017 Blizzard Lighting, LLC... -
Page 17: Keeping Your Wink™ As Good As New
Keeping Your Wink™ As Good As New The fixture you’ve received is a rugged, tough piece of pro lighting equip- ment, and as long as you take care of it, it will take care of you. That said, like anything, you’ll need to take care of it if you want it to operate as designed. -
Page 18: Tech Specs
Make sure all connectors are seated properly and securely. ing / Responding Use Only DMX Cables. Erratically Install a Terminator. Check all cables for defects. Reset fixture(s). Page 18 Wink™ User Manual - Rev. A (c) 2017 Blizzard Lighting, LLC... -
Page 19: Dimensional Drawings
159.5" (405 cm) Luminous Intensity: Beam 1m lux 1m fc 2.5m lux 2.5m fc 5m lux 5m fc 5° 28,180 2,618 6,517 605.5 1,700 45° 2,458 228.3 39.5 12.1 Page 19 Wink™ User Manual - Rev. A (c) 2017 Blizzard Lighting, LLC... - Page 20 Enjoy your product! Our sincerest thanks for your purchase! --The team @ Blizzard Lighting...
Need help?
Do you have a question about the Wink and is the answer not in the manual?
Questions and answers