Table of Contents
Advertisement
Quick Links
Advertisement
Table of Contents

Related Manuals for Blizzard Lighting ToughPar


Summary of Contents for Blizzard Lighting ToughPar
-
Page 1: Toughpar™ Rgbaw Led
Blizzard Lighting, LLC www.blizzardlighting.com Wisconsin, USA Copyright (c) 2011... -
Page 2: Table Of Contents
DMX Quick Reference ™ The ToughPAR Pin-up Picture 3. Setup Fuse Replacement Connecting A Bunch Of ToughPAR™ RGBAW PAR Cans Data/DMX Cables Cable Connectors 3-Pin??? 5-Pin??? Huh? Take It To The Next Level: Setting up DMX Control Fixture Linking (Master/Slave Mode) Mounting/Rigging 4. -
Page 3: Getting Started
1. GETTING STARTED What’s In The Box? • 1 x ToughPAR™ RGBAW Professional LED PAR Fixture • 1 x IP Rated AC power cord with cable cap • 1 x Set of IP Rated DMX in/out cables • This Lovely User Manual Getting It Out Of The Box Congratulations on purchasing one tough motha of a PAR fi... -
Page 4: Safety Instructions (Don't Stick Your Hand In The Toaster!)
• Avoid direct eye exposure to the light source while it is on. Caution! There are no user serviceable parts inside the unit. Do not open the housing or attempt any repairs yourself. In the unlikely event your unit may require service, please contact Blizzard Lighting at sup- port@blizzardlighting.com. Page 4 ToughPAR RGBAW Manual Rev. -
Page 5: Meet The Toughpar™ Rgbaw Led
2. MEET THE ToughPAR™ RGBAW LED PAR CONTROL FEATURES • RGB color mixing via 36x 1W Red/Green/Blue/Amber/White LEDs • Variable electronic strobe • Variable electronic dimmer • Built-in color & chase macros via DMX • Built-in automated programs via master/slave •... -
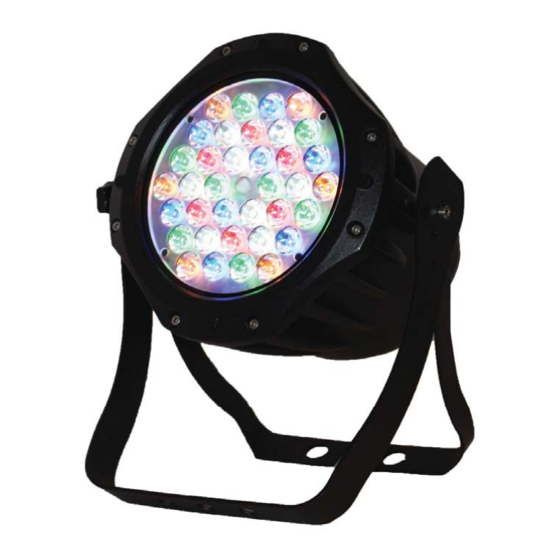
Page 6: The Toughpar ™ Pin-Up Picture
Figure 1: The ToughPAR™ Pin-Up Picture Mounting Yoke & Adjustment/ 1-watt RGBAW Locking Knobs LEDs Quick- Change LED Lens Plate IP65-Rated Cast Aluminum Enclosure Figure 2: The Rear Connections LED Control Panel DMX In DMX Out Power Linking Page 6 ToughPAR RGBAW Manual Rev. -
Page 7: Setup
The fuse is fi eld replaceable, however it is an advanced procedure suited to qualifi ed individuals. Should your ToughPAR™ fuse require replacement, please contact Blizzard Lighting for instructions, or to return your unit for service. Connecting A Bunch of ToughPAR™ RGBAW Fixtures You will need a serial data link to run light shows using a DMX-512 controller or to run shows on two or more fi... -
Page 8: Cable Connectors
Step 3: Connect other fi xtures in the chain from output to input as above. Place a DMX terminator on the output of the fi nal fi xture to ensure best communication. Page 8 ToughPAR RGBAW Manual Rev. A Copyright (c) 2011 Blizzard Lighting, LLC... -
Page 9: Fixture Linking (Master/Slave Mode)
• Safety cables MUST ALWAYS be used. • Never mount in places where the fi xture will be exposed to rain, high humidity, extreme temperature changes or restricted ventilation. Page 9 ToughPAR RGBAW Manual Rev. A Copyright (c) 2011 Blizzard Lighting, LLC... -
Page 10: Operating Adjustments
4. OPERATING ADJUSTMENTS The Control Panel All the goodies and different modes possible with the ToughPAR™ LED are accessed by using the control panel on the rear of the fi xture. There are 4 control buttons below the LED display which allow you to navigate through the various control panel menus. -
Page 11: Control Panel Menu Structure
<ENTER> <UP/DOWN/ENTER> rL-- r000- r255 <ENTER> <UP/DOWN/ENTER> GL-- G000- G255 <ENTER> <UP/DOWN/ENTER> bL-- b000- b255 <ENTER> <UP/DOWN/ENTER> AL-- A000- A255 <ENTER> <UP/DOWN/ENTER> UL-- U000- U255 <ENTER> <UP/DOWN/ENTER> Page 11 ToughPAR RGBAW Manual Rev. A Copyright (c) 2011 Blizzard Lighting, LLC... -
Page 12: Dmx Mode
(Amber Level), or (White Level), then hit <ENTER>. 2.) Using the <UP/DOWN> buttons, select the maximum level for each color x000-x255 between (000=off), then hit <ENTER> to confi rm. Page 12 ToughPAR RGBAW Manual Rev. A Copyright (c) 2011 Blizzard Lighting, LLC... -
Page 13: Dmx Channel Values In-Depth
Red Intensity 000 <--> 255 Green Intensity Amber Intensity 000 <--> 255 Blue Intensity White Intensity 000 <--> 255 Amber Intensity Dimmer (0-100%) 000 <--> 255 White Intensity Page 13 ToughPAR RGBAW Manual Rev. A Copyright (c) 2011 Blizzard Lighting, LLC... -
Page 14: Troubleshooting
Verify proper mode of operation. Is the fi xture in “Auto” On Its Own mode? If your problem isn’t listed, or if problems persist, please contact support: support@blizzardlighting.com. Page 14 ToughPAR RGBAW Manual Rev. A Copyright (c) 2011 Blizzard Lighting, LLC... -
Page 15: Appendix
It is fl exible, robust, and scalable, and its ability to control everything from dimmer packs to moving lights to foggers to lasers makes it an indispensible tool for any lighting designer or lighting performer. Page 15 ToughPAR RGBAW Manual Rev. A Copyright (c) 2011 Blizzard Lighting, LLC... -
Page 16: Keeping Your Toughpar™ As Good As New
Damage incurred in shipping is the responsibility of the shipper, and must be reported to the carrier immediately upon receipt of the items. Claims must be made within seven (7) days of receipt. Page 16 ToughPAR RGBAW Manual Rev. A Copyright (c) 2011 Blizzard Lighting, LLC... -
Page 17: Tech Specs
3-pin XLR Female Standalone, Master/Slave, Sound Active, Other Operating Modes Color Preset Tough? You bet. 2-year limited warranty, does not cover mal- Warranty function caused by damage to LED’s. Page 17 ToughPAR RGBAW Manual Rev. A Copyright (c) 2011 Blizzard Lighting, LLC... - Page 18 This page intentionally left blank. Page 18 ToughPAR RGBAW Manual Rev. A Copyright (c) 2011 Blizzard Lighting, LLC...
- Page 19 This page intentionally left blank.
- Page 20 Enjoy your product! Our sincerest thanks for your purchase! --The team @ Blizzard Lighting...
Need help?
Do you have a question about the ToughPar and is the answer not in the manual?
Questions and answers