Advertisement
This appliance can be used by children aged from 8 years and above and persons
with reduced physical, sensory or mental capabilities or lack of experience and
knowledge if they have been given supervision or instruction concerning use of
the appliance in a safe way and understand the hazards involved. Children shall
not play with the appliance. Cleaning and user maintenance shall not be made by
children without supervision.
The specific instructions related to the safe operation of this appliance (as given
in 7.12 of this standard) shall be collated together in the front section of the user
instructions.
The height of the characters, measured on the capital letters, shall be at least 3
mm.
These instructions shall also available in an alternative format, e.g. on a website.
A fire may result if the appliance is not used with care, therefore:
be careful when using the appliance in places where there are combustible
→
materials ;
→
do not apply to the same place for a long time;
→
do not use in presence of an explosive atmosphere;
be aware that heat may be conducted to combustible materials that are out
→
of sight;
→
place the appliance on its stand after use and allow it to cool down before
storage;
do not leave the appliance unattended when it is switched on.
→
Rohs
Correct Disposal of this product
This marking indicates that this product should not be disposed
with other household wastes throughout the EU. To prevent
possible harm to the environment or human health from
uncontrolled waste disposal, recycle it responsibly to promote
the sustainable reuse of material resources. To return your used
device, please use the return and collection systems or contact
the retailer where the product was purchased. They can take
this product for environmental safe recycling.
Manufacturer:
AOYUE INTERNATIONAL LIMITED
Jishui Industrial Zone, Nantou, Zhongshan City,
Guangdong Province, P.R.China
http://www.aoyue.com
Int936A / 936A
Int936 / 936
Temperature Controlled
Soldering Station
Instruction Manual
Thank you for purchasing the Aoyue Int936A / 936A,
Aoyue Int936 / 936 temperature controlled soldering station.
Please read the manual before using the unit.
Keep manual in accessible place for future reference.
Advertisement
Table of Contents

Related Manuals for aoyue Int936A


Summary of Contents for aoyue Int936A
- Page 1 → Rohs Correct Disposal of this product Thank you for purchasing the Aoyue Int936A / 936A, This marking indicates that this product should not be disposed Aoyue Int936 / 936 temperature controlled soldering station. with other household wastes throughout the EU. To prevent Please read the manual before using the unit.
-
Page 2: Table Of Contents
TABLE OF CONTENTS Package content …………………………………………. 3 Care and Safety Precautions ………….………..…….. 4 Specification ……………………………….…..…..…….. 5 Assembly and Usage …………………………………..6 Parts Guide………………………………………………… 7 Soldering Tip care and Maintenance ……………….. 8 Tip temperature Cleaning When not in use Tip calibration Disassembling the hand piece ………………….……... -
Page 3: Package Content
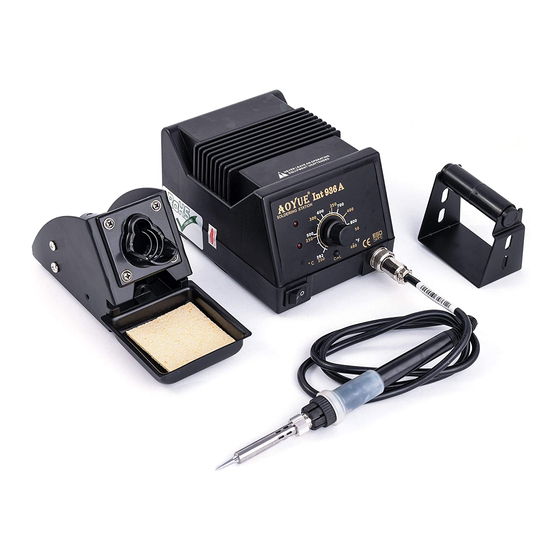
PARTS LIST PACKAGE CONTENT Please check if the listed parts below are included in the package: Aoyue Int936A/936A Main Station ..1 unit Soldering Iron ..1 pc. **2660 Soldering Iron Stand (including Sponge) . -
Page 4: Care And Safety Precautions
PARTS LIST CARE and SAFETY PRECAUTIONS Main Station CAUTION: Misuse may cause injury and physical damage. For your own safety, be sure to comply with the following precaution. Temperature may reach a high of 480°C when turned on. ● - Do not use near flammable gases, paper and other materials. - Do not touch heated parts, can cause severe burns. -
Page 5: Specification
Aoyue 936 规格 SPECIFICATION PROBLEM 3: SOLDERING IRON TEMPERATURE IS INTERMITTENT Description: Main power LED lights up and so does the heater LED but Int936A / 936A Int936 / 936 Model# soldering iron temperature rises and falls uncontrollably. Power Consumption SOLUTION: 0.5A... -
Page 6: Assembly And Usage
ASSEMBL Y and USAGE BASIC TROUBLESHOOTING GUIDE I. SOLDERING IRON STAND WARNING: To avoid personal injury or equipment damage, disconnect power cords before making any servicing to the equipment, unless instructed otherwise Assemble Soldering iron stand. troubleshooting procedures. ① ② PROBLEM 1: THE UNIT HAS NO POWER /MAIN POWER LED DOES NOT LIGHT UP Check if the unit is switched ON. -
Page 7: Parts Guide
PARTS GUIDE CHANGING THE FUSE Checking the fuse: Temperature The Fuse can be found at the back of the unit, it is incorporated adjustment knob Power indicator into the AC power receptacle. If fuse is blown replace with same type fuse only . -
Page 8: Soldering Tip Care And Maintenance
REASSEMBL Y OF HAND PIECE SOLDER TIP CARE and MAINTENANCE After test or replacement of heating elements are done follow the Tip Temperature ● following steps to reassemble the hand piece: If the tip temperature is too high, it decreases the life of the tip. So we suggest you to use the lowest *possible* tip temperature when Slide in hand piece PCB into the main handle. - Page 9 SOLDER TIP CARE and MAINTENANCE Aoyue 936 规格 REPLACING SOLDERING IRON CORD 焊铁头的维护和使用 When cord is proven to be faulty follow the steps to replace the cord: STEPS in Checking, Cleaning and Tinning the Tip ● Never use file or sharp rough objects in removing oxidation of the tip Follow the steps in disassembling the hand piece.
-
Page 10: Disassembling The Hand Piece
Proper connections table: 15” Detach the Soldering Iron Receptacle (“ as shown in the figure below) from the main unit. For Int936A / 936A : “1” Turn the Copper Nut, ( as shown in the figure below) counter CORD COLOR CORD COLOR Heating element clockwise to loosen it. -
Page 11: Testing The Heating Element
Pin 1 & Red wire Pin 2 & BLUE wire Pins 3 & BLACK wire Pin 4 & GREENwire Pin 5 & WHITE wire Heating element Note: Illustration shows diagram for Int936A/936A station, for the Int936/936 station the sensor wire is blue and white. -
Page 12: Replacing The Heating Element
Test the resistances of the following configurations: For Int936A / 936A: For Int936A / 936A: Solder one RED wire of heating element with red wire on PCB.
Need help?
Do you have a question about the Int936A and is the answer not in the manual?
Questions and answers