Table of Contents
Advertisement
Advertisement
Table of Contents

Related Manuals for aoyue 888A


Summary of Contents for aoyue 888A
- Page 1 ® AOYUE 888A (Centigrade / Fahrenheit switchable) Repairing System INSTRUCTION MANUAL Thank you for purchasing Aoyue 888A Repairing System. It is important to read the manual before using the equipment. Please keep manual in accessible place for future reference.
-
Page 2: Table Of Contents
Auto-Sleep Functions ……………………………………………… Temperature Scale ……………………………………………… Digital Calibration ……………………………………………… Line Frequency ……………………………………………… Care and Maintenance ……………………………………………… Basic Troubleshooting Guide ……………………………………………… Soldering Tips ……………………………………………… Air Nozzles ……………………………………………… Manufacturer: AOYUE INTERNATIONAL LIMITED Jishui Industrial Zone, Nantou, Zhongshan City, Guangdong Province, P.R.China http://www.aoyue.co... -
Page 3: Product Description
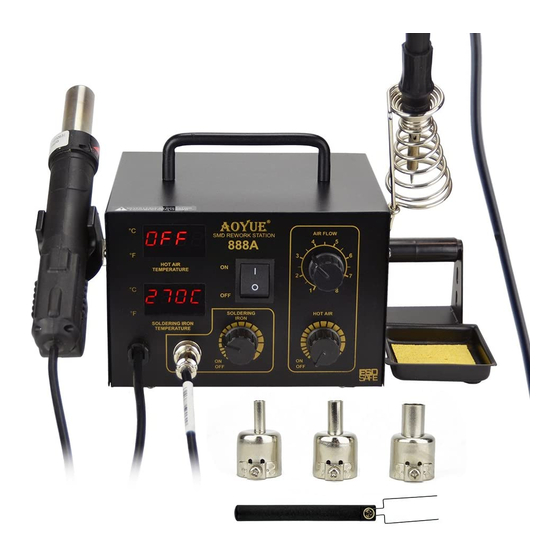
PRODUCT DESCRIPTION The Aoyue 888A SMD Repairing System is a reworking equipment that combines the functionality of Hot Air Gun and a lead free compatible Soldering Iron in one package. It has several safety features such as the auto-cooling process of the Hot Air Gun. -
Page 4: Package Inclusion
PACKAGE INCLUSIONS 1 unit Main Station with Hot Air Gun and Holder. 1pc. 1194 Air Nozzle 1pc. 1195 Air Nozzle 1198 Air Nozzle 1pc. B016 Soldering Iron Spring Iron Holder 1pc. G001 IC Popper Spool Holder 1pc. Sponge Tray 1pc. User Manual * Type of soldering tip included might change depending on availability. -
Page 5: Safety Precautions
SAFETY PRECAUTIONS CAUTION: Improper usage can cause serious injury to personnel and/or damage to equipment. For your own safety, please observe the ff. precautions. Check each component after opening the package to make sure ● everything is in good condition. If there are any suspected damage, do not use the item and report the issue to your vendor. -
Page 6: Control Panel Guide
CONTROL PANEL GUIDE LEGEND: C — Main Power Swtitch B1 — Soldering Iron Temperature Display. B2 — Soldering Iron Temperature Adjustment Knob with Function On/Off B3 — Soldering Iron 5-Pin Receptacle A1 — Hot Air Gun Temperature Display A2 — Hot Air Gun Airflow Adjustment Knob A3 —... -
Page 7: Assembly And Preparation
ASSEMBL Y and PREPARATIONS A. Soldering Iron 1. Connect the soldering iron cord assembly to the soldering iron output terminal . 2. Attach the sponge plate and solder spool holder(A) to the side of the unit (B). 3. Place the soldering iron to the soldering iron stand. 4. -
Page 8: Operating Guidelines
OPERATING GUIDELINES IMPORTANT REMINDERS: 1. Make sure the equipment is placed on a flat stable surface and all the heat-generating components placed on their re- spective holders or stands. 2. Ensure all function switches are OFF prior to reworking. 3. Ensure all terminal connections are properly secured. IMPORTANT: Please refer to the CONTROL PANEL GUIDE page for buttons and display panel directory. - Page 9 OPERATING GUIDELINES Adjust the air flow level using the airflow adjustment knob (“A2” from the control panel). Adjust the hot air gun air temperature using the hot air gun temperature adjustment knob (“A3” from the control panel). The display for Hot Air Gun Temperature will change from actual temperature display to set temperature display while the knob is being adjusted.
- Page 10 OFF position. 3. Power up unit by switching the power switch to ON. 4. While the “AOYUE” name is scrolling simultaneously turn the soldering iron and hot air gun set temperature knob to ON position.
- Page 11 OPERATING GUIDELINES Selection Menu Function None Soldering Iron Sleep Timer Hot Air Gun Sleep Timer Temperature Scale Adjustment Soldering Iron Digital Offset Hot Air Gun Digital Offset AC Line Frequency Selection H. Activating Soldering Iron Auto-Sleep Mode The soldering iron’s SLEEP mode can be activated by following the set of procedures below: 1.
-
Page 12: Auto-Sleep Functions
AUTO SLEEP FUNCTIONS 8. Turn the soldering iron temperature adjustment knob, to wake the soldering iron from its sleep mode I. Activating Hot Air Gun Auto-Sleep Mode The hot air gun’s SLEEP mode can be activated by following the set of procedures below: 1. -
Page 13: Temperature Scale
TEMPERATURE SCALE J. Selecting the Temperature Scale The displayed temperature can be toggled between the Centigrade scale or the Fahrenheit scale. To switch between the two scales follow these procedures: 1. Follow System Setting procedures 1 to 6. Adjust system selection menu to Set 003, then turn the hot air gun set temperature knob to off position. - Page 14 DIGITAL CALIBRATION K. Utilizing the Solder Iron Digital Temperature Calibration By default, the system is properly calibrated but for some cases when a little adjustment of the soldering iron temperature is required the following procedure can be done. 1. Turn on the soldering iron function. 2.
-
Page 15: Digital Calibration
DIGITAL CALIBRATION L. Utilizing the Hot Air Gun Digital Temperature Calibration By default, the system is properly calibrated but for some cases when a little adjustment of the Hot Air Gun temperature is required the following procedure can be done. 1. -
Page 16: Line Frequency
LINE FREQUENCY SELECTION M. Line Frequency Selection By default, the system's line frequency has been programmed from the factory but for some cases when a manual override of the line frequency is needed the following procedure can be done. 1. Follow System Setting procedures 1 to 6. - Page 17 This appliance can be used by children aged from 8 years and above and persons with reduced physical, sensory or mental capabilities or lack of experience and knowledge if they have been given supervision or instruction concerning use of the appliance in a safe way and understand the hazards involved. Children shall not play with the appliance.
-
Page 18: Basic Troubleshooting Guide
BASIC TROUBLESHOOTING GUIDE PROBLEM 1: THE UNIT HAS NO POWER Check if the unit is switched ON. Check the fuse. Replace with the same type if fuse is blown. Check the power cord and make sure there are no disconnections. Verify that the unit is properly connected to the power source. -
Page 19: Soldering Tips
REPLACEMENT TIPS Note: The above items are sold separately. -
Page 20: Air Nozzles
22mm 22mm SERIES SERIES Replacement Air Nozzles MODEL# IC SIZE L(mm) W(mm) SGL SERIES MODEL# IC SIZE 1010 9×9mm L(mm) W(mm) A(mm) B(mm) 1131 4.4×10mm 10.3 1313 12×12mm 1616 15×15mm 1132 5.6×13mm 11.7 1919 18×18mm 1133 7.5×15mm 2828N 27×27mm 1134 7.5×18mm 3030N 29×29mm...
Need help?
Do you have a question about the 888A and is the answer not in the manual?
Questions and answers