Table of Contents
Advertisement
Repairing System
INSTRUCTION MANUAL
Thank you for purchasing model 2738 Repairing System.
Please read manual before using the unit.
Keep manual in an accessible place for future reference.
FEATURES:
●
Higher power and optimized temperature control of soldering iron for higher melting
point requirement of lead free solder.
●
Builtin powerful suction, drawing fumes at the source.
●
Better thermal conductivity transferring needed heat into the solder joint without
increasing process temperature.
●
Easy slip in and out soldering iron tip cartridge.
●
Combined with hot air gun, increasing functionality in just one machine.
2 7 3 8
Advertisement
Table of Contents

Related Manuals for aoyue 2738


Summary of Contents for aoyue 2738
- Page 1 2 7 3 8 Repairing System INSTRUCTION MANUAL Thank you for purchasing model 2738 Repairing System. Please read manual before using the unit. Keep manual in an accessible place for future reference. FEATURES: ● Higher power and optimized temperature control of soldering iron for higher melting point requirement of lead free solder. ● Builtin powerful suction, drawing fumes at the source. ● Better thermal conductivity transferring needed heat into the solder joint without increasing process temperature. ● Easy slip in and out soldering iron tip cartridge. ● Combined with hot air gun, increasing functionality in just one machine.
-
Page 2: Table Of Contents
TABLE OF CONTENTS Package Inclusion ………………………………….……….. 3 Safety Instructions ……………………………….………….. 3 Specifications …………………………………….………….. 4 Assembly and Preparation …………………………….……. 4 Operation Control Panel …………………………………….…….. 5 Hot Air Gun Soldering …………………………..…… .. 6 Soldering Iron …………………………………..………. 7 Smoke Absorber . ………………………….….……….. 8 Troubleshooting Guide ……………………………..……….. 9 2 ... -
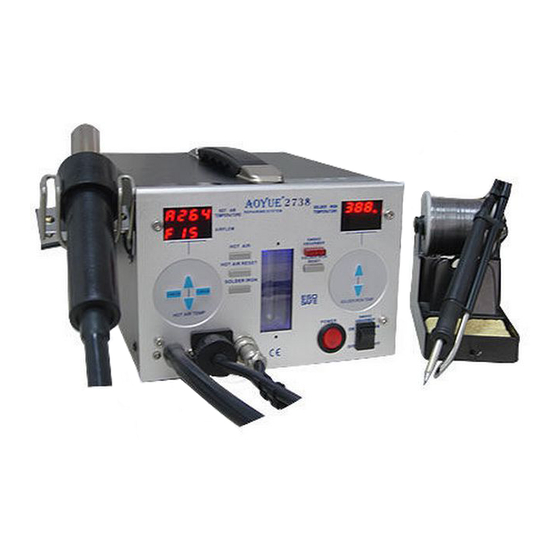
Page 3: Package Inclusion
PACKAGE INCLUSION Hot Air Gun 618 Versatile B011 Soldering Iron 2738 Repairing System Working Platform with Smoke Absorber (sold separately) Air Nozzles 939 Vacuum Power Cord (1124, 1130, 1197, Suction Pen 1010, 1313, 1818) 2630 Soldering Iron Stand with Solder Wire Holder 30181X Carbon G001 IC Popper Filters (2 pieces) LF2B Soldering Iron Tip with 30150J Heating Element Heat Resistant Pad SAFETY INSTRUCTIONS CAUTION When the power is ON, the temperature of the solder iron, hot air gun and the nozzle o ranges from 200 ~ 480 ... -
Page 4: Specifications
SPECIFICATIONS Power Input: 220V Station Dimensions: 188(w) x 126(h) x 250(d) mm Weight: 6 Kg SOLDERING IRON Power Consumption: 70W Output Voltage: 24V o Temperature Range: 200 480 C Heating Element with Tip: Ceramic Heater Tip to Ground Resistance: < 2 W Tip to Ground Potential: < 2 mV HOT AIR Power Consumption: 500W o Temperature Range: 200 480 C Heating Element: Metal Heating Core Nozzle to Ground Resistance: < 2 W Motor Type: Diaphragm Pump Air Capacity: 23 l / min (max) SMOKE ABSORBER Vacuum Pressure: ... -
Page 5: Control Panel
OPERATION CONTROL PANEL 1 — Hot air gun temperature display. The first character indicates the function mode. actual temperature temperature being set cooling down sleep (standby) and off mode 2 — Airflow. The first character indicates the function mode. actual airflow airflow being set 3 — Hot air gun airflow adjustment button 4 — Hot air gun temperature adjustment button 5 — Hot air gun connecting outlet 6 — Smoke absorber output 7 — Soldering iron 5pin output 8 — Airflow gauge 9 — Main power switch 10 — Smoke absorber switch 11 — Soldering iron temperature adjustment button 12 — Soldering iron heater lamp 13 — Soldering iron temperature (actual and set) 5 ... -
Page 6: Hot Air Gun Soldering
OPERATION I. HOT AIR GUN SOLDERING PROCEDURE A. Hot air gun airflow and temperature setting 1. Check whether all the function buttons are not pressed. Turn on the power switch. The digital display will indicate blank lines. When power switch is turned on and one of the display shows numbers, this means that the function is already turned on and is ready for use. HOT AIR 2. Press button to turn on the hot air soldering function. 3. Set the airflow level. Press button “3” from Control Panel Figure. Airflow range is from 15100. Be sure to set the airflow accordingly. Never set the airflow low especially when the temperature is high as this will not circulate the hot air and burn the ... -
Page 7: Soldering Iron
OPERATION II. SOLDERING IRON OPERATING PROCEDURE A. Changing the temperature setting 1. Turn on the power switch. SOLDER IRON 2. Press the button. Make sure that the soldering iron is attached properly to the 5pin output. When error signal beep is heard, press the reset button. The solder iron temperature display will show the solder iron’s current temperature, O this temperature will rise to 200 C. o o NOTE: Temperature can be set from 200 480 C. An increment/decrement of 2 C will be set whenever the temperature adjusting button is pressed. Press button steadily for large difference in desired temperature. ... - Page 8 OPERATION C. Replacing the tip 1. Always turn the power OFF when removing or inserting a tip. 2. When the tip is hot, hold it with the heat resistant pad and pull it out. 3. Insert the new tip fully into the handle. If the tip is not fully inserted, the display will show a sensor error when power is turned on. III. Smoke Absorber Operation 1. Wait until the soldering iron reaches the set temperature and stabilizes. 2. Turn on the smoke absorber switch. When the smoke absorber is on while working with the soldering iron, the dirty fumes created will be absorbed simultaneously. The fumes will pass through a filter and release clean air through the hot air gun. Note: The filter must be cleaned or replaced regularly so that dirt won’t clutter. Filter pad Hot air gun and smoke absorbing function cannot be used at the same time.
-
Page 9: Troubleshooting Guide
TROUBLESHOOTING GUIDE Before checking the inside part of the station or replacing parts, be sure to disconnect the power plug. Failure to do so may result in electric shock. ● The unit does not operate when the CHECK: Is the power cord and/or the power switch is turned on. connection plug disconnected? ACTION: Connect it. CHECK: Is the fuse blown? ACTION: Investigate why the fuse blew and then replace the fuse. If the cause can not be determined, replace the fuse. If the fuse blows again, send the unit for repair. CHECK: Is the power cord and/or the ● ... - Page 10 TROUBLESHOOTING GUIDE ● The solder flux does not stick to the CHECK: Is the soldering iron’s temperature very high and a black layer of soldering iron. oxide present? ACTION: Decrease temperature to o 200 C, remove the black layer of oxide using a cleaning sponge. Reapply a new layer of solder flux and adjust temperature to desired degree. Note: To prevent oxidation and lengthen usage life span, always maintain a layer of ...
- Page 11 SOLDERING IRON TIPS WITH HEATING ELEMENT Sold Separately 11 ...
- Page 12 AIR NOZZLES Sold Separately Manufacturer: AOYUE TONGYI ELECTRONIC EQUIPMENT FACTORY Jishui Industrial Zone, Nantou, Zhongshan City, Guangdong Province, P.R.China http://www.aoyue.com 12 ...
Need help?
Do you have a question about the 2738 and is the answer not in the manual?
Questions and answers