Table of Contents
Advertisement
Advertisement
Table of Contents

Related Manuals for Genexis DRG700


Summary of Contents for Genexis DRG700
- Page 1 DRG700 UIDE...
- Page 2 DOC-DRG700-WIFI-USER. Printed March 18, 2010 Copyright © 2010 Packetfront Systems AB. All Rights Reserved. All trademarks and trade names are the properties of their respective owners. Page 2 of 35...
-
Page 3: Table Of Contents
OTTOM ANEL REQUIREMENTS ............................. 11 INSTALLING THE DRG700 ........................11 CONNECT YOUR PC TO THE DRG700 USING A NETWORK CABLE ..........12 CONNECT TO THE DRG700 USING WIFI ................... 13 OVERVIEW ..............................16 START THE CONFIGURATION PROGRAM ..................16 USING THE DRG700 CONFIGURATION PROGRAM ................. 18 INFO TAB .............................. - Page 4 .................................. 26 YSTEM ASSWORD ..................................27 YSTEM EBOOT NETWORK ..............................28 WAN C ................................. 28 ONFIGURATION LAN C ................................30 ONFIGURATION ..............................31 IRELESS ONFIGURATION Wireless Security ................................. 33 DHCP I ................................34 NTERFACES Page 4 of 35...
-
Page 5: Drg600 Wifi Features
Introduction This Chapter provides an overview of the DRG700 features and capabilities. Congratulations on the purchase of your new DRG700 router. The DRG700- is a multi-function digital residential gateway device that provides the following services: • for 100BaseT or 1000BaseT connections. -
Page 6: Wireless Features
• Dynamic Host Configuration Protocol provides a dynamic IP address to PCs and other DHCP Server Support. devices upon request. The DRG700 can act as a DHCP Server for devices on your local LAN and WLAN. Configuration & Management •... -
Page 7: Package Contents
DRG700 User Guide Introduction Package Contents The following items are included in your DRG700 package: • DRG700 Unit • Power Supply Unit (PSU) • Quick Guide leaflet • CD-ROM containing this online manual If any of the above items are damaged or missing, please contact your vendor immediately. -
Page 8: Physical Details
WAN uplink is working and connected at 100Mbps. If flashing, the WAN uplink is active, OFF- TV not active. GREEN TV transmission is enabled. When the DRG700 is operating correctly, this LED is constantly lit. RED. TV transmission error. If this LED is lit, then it means that there is an irreparable operating error. - Page 9 GREEN Telephone Line 2 is enabled and connected to server. If flashing, the module is still connecting to the network server. When the DRG700 is operating correctly, it is constantly lit. GREEN WLAN connection is enabled and at least one client is associated with the DRG access point.
-
Page 10: Bottom Panel
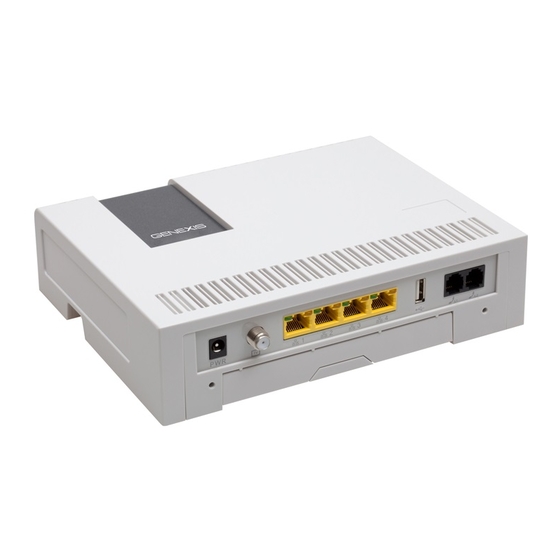
Introduction Bottom Panel Figure 3. Bottom Panel Power connector socket. ONLY use the power supply unit shipped with the DRG700 unit. (Optional) Connecter for RF coaxial cable for analog TV devices. LAN 1-4 Local Area Network (LAN) device ports – each port has an orange and green LED. -
Page 11: Requirements
4. Slide the DRG700 upwards until the optical connectors connect and press downwards gently so the DRG700 sits firmly on the FTU. 5. Connect the PSU to the PWR socket on the bottom panel of the DRG700. The PWR LED on the top panel will blink first GREEN, then RED, while the DRG is booting. -
Page 12: Connect Your Pc To The Drg700 Using A Network Cable
For DRGs without WIFI, use a standard Twisted Pair (TP) network cable to connect your PC LAN port to one of the LAN ports on the bottom of the DRG700. The LED indicators will start blinking showing that the port is active. -
Page 13: Connect To The Drg700 Using Wifi
Connect to the DRG700 using WIFI For DRG700 models with WIFI functionality, you can create a wireless connection using the SSID and the WPA2 security key supplied with the device. To create the wireless connection for a PC using Windows 7, do the following: 1. - Page 14 3. Right click on the tool to display all available networks and select the wireless network with your SSID to open the Connect to Network window. 4. Enter the WPA2 security key provided with your DRG and click OK. The DRG700 will validate the keyword and Windows 7 will wait for the connection to be validated Page 14 of 35...
- Page 15 If you are not running Windows 7, please consult your operating system manuals on how to connect to a WPA2 AES protected wireless network. If your PC does not support WPA2-AES encryption, you can also change the encryption method used by the DRG700 to suit your device. See next chapter for details. Page 15 of 35...
-
Page 16: Overview
This Chapter provides details.on how to setup your network with the DRG700. Overview Now that your DRG700 is installed and connected to your PC, you will need to setup your devices. This chapter describes the setup procedure for: • Internet Access •... - Page 17 2. Login using with the User Name admin and the Password admin. The DRG700 configuration program now starts by displaying the system information.. Page 17 of 35...
-
Page 18: Using The Drg700 Configuration Program
The main window for the GUI uses tabs and buttons to navigate between different screens of the configuration program. The tabs are located at the top of the screen and will take you to related functions of the DRG700 that you can configure. The different tabs are: •... -
Page 19: Info Tab
Info tab The Info tab only has one page; the Status page. Device information and Software information is displayed. This data is generated and cannot be changed here. Page 19 of 35... -
Page 20: Status
• Interfaces • DHCP clients • Netstat • Diagnostics Status Interfaces Interfaces are the physical connections to the DRG700. Statistics for the DRG700 interfaces are displayed here. Field Description Displays real time information for the uplink interface to the broadband network. -
Page 21: Status Dhcp Clients
Status DHCP clients DHCP clients are the devices connected to your home network. This page allows you to see which devices are using the DRG700 at any given point in time, as well as how long they have been connected. -
Page 22: Status Netstats
Status Netstats The network statistics shown here shows statistics for traffic over the network at any given moment. Field Description Ethernet/Wireless Physical Connections Routing Table Router Listening Ports Connections to the Router Page 22 of 35... -
Page 23: Status Diagnostics
The ping tool is a network utility used to test whether a particular website is reachable across the Internet Protocol (IP) network. It also measures the round-trip time for packets sent from the DRG700 to a specified destination. Use this to verify that the DRG700 has internet access. FIXME: example of successful/unsuccessful ping requests... - Page 24 Page 24 of 35...
-
Page 25: System Tab
This is the hostname used by the router to identify it when communicating with other routers. Enter a new hostname using alphanumeric characters (A-Z, 0-9), blank spaces are not allowed. To save the new host name for the DRG700, click Save Changes. Page 25 of 35... -
Page 26: System Password
System Password The default password is admin for all DRG700 devices. You should change this to prevent unauthorized use of the configuration program. From this page, you can change the password used to logon to the web server. Field Description... -
Page 27: System Reboot
System Reboot Selecting Reboot will restart the DRG700 and reload the software with any modifications that you have made. First, you will have to confirm that you really want to reboot. Click the button to confirm the reboot. The DRG700 will now restart. -
Page 28: Network
If "Disabled", the Internet IP Address from your ISP is Fixed or Static. Connection Type This is the method used to assign the IP address for the DRG700. In most cases, it will be DHCP. Interface The WAN interface is always eth0 Page 28 of 35... -
Page 29: Lan Configuration
The default value 255.255.255.0 is standard for small (class "C") networks. For other networks, use the Network Mask for the LAN segment to which the DRG700 is attached. i.e. the same value as the PCs on that LAN segment. Page 30 of 35... -
Page 30: Wireless Configuration
Wireless Configuration The wireless configuration page allows you to configure the parameters for the wireless network. For example, you may wish to change the default SSID and password. Field Description Radio By default ON, this broadcast Country Select your country from the drop-down list. This field displays the country of operation for which the wireless interface is intended. - Page 31 Mixed 802.11b and 802.11g – Excludes 802.11n devices from the wireless network. Mixed 802.11g and 802.11n – Excludes 802.11b devices from the wireless network. Channel This field determines which operating frequency will be used. It should not be necessary to change the wireless channel unless you notice interference problems with another nearby access point.
-
Page 32: Wireless Security
Wireless Security There are four options for Wireless security: • Disabled - no data encryption is used. It is strongly recommended that this mode is not used. All WLAN data will be visible to anyone with range of the WLAN. •... -
Page 33: Dhcp Interfaces
DHCP Interfaces Press Modify to edit the DHCP settings for an interface. Page 34 of 35... - Page 34 This equipment has been tested and found to comply with the limits for a Class B digital device, pursuant to part 15 of the FCC rules. These limits are designed to provide reasonable protection against harmful interference in a residential installation. This equipment generates, uses and can radiate radio frequency energy and, if not installed and used in accordance with the instructions, may cause harmful interference to radio communications.
Need help?
Do you have a question about the DRG700 and is the answer not in the manual?
Questions and answers