Table of Contents
Advertisement
Quick Links
Advertisement
Table of Contents

Related Manuals for signia Motion 13 BT primax


Summary of Contents for signia Motion 13 BT primax
- Page 1 Motion 13 BT primax User Guide...
-
Page 2: Table Of Contents
Content Welcome Your hearing instruments Instrument type Getting to know your hearing instruments Components and names Controls Settings Batteries Battery size and handling tips Replacing batteries Daily use Turning on and off Inserting and removing the hearing instruments 14 Adjusting the volume Changing the hearing program ... - Page 3 Maintenance and care Hearing instruments Ear pieces and tubes Professional maintenance Further information Safety information Accessories Symbols used in this document Troubleshooting Country-specific information Service and warranty ...
-
Page 4: Welcome
Welcome Thank you for choosing our hearing instruments to accompany you through everyday life. Like anything new, it may take you a little time to become familiar with them. This guide, along with support from your Hearing Care Professional, will help you understand the advantages and greater quality of life your hearing instruments offer. -
Page 5: Your Hearing Instruments
Your hearing instruments This user guide describes optional features that your hearing instruments may or may not have. Ask your Hearing Care Professional to indicate the features that are valid for your hearing instruments. Instrument type Your hearing instruments are BTE (Behind-The-Ear) models. A tube delivers the sound from the hearing instrument into the ear. -
Page 6: Getting To Know Your Hearing Instruments
Getting to know your hearing instruments It is recommended to familiarize yourself with your new hearing instruments. With the instruments in your hand try using the controls and note their location on the instrument. This will make it easier for you to feel and press the controls while wearing the hearing instruments. If you have problems pressing the controls of your hearing instruments while wearing them, you can use a remote control to control your instruments. -
Page 7: Components And Names
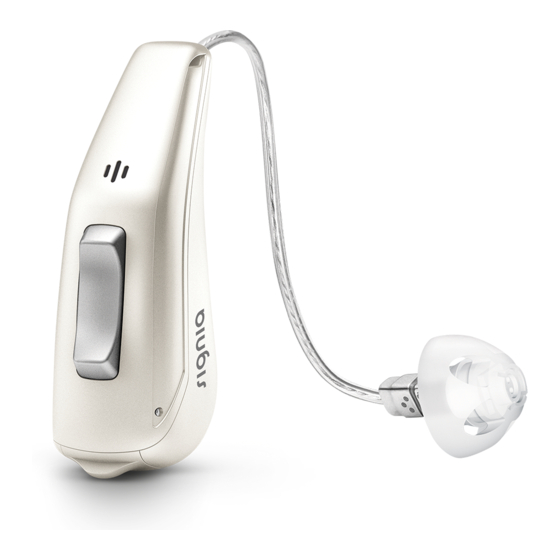
C omponents and names Your hearing instruments are either attached to an earhook and a custom-made ear piece or to a standard tube (ThinTube) and a standard ear piece (LifeTip). ➏ ➊ ➎ Ear piece (LifeTip) Earhook ➋ ➏ Retention strand Microphone openings (optional) ➐... - Page 8 You can use standard ear pieces together with a standard tube or custom-made ear pieces together with an earhook and tube. You can easily exchange the standard ear pieces and clean the standard tube. Read more in section "Maintenance and care". Standard ear pieces / tubes Size LifeTip open or closed...
-
Page 9: Controls
Controls With the rocker switch you can, for example, adjust the volume or switch hearing programs. Your Hearing Care Professional has programmed your desired functions to the rocker switch. Rocker switch function Press briefly: Program up/down Volume up/down Tinnitus therapy signal level up/down Press for about 2 seconds: Program up/down Volume up/down... -
Page 10: Settings
Settings Hearing programs Read more in section "Changing the hearing program". Features Power-on delay enables whistle-free insertion of hearing instruments. Read more in section "Turning on and off". The tinnitus therapy feature generates a sound to distract you from your tinnitus. -
Page 11: Batteries
Batteries When the battery is low the sound becomes weaker or you will hear an alert signal. The battery type will determine how long you have to replace the battery. Battery size and handling tips Ask your Hearing Care Professional for recommended batteries. Battery size: ●... -
Page 12: Replacing Batteries
Replacing batteries Removing the battery: Open the battery compartment. Use the magnet stick to pull out the battery. The magnet stick is available as an accessory. Inserting the battery: If the battery has a protective film, remove it only when you are ready to use the battery. Insert the battery with the "+"... -
Page 13: Daily Use
Daily use Turning on and off You have the following options to turn your hearing instruments on or off. Via battery compartment: Turning on: Close the battery compartment. The default volume and hearing program are set. Turning off: Open the battery compartment to the first catch. -
Page 14: Inserting And Removing The Hearing Instruments
Inserting and removing the hearing instruments Your hearing instruments have been fine-tuned for your right and left ear. Colored markers indicate the side: ● red marker = right ear ● blue marker = left ear Inserting a hearing instrument: Hold the tube close to the ear piece. Carefully push the ear piece ➊... - Page 15 ● It may be helpful to insert the right hearing instrument with the right hand and the left hearing instrument with the left hand. ● If you have problems inserting the ear piece, use the other hand to gently pull your earlobe downwards.
- Page 16 Removing a hearing instrument: Lift the hearing instrument and slide it over the top of ➊ your ear Hold the tube close to the ear piece and pull the ➋ ear piece out carefully CAUTION Risk of injury! In very rare cases the ear piece could remain in your ear when removing the hearing instrument.
-
Page 17: Adjusting The Volume
Adjusting the volume Your hearing instruments automatically adjust the volume to the listening situation. If you prefer manual volume adjustment, press the rocker switch. Refer to section "Controls" for the setting of the rocker switch. An optional signal tone can indicate the volume change. Once the maximum or minimum volume has been reached, you may hear an optional signal tone. -
Page 18: Further Adjustments (Optional)
Further adjustments (optional) You can also use the hearing instrument controls to change other features, for example, the level of the tinnitus therapy signal. Refer to section "Controls" for the setting of your controls. -
Page 19: Special Listening Situations
S pecial listening situations On the phone When you are on the phone, hold the telephone receiver slightly above your ear. The hearing instrument and telephone receiver have to be aligned. Turn the receiver slightly so that the ear is not completely covered. Telephone program You may prefer a certain volume when using the phone. -
Page 20: Audio Streaming And Control With Iphone
Audio streaming and control with iPhone Your hearing instruments are Made for iPhone hearing instruments. This means you can get phone calls and listen to music from your iPhone directly into your hearing instruments. And you can control your hearing instruments with the myControl App. For more information about compatible iOS devices, pairing, audio streaming and other useful functions, contact your Hearing Care Professional. -
Page 21: Maintenance And Care
Maintenance and care To prevent damage it is important that you take care of your hearing instruments and follow a few basic rules, which will soon become a part of your daily routine. H earing instruments D rying and storage Dry your hearing instruments overnight. Ask your Hearing Care Professional for recommended drying products. -
Page 22: Ear Pieces And Tubes
Ask your Hearing Care Professional for recommended cleaning products, special care sets, or more information on how to keep your hearing instruments in good condition. Ear pieces and tubes Cerumen (ear wax) may accumulate on the ear pieces. This may affect sound quality. ●... - Page 23 C leaning ear pieces Clean the ear piece upon removal with a soft and dry tissue. This prevents cerumen becoming dry and hardening. Never use running water or immerse the ear piece in water.
- Page 24 C leaning standard tubes Never use running water or immerse the tube in water. You can clean standard tubes (ThinTube) using a special cleaning wire. Ask your Hearing Care Professional for suitable cleaning wires. Remove tube and adapter by unscrewing the adapter from the hearing instrument.
- Page 25 E xchanging standard ear pieces (LifeTip) Pull off the used ear piece and plug on the new ear piece. E xchanging standard tubes and adapters ➊ Unscrew the used tube from the adapter ➋ If necessary, unscrew the used adapter ➊ ➋ Screw on the new adapter and tube.
-
Page 26: Professional Maintenance
Professional maintenance Your Hearing Care Professional can perform a thorough professional cleaning and maintenance. Custom-made ear pieces and wax filters should be exchanged as needed by your Hearing Care Professional. Ask your Hearing Care Professional for your individual recommendation of maintenance intervals and for support. -
Page 27: Further Information
Further information Safety information For more safety information, refer to the safety manual supplied with the device. Accessories You can use the myControl App for convenient remote control of your hearing instruments. The app also allows you to deactivate signal tones, to create individual sound profiles and many more functions. -
Page 28: Symbols Used In This Document
S ymbols used in this document Points out a situation that could lead to serious, moderate, or minor injuries. Indicates possible property damage. Advice and tips on how to handle your device better. "Made for iPhone" means that an electronic accessory has been designed to connect specifically to iPhone and has been certified by the developer to meet Apple performance standards. -
Page 29: Troubleshooting
Troubleshooting Problem and possible solutions Sound is weak. ● Increase the volume. ● Replace the empty battery. ● Clean or exchange the tube and the ear piece. Hearing instrument emits whistling sounds. ● Reinsert the ear piece until it fits securely. ● Decrease the volume. ●... -
Page 30: Country-Specific Information
Country-specific information USA and Canada These hearing instruments with wireless functionality are certified under: ● USA FCC ID: SGI-BTE001 ● Canada: 267AB-BTE001... -
Page 31: Service And Warranty
Service and warranty Serial numbers Left: Right: Service dates Warranty Date of purchase: Warranty period in months: Your Hearing Care Professional... - Page 32 Legal Manufacturer Signia GmbH Henri-Dunant-Strasse 100 91058 Erlangen Germany Phone +49 9131 308 0 Manufactured by Signia GmbH under Trademark License of Siemens AG. Document No. 03268-99T01-7600 EN Order/Item No. 109 491 80 0123 Master Rev01, 05.2017 © Signia GmbH, 06.2017...
Need help?
Do you have a question about the Motion 13 BT primax and is the answer not in the manual?
Questions and answers