Lutron Electronics Sivoia QED Installation Instructions Manual
Dual mount roller shade
Hide thumbs
Also See for Sivoia QED:
- Technical reference manual (81 pages) ,
- Wiring and programming manual (62 pages) ,
- Installation and operating instructions manual (19 pages)

Related Manuals for Lutron Electronics Sivoia QED


Summary of Contents for Lutron Electronics Sivoia QED
- Page 1 Sivoia QED Installation Instructions Dual Mount Roller Shade Note: If installing a coupled system, use In-Line Coupled Roller Shade Addendum as the primary installation guide.
-
Page 2: Installation Instructions
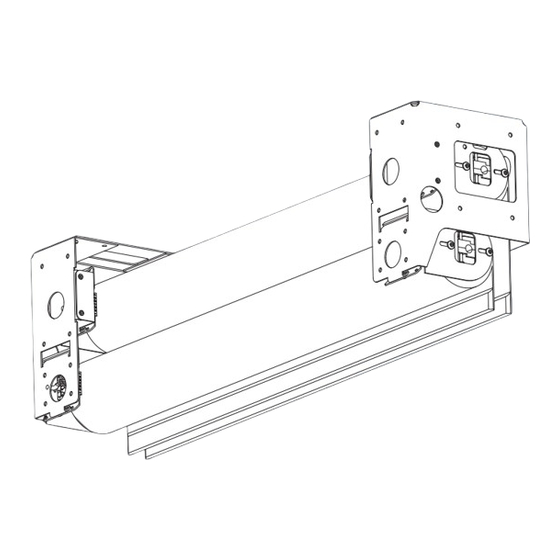
1) For In-Line Coupled Shade Systems, begin with Sivoia QED In-Line Coupled Roller Shade Addendum, P/N 045-048. The Addendum will indicate when to use this document. 2) Complete wiring and programming information can be found in the Sivoia QED Wire and Programming Guide, P/N 045-038 or at www.lutron.com. - Page 3 Orient sub-bracket for installation as shown to right. The shade and sub-brackets mount to the inside surface of the dual that is OPPOSITE the glass. The fabric drop should be closest to the glass. glass SIVOIA QED Dual Mount Installation Instructions...
- Page 4 1 1/2" - 2 1/2" (38-64mm) from end of the system. Drill for second cable 6 1/2" - 7 1/2" (165-191mm) from top and 1 1/2" - 2 1/2" (38-64mm) from end of system. SIVOIA QED Dual Mount Installation Instructions...
- Page 5 The sub-brackets for each shade tube should be mounted to support a weight of at least 300 pounds (136kg). The fasteners provided with the sub-brackets may not be appropriate for use in all applications. SIVOIA QED Dual Mount Installation Instructions...
- Page 6 Wire the 7-pin terminal block (provided) to the cable. Note: SVQ-CBL-250 shown Repeat for each cable. EGND (Yellow/Green) 24 VAC (Red) 24 VAC (Red/White) To EDU MUX (Purple) Connector MUX (Gray) +12 VDC (Blue) Common (Yellow) SIVOIA QED Dual Mount Installation Instructions...
- Page 7 Note: Ensure cable is kept outside the shade bracket. Route cable wires from wall, ceiling or jamb between the shade bracket and sub-bracket being careful not to pinch wire. SIVOIA QED Dual Mount Installation Instructions...
- Page 8 Screws should be tightened down all the way. retaining screw WARNING: After installing retaining screws, gently push up and pull down on the roller shade to ensure a secure installation. SIVOIA QED Dual Mount Installation Instructions...
- Page 9 Adjust shade projection from window so that it clears any window trim or hardware when operating. Confirm roller tube turns freely without rubbing on anything. SIVOIA QED Dual Mount Installation Instructions...
- Page 10 Ensure terminal blocks are oriented as shown. 7” (178mm) cable tie Secure terminal blocks with 7” (178mm) cable tie. Use 4” (102mm) Cable Ties to dress wires to prevent them from rubbing against shade fabric. SIVOIA QED Dual Mount Installation Instructions...
- Page 11 (bottom) shade. The second shade will block access to the EDU on the first shade. Repeat steps 5 through 8 to hang second (bottom) shade. Note: Remove protective wrapping from first shade before installing the second (bottom) shade glass SIVOIA QED Dual Mount Installation Instructions...
- Page 12 (SV-IR). ceiling 10.2 Position the IR eye where it is not covered from view of remote control. 10.3 Ensure IR connector does not rub on either shade. EDU IR connector SV-IR connector SIVOIA QED Dual Mount Installation Instructions...
- Page 13 EDU is in “Set Open Limit Mode”. Steady LED 11.2 Adjust the position of the EDU to the desired Open Limit using the adjustment buttons ( Use the Adjustment buttons to move the EDU position. SIVOIA QED Dual Mount Installation Instructions...
- Page 14 Close Limit Button. 11.4 Press and release the “Close Limit Button” ( the LED on the roller Shade EDU will turn on steady, indicating that the EDU is in “Set Close Limit Mode”. Steady LED SIVOIA QED Dual Mount Installation Instructions...
- Page 15 ) for 5 sec- onds, the LED on the roller shade EDU will flash for 2 seconds, then go dark, indicating that the current position has been stored as Flashing LED the Close Limit. SIVOIA QED Dual Mount Installation Instructions...
- Page 16 Finish System Programming The Sivoia QED shade is now installed, wired, and the OPEN/CLOSE limits for each shade have been set. The next step is to finish programming the system. Use the instructions in the Wiring and Programming Guide (p/n 045-038) or the Technical Reference Guide (p/n 367-592) and perform these four easy steps: 1.
-
Page 17: Troubleshooting
...Out of range - move to within 40 feet (12m) of IR receiver..EDUs not assigned to IR receiver..IR receiver not plugged into any EDU within range..Batteries are not providing power, replace them. SIVOIA QED Dual Mount Installation Instructions... -
Page 18: Technical Assistance
& SERVICES Fax: +86-21-6288-1751 USA +1-610-282-3800 – Lutron, the Sunburst logo, and Sivoia are Singapore 24 hours/7 days registered trademarks, and Sivoia QED and Tel: +65-6220-4666 UK +44-(0)20-7702-0657 “Lutron controls your light” are trademarks of Fax: +65-6220-4333 09.00 - 18.00 GMT Lutron Electronics Co., Inc.
Need help?
Do you have a question about the Sivoia QED and is the answer not in the manual?
Questions and answers