Table of Contents
Advertisement
Advertisement
Table of Contents

Subscribe to Our Youtube Channel
Related Manuals for Sper scientific 800025


Summary of Contents for Sper scientific 800025
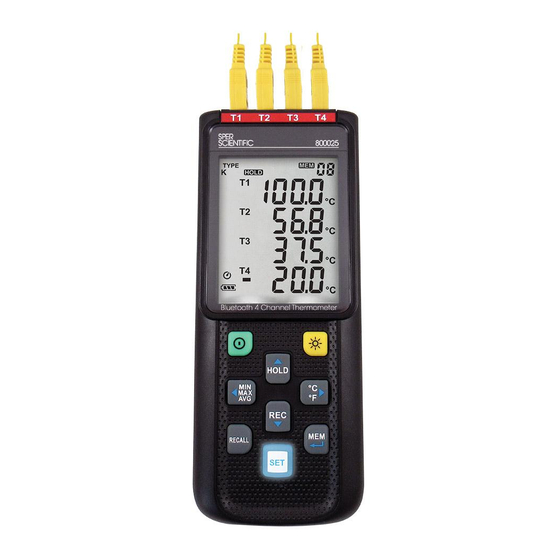
- Page 1 Bluetooth® 4 Channel Datalogging Thermometer 800025 Instruction Manual...
-
Page 2: Table Of Contents
TABLE OF CONTENTS INTRODUCTION ..............3 BLUETOOTH® ADAPTOR INFORMATION ..... 3 FEATURES ................4 MATERIALS SUPPLIED ............ 4 FRONT PANEL DESCRIPTION ......... 5 LCD DISPLAY ..............6 SET UP ................7 BLUETOOTH® ADAPTER INSTALLATION ....12 MEASUREMENT PROCEDURES ........13 DOWNLOAD THE APP ............ -
Page 3: Introduction
Bluetooth® connectivity. This can be done on a computer using free software or via the Sper Scientific phone app. The meter has the versatility to connect via Bluetooth® or the included USB interface. Real-time data can be logged in the field or with the meter... -
Page 4: Features
FEATURES • Four-channel simultaneous display • Customizable High/Low Alarm (Channel 1) • Maximum/minimum/average values • Offset to compensate for probe errors • T1 – T2 Δ delta mode • 32,000 data points stored per channel • Direct upload of data to EXCEL, text, or graph files. •... -
Page 5: Front Panel Description
FRONT PANEL DESCRIPTION Thermocouple Input Recall Button LCD Display 10. Enter / Setup Button Power Button 11. Memory Button Backlight Button 12. USB Interface/ Power Supply Maximum/Minimum/ 13. Bluetooth® Adapter Average Button Data Hold Button 14. Bluetooth® Compartment Temperature Unit 15. - Page 6 Low-Battery Icon Minimum Reading Maximum Reading Average Reading Setup Mode Automatic Shutoff Indicator Recording In Process Memory Full Indicator FULL Save Reading In Memory Recall stored reading RECALL Thermocouple type TYPE KJET Temperature reading -8888 Temperature channel T1 T2 T3 T4 Δ...
-
Page 7: Lcd Display
LCD DISPLAY SETUP Note… Install the Bluetooth® adapter as described on page12. Meter On and Off 1. Press POWER to turn the meter on. 2. Press and hold POWER for 3 seconds to turn the meter off. Setup Mode 1. Press POWER to turn the meter on. 2. - Page 8 Thermocouple Type 1. “Type” appears on the display along with the thermocouple type. Press ▲or ▼ to cycle through K, J, E and T types. Note… The n, r, and s probe types will appear on the right side of the screen.
- Page 9 Offset Values Thermometer readings can be adjusted to compensate for probe errors. The offset range is ± 5 °C or ± 9 °F. 1. “T1” through “T4” appear on the display. Press ◄ or ► to cycle through the thermocouple channels. 2.
- Page 10 3. The first digit of the high alarm threshold flashes. Press ▲or ▼ to increase or decrease the value. 4. Press ► to select the next digit. 5. Press ▲or ▼ to increase or decrease the value. 6. Repeat steps 4-5 to set both the high and low alarm threshold values.
- Page 11 Date and Time 1. The date and time display and the year flashes. Press ▲or ▼ to set the year. 2. Press ► to select the month. Press ◄ if needed to return to a previous selection. 3. Press ▲or ▼ to set the month. 4.
-
Page 12: Bluetooth® Adapter Installation
BLUETOOTH® ADAPTER INSTALLATION 1. Lift the tilt stand to expose the single screw located behind the stand. 2. Remove the screw and plastic cover. 3. Place the Bluetooth® adapter into the housing with the label facing up. 4. Slide the adapter up to connect the pins of the adapter with the pins of the meter. -
Page 13: Measurement Procedures
MEASUREMENT PROCEDURES 1. Insert the thermocouple(s) into the appropriate port(s). 2. Press POWER to turn the meter on. Backlight 1. Press the backlight button to illuminate the LCD screen. 2. The backlight will shut off automatically after 30 seconds, or press the backlight button to turn it off sooner. Select Temperature Units Press °C °F to toggle between Celsius and Fahrenheit temperature units. - Page 14 Maximum/Minimum/Average Mode Note… Viewing the maximum, minimum and average values will not interrupt temperature measurement. The maximum, minimum and average values will continue to be updated. 1. Press MIN/MAX/AVG to enter Maximum/Minimum Mode and record maximum, minimum and average values. “MAX”...
-
Page 15: Memory Function
Clearing the Recorded Data 1. Press and hold POWER for 3 seconds to turn the meter off. 2. Press and hold REC. 3. While continuing to hold REC, press and hold POWER to turn the meter on. 4. Continue to hold REC and POWER. The meter displays “REC,”... -
Page 16: Download The App
6. To exit the process without clearing the memory, release the MEM button before “SUrE 0” displays. DOWNLOAD THE APP AND CONNECT TO YOUR METER 1. Find and download the Sper Scientific App in the Apple, or Google Play, store. Search for Sper Scientific or Bluetooth®... - Page 17 5. Open the application on the phone. If the meter is not yet paired, the application will automatically search for a meter. See image to the right. 6. Once the meter is paired, you will see real- time readings, graphs, and download data from the meter by simply clicking the icons for each of these features.
-
Page 18: Software Installation
5. Select the location for the program shortcuts and click Next. 6. Click Next to begin the configuration. 7. Click Finish. 800025 software is now installed along with a help file Uninstalling the Software If you wish to remove software from your computer, use one of the following methods. -
Page 19: Processing Data With Pc Software
7. Click Next. 8. Click Finish. 1. Click on the Start Menu. 2. Select Control Panel. 3. Select Programs and Features. 4. Double-click on 800025. 5. The Installation Dialog Box appears. Select Uninstall and click Next. 6. Click Next. 7. Click Finish. - Page 20 3. Insert the thermocouple(s) into the appropriate port(s) 4. Open the 800025 software. An image of the meter displays along with a graph. 5. Connect the software to the meter by clicking the Bluetooth® icon (see the image, below). Please note that the meter’s Bluetooth®...
- Page 21 10. Enter the sampling rate. 11. Enter the recording period. 12. Click Start to begin recording and graphing. 13. Click to end recording. Tool Bar Options Connect to Bluetooth® Disconnect from Bluetooth® Hide or display the statistics above the graph (Statistic 1.) Hide or display the statistics below the graph (Statistic 2.)
- Page 22 - Separate the four channels. - Combine the four channels. Viewing the Graph • To zoom in: Press the left mouse button and drag the cursor to select the new area. • To zoom out: Click Undo Zoom. Customizing the Graph 1.
- Page 23 2. Click File and select Save, or simply click the disc icon. 3. Enter the file name and file type extension: File Type Extension Graph file. This file type can only be used *.ghf in 800025. Text file *.txt EXCEL format file *.csv 4. Click Save.
- Page 24 Printing the Graph 1. Click File and select Print, or simply click the printer icon. 2. Select the destination printer and click OK. Downloading Recorded Data Select Data Logger from the main menu bar or click (the datalogger icon) under the main menu. An indicator shows the loading progress.
-
Page 25: Power Supply
• The left side of the screen will display the number of data sets with detail information for each set. • The first data set will appear in the graph on the right side. • Click any data set to graph that set. POWER SUPPLY Battery Power This meter uses four AAA batteries. -
Page 26: Care And Maintenance
• Do not use abrasives, solvents or cleaning agents containing carbon, alcohol or benzenes on the meter. • Repairs or services not covered in this manual should be performed by qualified personnel only. Please contact Sper Scientific to speak with a technician. -
Page 27: Specifications
SPECIFICATIONS Range Resolution Accuracy (excluding probe error) Temperature -200 to 1372°C 0.1°C < 600°C ±(0.1% of reading + 0.7°C) -328 to 2501°F 1°C ≥ 600°C ±(0.1% of -200 to 1000°C reading + 1.3°F) -328 to 1832°F 0.1°F < 1000°F Below -100°C (-148°F) -200 to 750°C 1°F ≥... -
Page 28: Warranty
WARRANTY Sper Scientific warrants this product against defects in materials and workmanship for a period of five (5) year from the date of purchase, and agrees to repair or replace any defective unit without charge. If your model has since been discontinued, an equivalent Sper Scientific product will be substituted if available.
Need help?
Do you have a question about the 800025 and is the answer not in the manual?
Questions and answers