Table of Contents
Advertisement
Available languages
Available languages
Quick Links
Advertisement
Table of Contents

Related Manuals for Polytron HDM 4 C


Summary of Contents for Polytron HDM 4 C
- Page 1 HDMI Modulator DVB-C / IP HDM 4 C Bedienungsanleitung User manual 0901664 V4...
-
Page 2: Montage- Und Sicherheitshinweise
Montage- und Sicherheitshinweise Vor Arbeiten am Modulator bitte unbedingt folgende Sicherheitsbestimmungen sorgfältig lesen! - Page 3 Inhaltsverzeichnis Montage- und Sicherheitshinweise Inhaltsverzeichnis Beschreibung Bedienelemente Anschlüsse Handprogrammierung am Gerät Programmierung über Webbrowser (NMS) Technische Daten Beschreibung Modulator zur Umsetzung von bis zu 4 HDMI-Signalen und einem ASI-Transportstrom in einen DVB-C (QAM) Kanal. Die Signale stehen auch als IP-Stream zur Verfügung und können in IPTV- Netzwerke eingespeist werden.
-
Page 4: Bedienelemente
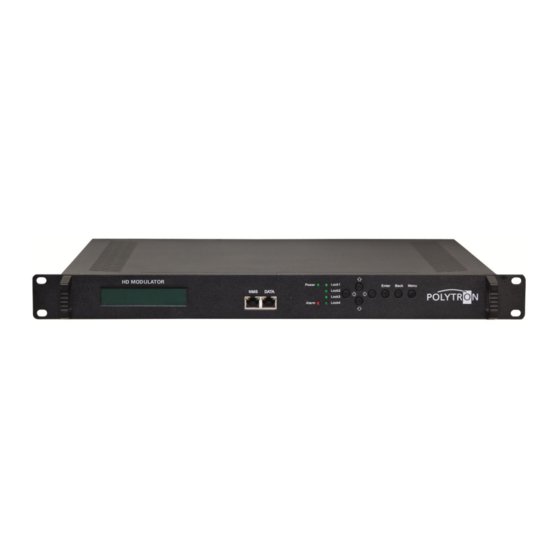
Bedienelemente Taste nach oben im Menü Taste nach unten im Menü Taste nach links im Menü Taste nach rechts im Menü Taste Enter (Auswahl bestätigen) Taste Back (im Menü einen Schritt zurück) Taste Menu (um in das Menü zu kommen und es zu verlassen) Anzeige Betriebsspannung Anzeige Alarm, wenn kein Signal anliegt 10 Anzeige ob ein HDMI Signal anliegt... -
Page 5: Handprogrammierung Am Gerät
Handprogrammierung am Gerät LCD Anzeige nach dem Einschalten: DVB-C 750.00MHz Start up… Start ok… 0.000 Mbps 0.0M 1. Zeigt die Modulation des Ausgangssignals. 2. Zeigt die Ausgangsfrequenz. 3. Zeigt die Datenrate des Ausgangssignals. 4. Ohne Bedeutung Übersicht Hauptmenü: Das Hauptmenü erscheint nach drücken der Taste „Menu“. Mit den Pfeiltasten erfolgt die Steuerung durch das Menü. - Page 6 2. Input Settings / Eingangs Einstellungen Die 4 Eingänge sind wie folgt anzuwählen: 2. 1 Input 1 : 2.1.1 Program 1 2.1.2 Program 2 2. 2 Input 2 : 2.2.1 Program 3 2.2.2 Program 4 Video Format: Mpeg2 oder H.264 / Standard: H.264 Low delay: Normal, Mode 1, Mode 2 / Standard: Normal Video Bit Rate:...
- Page 7 3. Modulation Setting / Modulator Einstellungen 3.x Output: 3.1 Output A Auswahl: A, B, C, D 3.2 Output B 3.x.1 RF on: RF (DVB-C) on oder off Standard: on 3.x.1 RF on 3.x.2 Standard 3.x.2 Standard: Auswahl: J.83A, J.83B, J.83C Standard: J.83A (DVB-C) 3.x.3 Constellation / QAM Mode: Auswahl: 16 QAM, 32 QAM, 64 QAM,...
- Page 8 5 Network / Network Einstellungen 5.1 NMS Anschluss für die Programmierung über Software einstellen 5.1.1 NMS IP Address: Einstellung der IP Adresse für den Webbrowser Zugang Standard: 192.168.00.136 5.1.1 NMS IP Address 5.1.2 NMS IP Address 5.1.2 Subnet Mask: Standard: 255.255.255.000 5.1.3 Gateway: 5.1.3 Gateway Standard: 192.168.00.001...
- Page 9 Service IP: Eingang-IP-Adresse des Modulators Default: 192.168.002.137 Service IP Subnet Mask Subnet Mask: Standard: 255.255.255.000 Gateway: Standard: 192.168.002.000 Gateway Protocol Protocol: Standard: UDP 6. System 6.1 Save config / Einstellungen speichern Auswahl: „Yes“ oder „No“ 6.2 Load saved CFG / Lade abgespeicherte Einstellungen Auswahl: „Yes“...
-
Page 10: Programmierung Über Webbrowser (Nms)
Programmierung über Webbrowser (NMS) Verbinden Sie den PC oder Notebook, durch ein Standard-Netzwerkkabel, mit der NMS-Buchse. Falls ein Proxyserver verwendet wird ist dieser, in den Netzwerkverbindungen, zu deaktivieren. Der verwendete PC muss sich im gleichen Netzwerk befinden wie der Modulator. In der Grundeinstellung besitzt das Gerät die IP-Adresse 192.168.001.225. - Page 11 Auf der Übersichtsseite sind alle Statuswerte ersichtlich. Angezeigt wird die Version der Software, Hardware und Weboberfläche. Zusätzlich können aktuelle Informationen bzw. Zuordnungen für das Ein – und Ausgangssignal abgelesen werden. In der linken Spalte können alle veränderbaren Parameter ausgewählt werden. Einstellungen Die 4 Eingänge können wie folgt ausgewählt und eingestellt werden: Input 1 :...
- Page 12 Video Format: Mpeg2 oder H.264 Standard: H.264 Video Bit Rate: Wert zwischen 1 und 19 Mbps einstellen Standard: 8 Mbps Audio Format: Mpeg2, Mpeg2 AAC oder Mpeg4 AAC Standard: Mpeg2 Audio Bit Rate: Auswahl: 64, 96, 128, 192, 256, 320 kbps. Standard: 192 kbps.
- Page 13 ASI Input PID Pass: Falls die gleiche PID in dem System bereits vergeben wurde, ist es möglich die PID`s zu verändern. Änderungen sollten nur von erfahrenen Nutzern durchgeführt werden. Passthrough: Am Ausgang werden nur die ausgewählten ASI-Programme moduliert. Multiplex: ASI-Programme können mit HDMI-Eingängen gemischt werden. Input Program: Alle im ASI-Datenstrom enthaltenen Programme werden angezeigt.
- Page 14 All Output: Wählt alle im Ausgang angezeigten Programme aus. Parse timeout: Auslese-Zeitbegrenzung des ASI-Datenstroms. In die NIT Einstellung muss nur in großen Netzen eingegriffen werden. Änderungen sollten nur von erfahrenen Nutzern durchgeführt werden.
- Page 15 IP Output Einstellungen für den IP Ausgang: IP Output Enable: IP Output ON oder OFF Service IP: Eingangs-IP Adresse des Modulators Standard: 192.168.002.137 Output IP: Multicast IP Adresse des ausgehenden Datenstroms Standard: 224.002.002.002 Input VLC Player: udp://@ 224.002.002.002 Subnet Mask: Standard: 255.255.255.000 Gateway: Standard: 192.168.002.000...
- Page 16 Modulator Standard: Auswahl: J.83A, J.83B, J.83C Standard: J.83A (DVB-C) Constellation / QAM Mode: Auswahl: 16 QAM, 32 QAM, 64 QAM, 128 QAM, 256 QAM Standard: 256 QAM Symbol Rate: Auswahl 5 bis 9 Msps Standard: 6,9 Msps RF Frequency / Ausgangsfrequenz: 30-960 MHz Standard: 474 MHz RF output level / Ausgangspegel:...
- Page 17 Save and restore Save Configuration: Ausgewählte Parameter speichern Restore Configuration: Die zuletzt gespeicherten Parameter wiederherstellen. Danach speichern (Save Configuration) da sonst diese Daten bei einem Reboot verloren gehen. Factory Set: Werkseinstellungen: Stellt die Default Parameter wieder her. Reboot Neustart des Modulators nach Firmware update oder Einstellung anderer Parameter.
- Page 18 Firmware Update Mit “Durchsuchen” den Order mit dem Firmware-Update suchen und Datei auswählen. Danach auf „Update“ klicken. Network / Netzwerkeinstellungen IP Address: Einstellung der IP Addresse für den Webbrowser Zugang Standard: 192.168.1.225 Subnet Mask: Standard: 255.255.255.000 Gateway: Standard: 192.168.000.001 Web Manager Port: Standard: 00080...
- Page 19 Password / Passwort und User Name ändern Current UserName: Derzeitiger Benutzername eingeben (default admin) Current Password: Derzeitiges Passwort eingeben (default admin) New UserName: Neuer Username eingeben New Password: Neues Passwort eingeben Confirm New Password: Passwort bestätigen Backup / Load Backup Configuration: Zum Speichern einer Backupdatei auf PC oder Notebook.
-
Page 20: Technische Daten
Technische Daten Typ / Type HDM 4 C Artikel –Nr. / Article no. 5741654 Videoformat / Video Encoding H.264 / Mpeg2 Eingänge / Inputs 4x HDMI, 1x ASI (BNC) Ausgänge / Outputs RF (F-connector) 1x DVB-C, 2x ASI (BNC), IP (RJ45) Auflösung / Resolution... -
Page 21: Mounting And Safety Instructions
Mounting and safety instructions Before working on the modulator please read the following safety precautions carefully! -
Page 22: Table Of Contents
Contents Mounting and safety instructions Contents Description Display and Buttons Connectors Hand programming of the device Programing via web browser (NMS) Specifications Description Modulator for converting up to 4 HDMI signals and an ASI transport stream into a DVB-C (QAM) channel. -
Page 23: Display And Buttons
Display and Buttons 1 Button up in the menu 2 Button down in the menu 3 Button left in the menu 4 Button right in the menu 5 Button Enter (confirm selection) 6 Button Back (in menu one step back) 7 Button Menu (go inside menu and out) 8 Indicate Operating voltage 9 Indicate Alarm, if there is no signal... -
Page 24: Hand Programming Of The Device
Hand programming of the device LCD Screen after switch on: Cable 750.00MHz Start up… Start ok… 0.000 Mbps 0.0M 1. Shows the modulation of the output signal 2. Output frequency 3. Data rate of the output signal 4. Not relevant Over view Main menu: The main menu occurs after pushing the button “Menu”. - Page 25 2.Encode Settings The 4 Inputs are to select as follows: 2. 1 Input 1 : 2.1.1 Program 1 2.1.2 Program 2 2. 2 Input 2 : 2.2.1 Program 1 2.2.2 Program 2 Video Format: Mpeg2 or H.264 / Default: H.264 Low delay: Normal, Mode 1, Mode 2 / Default: Normal Video Bit Rate:...
- Page 26 3. Modulate Setting 3.x Output: Selection: A, B, C, D 3.1 Output A 3.2 Output B 3.x.1 RF on: RF (DVB-C) on or off Default: on 3.x.1 RF on 3.x.2 Standard 3.x.2 Standard: Selection: J.83A, J.83B, J.83C Default: J.83A (DVB-C) 3.x.3 Constellation: Selection 16 QAM, 32 QAM, 64 QAM, 128 QAM, 256 QAM...
- Page 27 5 Network Settings 5.1 NMS Anschluss für programmieren über Software einstellen 5.1.1 NMS IP Address: Adjustment for the IP Address For the web browser access. Default: 192.168.00.136 5.1.1 NMS IP Address 5.1.2 Subnet mask 5.1.2 Subnet Mask: Default: 255.255.255.000 5.1.3 Gateway: 5.1.3 Gateway Default: 192.168.00.001 5.1.4 MAC Address...
- Page 28 Service IP: Input-IP address of the modulator Default: 192.168.002.137 Service IP Subnet Mask Subnet Mask: Standard: 255.255.255.000 Gateway: Standard: 192.168.002.000 Gateway Protocol Protocol: Standard: UDP 6. System 6.1 Save config / Select: „Yes“ or „No“ 6.2 Load saved CFG Select: „Yes“ or „No“. 6.3 Factory reset Select: „Yes“...
-
Page 29: Programing Via Web Browser (Nms)
Programing via web browser (NMS) Connect PC or laptop, via standard network cable, with the NMS-socket. If you use a Proxy server, please deactivate them in the network settings. The PC has to be in the same network like the modulator. Default IP address of the device is 192.168.001.225. - Page 30 On the overview page are all parameters visible. Displayed is the version of the software, hardware and web interface. Additionally shown is current information about the input and output signal. In the left column can all adjustable parameters be selected. Input Settings The 4 Inputs are to select as follows: 2.
- Page 31 Video Format: Mpeg2 or H.264 Standard: H.264 Video Bit Rate: Set value between 1 and 19 Mbps Default: 8 Mbps Audio Format: Mpeg2, Mpeg2 AAC or Mpeg4 AAC Standard: Mpeg2 Audio Bit Rate: Selection: 64, 96, 128, 192, 256, 320 kbps. Default: 192 kbps.
- Page 32 ASI Input PID Pass: Is the PID already used in the system, the user has to change this settings. Passthrough: Only the selected ASI programs are modulated at the output. Multiplex: ASI programs can be mixed with HDMI inputs. Input Program: All programs in the ASI stream are displayed.
- Page 33 All Input / All Output: To select all the input/output programs with one-time clicking. Parse timeout: Time limitation to parse the input programs. The NIT settings have only to be modified in large networks.
- Page 34 IP Output Settings for IP output IP Output: IP output ON or OFF Service IP: Input-IP address of the modulator Default: 192.168.002.137 Output IP: Multicast IP address of the data stream Default: 224.002.002.002 Subnet Mask: Default: 255.255.255.000 Gateway: Default: 192.168.002.000 Port: Default: 01234...
- Page 35 Modulator Standard: Selection: J.83A, J.83B, J.83C Default: J.83A (DVB-C) Constellation: Selection: 16 QAM, 32 QAM, 64 QAM, 128 QAM, 256 QAM Default: 256 QAM Symbol Rate: Selection: 5 to 9 Msps Default: 6,9 Msps RF Frequency: Range: 30-960 MHz Default: 474 MHz RF output level: Range -30 dBm to -10 dBm -30 dBm = 79 dBµV...
- Page 36 Save and restore Save Configuration: Save settings Restore Configuration: Restore the last saved parameters. Save after (Save Configuration). If not, the settings will be lost after the next reboot. Factory Setting: Restore the default settings. Reboot Reboot after firmware update or using new adjustments.
- Page 37 Firmware Update Choose with “Search or Find”, the directory where the firmware update is located. Then click to the button „Update“. Network IP Address: IP address for web browser access Default: 192.168.1.225 Subnet Mask: Default 255.255.255.000 Gateway: Default 192.168.000.001 Web Manager Port: Default 00080...
- Page 38 Password Current UserName: Enter current UserName (default admin) Current Password: Enter current Password (default admin) New UserName: Enter new UserName New Password: Enter new Password Confirm New Password: Confirm the new password Backup / Load...
-
Page 39: Specifications
Choose with “Search or Find”, the directory where the backup file is located. Then click to the button „Load file“ Specifications Typ / Type HDM 4 C Artikel –Nr. / Article no. 5741654 Videoformat / Video Encoding H.264 / Mpeg2 Eingänge / Inputs... - Page 40 Technische Hotline Technical hotline + 49 (0) 70 81 / 1702 - 0 Telefax + 49 (0) 70 81 / 1702 - 50 Internet http://www.polytron.de eMail info@polytron.de Technische Änderungen vorbehalten Subject to change without prior notice Copyright © Polytron-Vertrieb GmbH...
Need help?
Do you have a question about the HDM 4 C and is the answer not in the manual?
Questions and answers