Table of Contents
Advertisement
Quick Links
Visit us online at
www.uswatersystems.com
US Water Systems Pulsar Bodyguard Whole
House Chemical Removal Filter
Owners Manual
390-PWFMS1-A, 390-PWFMS1-B, 390-PWFMS1-C
REVISION #
1.2
REVISION DATE
January 8, 2018
US Water Systems Corporate Office
1209 Country Club Road
Indianapolis, IN 46234
1-800-608-8792
info@uswatersystems.com
Advertisement
Table of Contents

Related Manuals for US Water Systems Pulsar Bodyguard 390-PWFMS1-A


Summary of Contents for US Water Systems Pulsar Bodyguard 390-PWFMS1-A
- Page 1 Visit us online at www.uswatersystems.com US Water Systems Pulsar Bodyguard Whole House Chemical Removal Filter Owners Manual 390-PWFMS1-A, 390-PWFMS1-B, 390-PWFMS1-C US Water Systems Corporate Office 1209 Country Club Road Indianapolis, IN 46234 1-800-608-8792 REVISION # info@uswatersystems.com REVISION DATE January 8, 2018...
- Page 2 Be sure to check the entire system for any shipping damage or parts loss. Also note damage to the shipping cartons. Contact US Water Systems at 1-800-608-8792 to report any shipping damage within 24 hours of de- livery. Claims made after 24 hours may not be honored.
-
Page 4: System Dimensions
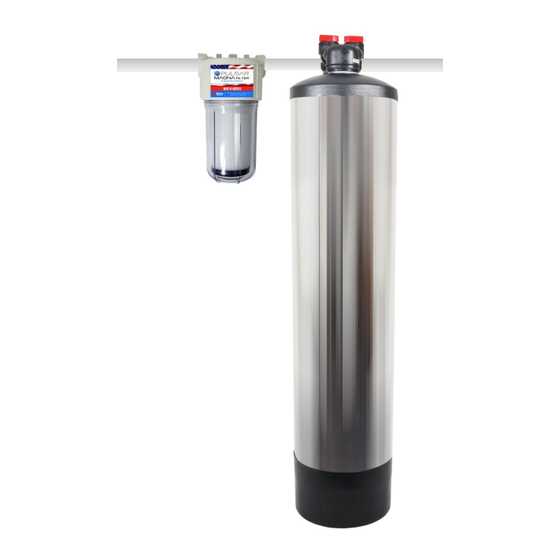
System Dimensions... - Page 5 System Dimensions Pulsar Bodyguard systems are complete, self-contained, loaded with media and ready to use. A simple inlet and outlet connection is all that is required for installation. Please review operating pressures, temperatures and water chemistry limitations to ensure compatibility. Specifications Inlet/Outlet Connection 1”...
-
Page 6: Pulsar Magna Filter Specification And Operation
Pulsar Magna Filter Specifications and Operation Magna Benefits Magna Seal - It has a positive “o-ring seal” unlike traditional “flat top” filters Magna Media – A 10” filter has 18 square feet of pleated polyester commercial grade me- dia, and a 20”... - Page 7 Pulsar Magna Filter Specifications and Operation Maintenance The Magna Pre-filter can be installed for up to a year. The Magna filter should be changed an- nually or sooner depending on the water usage or water conditions. Pretreatment Guidelines Turbidity < 3 NTU ...
-
Page 8: Bodyguard Equipment Introduction
Bodyguard Equipment Introduction Pulsar Bodyguard™ Premium Whole House Chemical Removal Filter The Pulsar BodyGuard is a non-electric carbon filter that removes chlorine, chloramines, chemicals, pesticides and a multitude of other contaminants through Prolonged Contact to de- liver the way nature intended it, using all NSF & WQA Certified Components. The BodyGuard delivers clean, great-tasting water from every tap in your home by removing chlorine, chloramines and other chemicals in your tap water. - Page 9 Pulsar Filter Installation Instructions 1. Install the Pulsar Magna system in the desired location in the water treatment system. Typi- cally this will be the first component in the line of treatment. The cap are marked “Cartridge INLET” (Bag Outlet) and “Cartridge OUTLET” (Bag INLET) on the top of the housing. We will be using the Cartridge inlet and outlet configuration.
- Page 10 Pulsar Filter Installation Instructions 3. Install the supplied 1 1/2” x 1” reducing nipples in the housing. Be sure to use Teflon tape on the fittings. Tighten them with channels locks. If flex pipes with rubber gaskets are used there is no need to Teflon tape the outer fittings. If a normal plumbing fitting is used then be sure to Teflon tape the outer fitting.
- Page 11 Pulsar Filter Installation Instructions 5. Shut off the water and release the water pressure at the lowest sing or spigot. Cut the pipe and connect it to the filter. Connect the inlet plumbing to the inlet on the filter housing (Bag outlet, cartridge inlet).
- Page 12 Pulsar Filter Installation Instructions 1. Remove the sump from the filter housing and install the filter. A very small amount of sili- cone grease or water can be used to lubricate the O-rings on the filter. The filter housing cap has a couple that will accept the o-ringed nipple on top of the filter. Install the filter so the nipple on the top is fully seated in the filter housing cap.
- Page 13 Bodyguard Tank Installation 1. Make sure that the distributor tube (shipped inside the tank) is centered in the indent in the bottom of the tank (use a flashlight if necessary). 2. The distributor tube should be even with the top of the tank. There is an o-ring inside the tank head that seals around the distributor.
-
Page 14: Bodyguard Tank Installation
Bodyguard Tank Installation The tank should now be filled approximately 70-80%. US Water does not send extra media. 8. Be sure to remove the tape and wipe the top of the tank and distributor tube with a clean cloth. 9. Fill the tank with water until it is approx. 4” from the top. Be sure to let the carbon soak for a mini- mum of 2 hrs. - Page 15 Bodyguard Tank Installation 13. Assemble the tank connectors using the locking clip and the O-ring. 14. Make sure the O-ring isn’t twisted then lubricate it with silicone grease or corn oil. Hand tighten the nuts on the bypass. NOTE: It is normal for the bypass and connectors to move/float when the nuts are tightened. This is an intentional design feature intended to allow flexibility with the connections and possible tank deflection.
- Page 16 Bodyguard Tank Installation 1. Place the Pulsar Bodyguard tanks in the desired location on a flat level surface. 2. Make sure the tank head is tightened securely by hand tightening—Do Not Use a Wrench. Hand-tight is recommended. 3. Connect the inlet piping from the Magna filter to the DOWNFLOW inlet on the Pulsar Bodyguard carbon tank.
-
Page 17: Bodyguard Tank Startup
Pulsar Filter Startup Instructions 1. Put the Bodyguard filter in the bypass position (See Page 15). Open a faucet or spigot down stream of the Pulsar filter. Slowly open the water shutoff valve and all the filter fill and air to be pushed out of the filter through the open spigot or faucet. Once there is no air coming out of the faucet or spigot, place a bucket under the filter housing and push the red pressure relief button on top of the filter housing until only water and no air is coming out. - Page 18 Bodyguard Filter Start Up WARNING: FLUSH THE BODY GUARD TANK BEFORE INSTALLING ANY DOWNSTREAM FILTER CARTRIDGE IN THE SYSTEM. 1. Slowly open the Carbon Tank Bypass inlet valve on the Bodyguard tank. Allow the tank to fill with water until all the air is purged. Open a spigot or faucet downstream of the Bodyguard fil- ter.
- Page 19 Pulsar Filter Cartridge Replacement Instructions 1. Shutoff the water supply. 2. Open a faucet of spigot closest to the filter housing and allow all the water to empty from the plumbing system. 3. Push the red button on the top of the filter housing to release the remaining water pressure. 4.
- Page 20 Pulsar Filter Cartridge Replacement Instructions 6. Remove the old filter and discard. 7. Lubricate the O-rings and install the new filter in the filter housing cap. 8. Lubricate the o-ring for the sump and lubricate the sump threads with food grade silicone grease.
- Page 21 Pulsar Filter Cartridge Replacement Instructions 9. Install the filter sump in the filter cap by turning it clockwise until it is hand tight. NOTE: The housing should spin tight fairly easily. If not, add more lubrication to the sump threads. This will aid with removing the sump when the filter needs to be replaced again.
- Page 22 GENERAL PROVISIONS residential place of installation of this Pulsar Water This warranty does not apply to any commercial or Conditioning System, US WATER SYSTEMS, INC. industrial installations or to any part of the water warrants the following: conditioner which has been subjected to misuse, neglect, alteration or accident;...
Need help?
Do you have a question about the Pulsar Bodyguard 390-PWFMS1-A and is the answer not in the manual?
Questions and answers